Contents
- Product overview and base operations
- Workbench user interface introduction
- Creating a channel
- Channel Settings menu
- Advanced Channel settings and functions
- EPG function
- Sharing a channel with collaborators
- Scheduling your channel Offline
- Starting and stopping a channel
- TVU CHANNEL SCHEDULER:
- Scheduler interface overview, controls, and operations
- Setting recurrences
- Building program and schedule templates
- Creating a program template
- Creating a schedule template
- TVU CHANNEL PLAYOUT:
- Interface overview, controls, and operations
- Take Breaking Source, Take Playlist, Take Next, and Emergency switch buttons and shortcut keys
- Closed Captioning, Logo, Crawl, Ext GFX, and SCTE controls and shortcut keys
- How to take your channel to air
- How to enable Closed Captioning (CC)
- How to break into and rejoin programming
- Emergency switch feature
- Adding SCTE triggers
TVU Channel User Guide

Product Overview
TVU Channel is a cloud streaming service created by TVU Networks that completely revolutionizes creating, managing, operating, and monetizing a 24/7 digital channel. TVU Channel provides a simplified way to take news live, breaking news live, and create a program schedule.
Our zero-infrastructure environment has massively reduced the time, cost, and complexity of creating custom channels. In addition to creating new content channels, a broadcaster can use Channel as a backup for their television station Master Control.
Schedule live programming with full SCTE support and set up multiple encoders for delivery to CDNs, OVPs, or edge devices for traditional linear workflows from a simple web browser interface. Use for traditional linear channel television playout, an OTT channel, a unique pop-up channel, or send directly to social media 24/7 and without required infrastructure.
Using TVU Channel requires a subscription activation through TVU sales and support.
BASE OPERATIONS:
Note: To navigate to and find subtitle content, simply press Ctl-F and enter a keyword to find a topic.
Logging in and creating a TVU Channel
To start using TVU Channel, you must log in and create a channel. After your channel is created, you can configure advanced settings for your channel from the Workbench user interface.
Logging into TVU Channel
To log into TVU Channel complete the following steps:
- Open a Chrome web browser and enter https://www.channel.tvunetworks.com.
- Click Enter. The TVU Channel landing page displays.
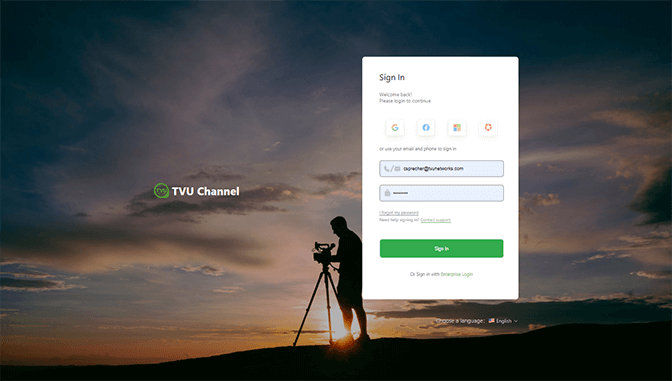
- To Log in to the TVU Channel Web user interface, Enter the following information:
User ID: email address
Password: Your Password
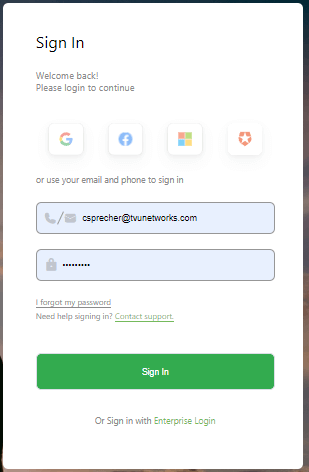
- Click Sign In.
- The Workbench User Interface displays.
TVU Channel Workbench user interface introduction
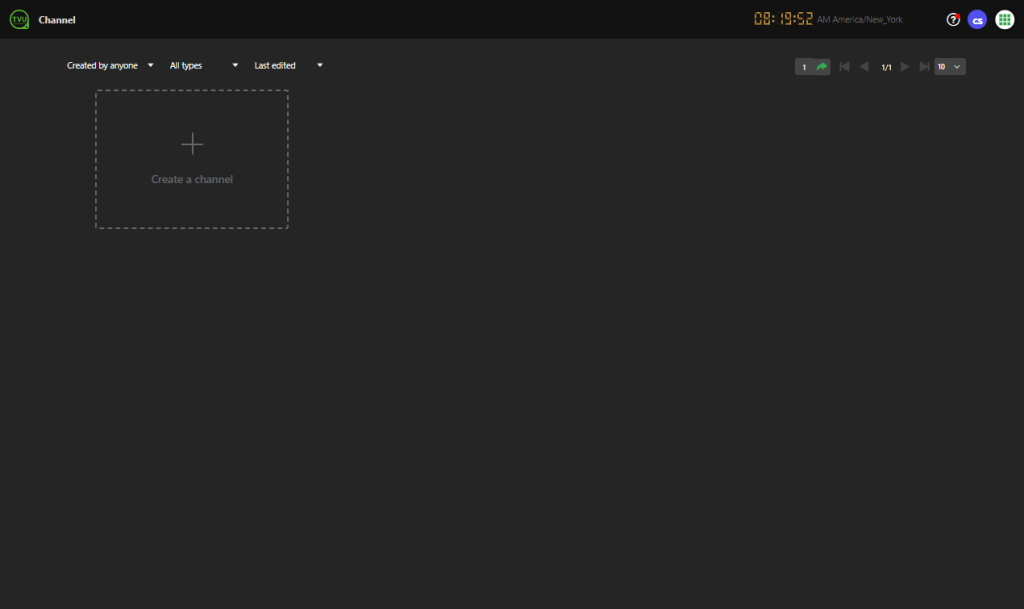
The TVU Channel Workbench is a gateway to create and choose the channel you wish to control. Each local channel is located and accessed in the TVU Channel Workbench user interface. Users and administrators will start their channel from the Workbench and be redirected to the TVU Channel user interface, where they can schedule and manage their local channel.
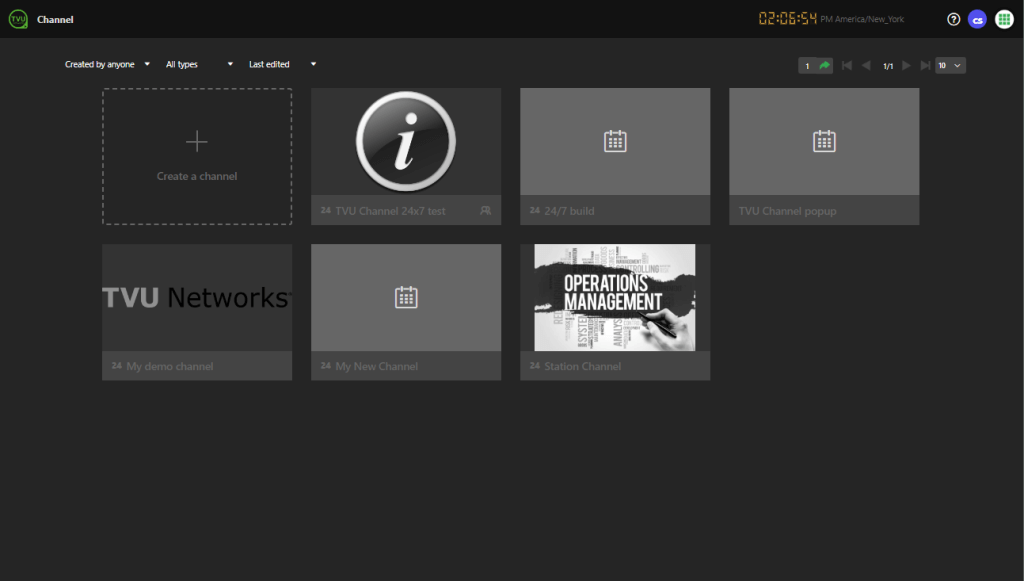
The Workbench page is where you will perform your basic channel management:
- You can create a new channel by clicking on Create a Channel. Refer to Creating a channel.
- You can change the channel Settings by clicking the three-dot icon
 in the top right corner of your channel. Refer to Channel Settings menu.
 - You can spin up your channel or prepare your programming schedule Offline. Refer to Starting and stopping a channel.
- You can stop a running channel by clicking on the three-dot icon and selecting Disable
 . Refer to Starting and stopping a channel.
 - The Workbench allows the channel owner to access their channel and configure advanced channel settings. The channel owner and any shared participants can access their channel along with shared collaborators.
- You can delete a channel from the Workbench.
Creating a channel
To create a channel, complete the following steps:
- In the Workbench, click + Create a Channel.
The Create a channel pop-up displays.

- Enter a Channel Name.
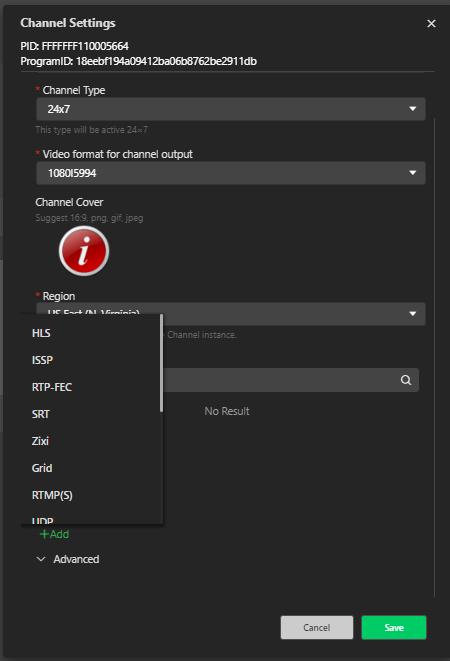
- Choose the Channel type:
- Popup: This type will turn on when there are events in the schedule.
Important: Popup Type allows your VM to turn on only when events are in your schedule and power off if nothing is scheduled. It automatically turns on 10 minutes before an event and automatically powers off if there is no event within the next 30 minutes. You cannot add an event within 10 minutes of the current time (if your VM is off/powering on). If your VM is off, you won’t be able to add to/modify your schedule until it is On (or turning On). If you always have events in your schedule, it doesn’t matter which mode you are in, but TVU recommends choosing 24×7 to ensure they don’t shut down accidentally.
- 24×7: This type will be active 24+7. The scheduled channel will always be active until the VM is manually powered down.
- Choose the video format for the video resolution and framerate from the drop-down menu, and click Save.
Note: If you start an addition channel additional costs will be incurred.
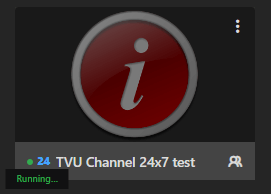
Channel status indicators in Workbench
Your channel status indicator is located below the channel cover image and displays green when running (as shown) and red when offline or paused in the Workbench UI.
Channel Settings menu
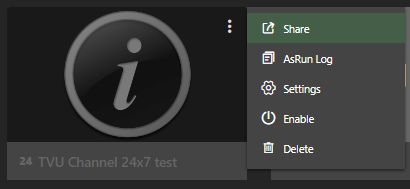
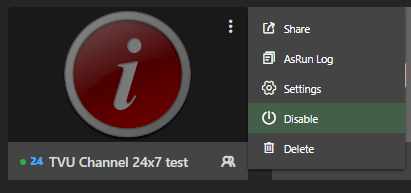
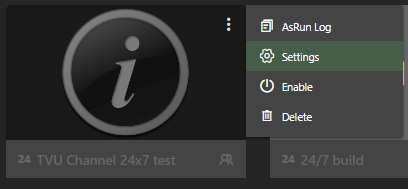
To configure your Channel settings in the Workbench, click the three dots in the top-right corner of your channel and select Settings.
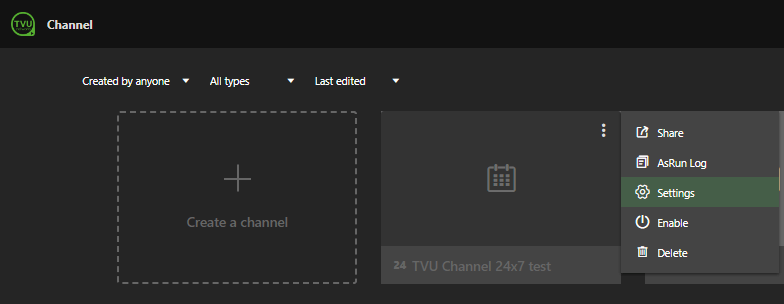
Your Channel menu selections are:
Share – Click Share to add a collaborator or an additional local channel administrator to help manage your local channel.
AsRun log – Opens a new tab and displays a list of events and their details in your channel.
Enable or Disable – Choose Enable to take your scheduled program live. Choose Disable to stop your running channel.
Delete – Select Delete to remove a channel from the Workbench.
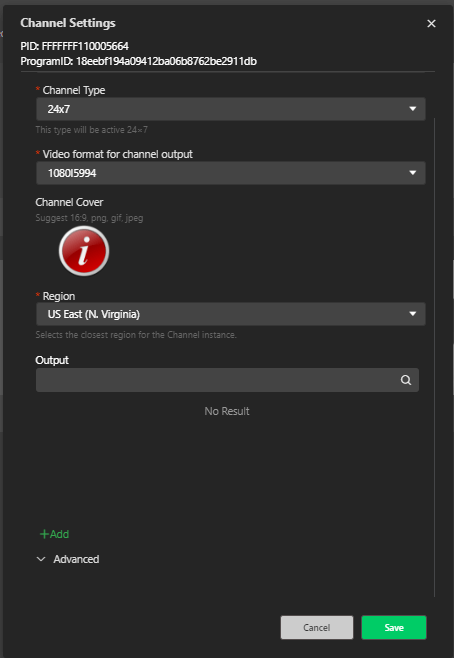
Settings – Use the Settings option to open the Channel Settings pop-up window to further configure your basic channel settings. You can select and modify the following channel information:
- Your Channel Name
- The Channel Type
- Select a video format for channel output
- Add a channel cover image in png, gif, or jpeg format
- Choose a region closest to your location
- Add an Output
- Access and configure Advanced channel settings
Advanced channel settings
A channel’s Advanced settings menu is expandable in the Channel Settings menu. To further configure advanced Channel settings, click three dots in the top right corner of your channel and select Settings.
To configure advanced Channel settings, expand the Advanced tab. In the Advanced settings window, your configuration settings are:
- Media folders – A user can select folders that will display in the Media tab file structure. Some folders are created automatically and added to the file structure.
- Date / Time – Date and time settings to match the Scheduler and Playout of your linear broadcast day if desired.
- Electronic Programming Guide (EPG) – Create an EPG programming guide link in JSON or XML format for your channel’s programming guide.
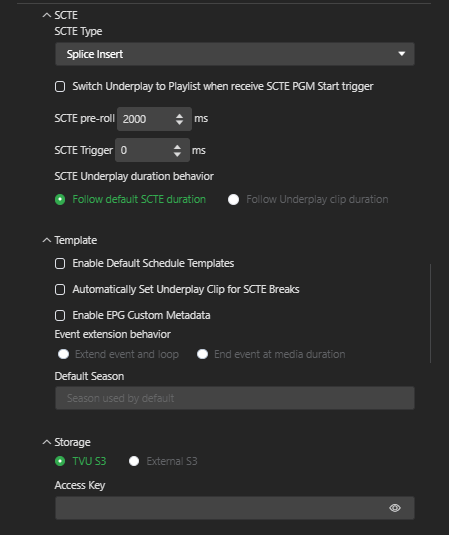
- SCTE – Select a Splice insert or Time signal Ad insertion type for your channel.
- Schedule – Upload, import, and display event metadata into your channel’s program schedule. Supported formats are BXF, MPL, LST, and XLS. The Enable “Record” by default if the primary source is live checkbox can also be configured in this menu.
- Ext Graphics – A Singular.Live account is required to use this option by entering a URL or Token code. A Flowics account is required to use this option by entering a Flowics Token code.
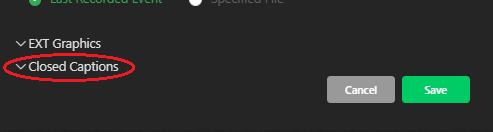
- Closed Captions – TVU Transcriber as a paid service. Contact the TVU Solutions team to integrate the Closed Captions feature into TVU Channel. Do not Enable VTT Caption insertion without authorization from the TVU Solutions team to ensure that the customer gets charged correctly for this service.
- Notification – Configure a Channel notification via email if the channel reaches its end status.
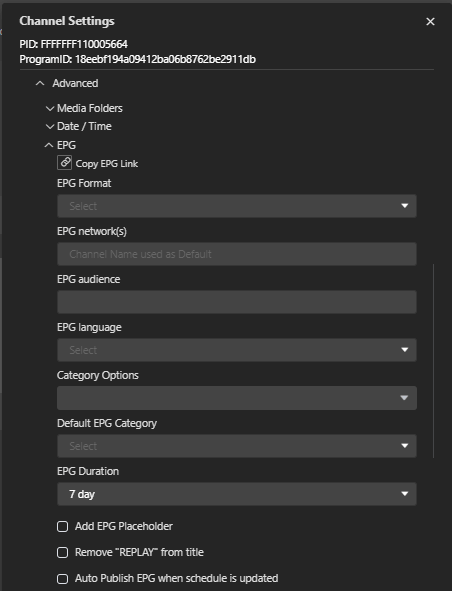

EPG function
The Electronic Programming Guide (EPG) function adds detailed descriptions and thumbnails to your scheduled programs.
The EPG is configured in the Advanced Settings window.
To set up an EPG, click the three dots in the program window. In the Settings window, click Advanced:
- Click the Copy EPG link to copy the channel’s Electronic Programming Guide.
- Use the EPG Format menu to select the file format as JSON or XML.
- Use the EPG network(s) text field to enter a custom name for your EPG network if you do not wish to keep the default option of using this channel’s name for this field.
- In the EPG audience field, type in the age rating code for this channel.
- Use the EPG language drop-down menu to select the language for your EPG file.
- In the Category Options drop-down menu, click the checkbox that describes your channel’s content.
- You can add custom categories by clicking on the +Add option at the bottom of the category list.
- Click the Default EPG Category drop-down menu to select a default Category for your programming.
- In the EPG Duration drop-down menu, choose whether you want your EPG file to contain either 7 or 30 days of programming.
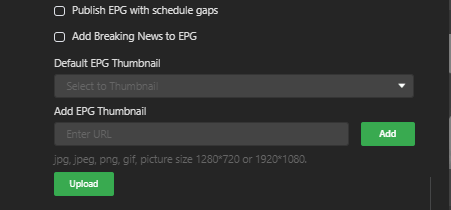
- Enable the following checkboxes as desired.
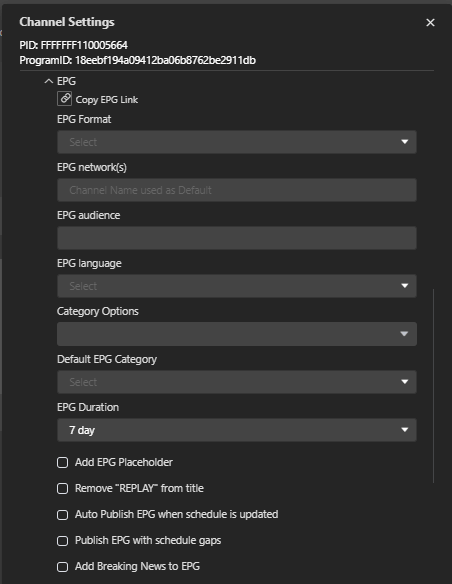
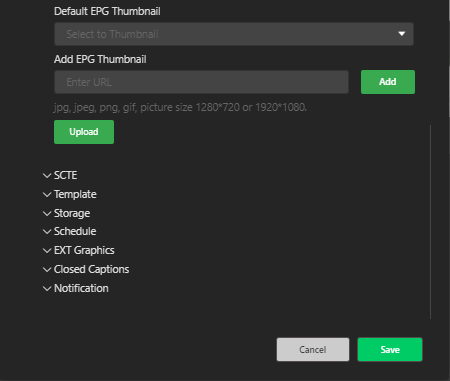
- In the Default EPG Thumbnail drop-down menu select a default EPG image if desired.
- To Add an EPG Thumbnail via URL, Enter the URL and click the Add button. To upload a local thumbnail click the Upload button. Save your changes.
- Additional EPG information can be generated via TVU EPG API when integrated with a third party.
Sharing a channel with collaborators
The Share feature allows the TVU Channel owner to create and share a program within the local channel environment. This feature allows a collaborative effort to produce and publish a live or file-based show.
To use the Share feature, create a program in Workbench and complete the following steps:
- Click the three dots in the program window to set up the Share feature. The Setting pop-up displays.
- Select Share from the settings menu.
The Share pop-up window displays.
- Enter your collaborator’s TVU Channel account email address in the Email field and click Send.
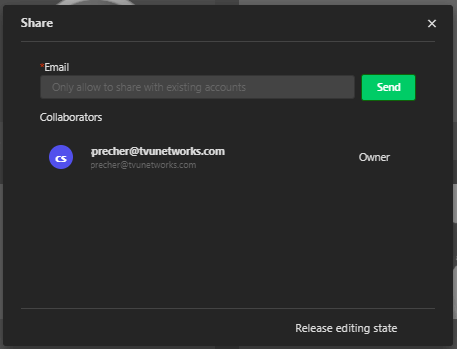
- The Shared collaborator is displayed in the Share pop-up window. Click the caret and select a collaborator role, then close the window.
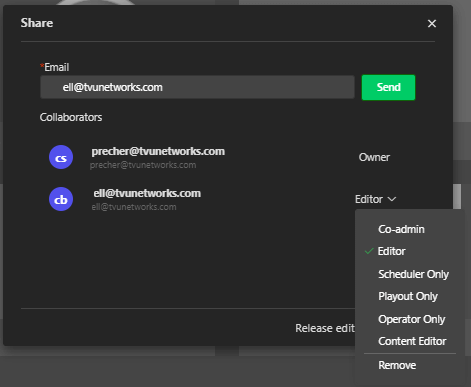
- The collaborator can now open a browser window and Sign in to TVU Channel. The shared program and any previously created programs are displayed on the Workbench screen.
- The TVU Channel user and collaborator are ready to run the same program or live show.
Note: Outputs are assigned to the channel not the user. The channel owner and collaborators will see the same outputs in TVU Channel.
When a new program is shared with the collaborator by the primary TVU Channel user, the collaborator does not have the option to share the program with other users. The primary TVU Channel user controls that functionality.
Shared collaborators
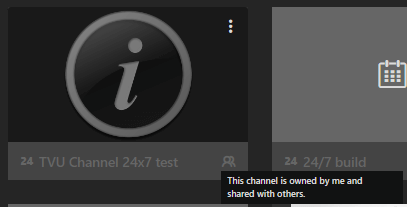
To become a shared collaborator, the user must have an active TVU account to participate. If you need a TVU account, contact TVU support. A shared channel displays the shared icon in the bottom right corner of the channel. Collaborators can upload and view media file(s) in the owner’s TVU drive. The media becomes shared with collaborators.
Important: If a collaborator deletes a folder, it can’t be recovered and is deleted from the TVU drive. There is no recovery capability from within TVU Channel.
To view the channel owner, hover your mouse over the shared icon.
Scheduling your channel Offline
Users can create program schedules in Offline (Disabled) Mode without spinning up the channel’s output module. While in the Offline Mode, the user has full access to the Scheduler interface and is not charged for the time spent scheduling programs.
Note: In the Workbench, offline channels display in monochrome. When enabled, programs display in color.
To schedule programs in Offline mode, complete the following steps:
- Select a program in the Workbench you would like to schedule in TVU Channel.
- The TVU Channel Playout interface opens.
- Click Scheduler in the top navigation. You will have full access to the Scheduler window to create your schedule.
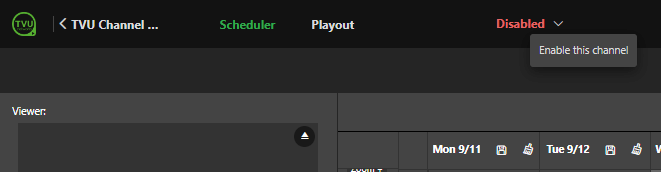
Note: In Offline mode, your status is displayed “Disabled” in red at the top of the window. You may also start the output module from this indicator.
- You can start the output module from the Disabled mode indicator on the Playout or Scheduler window, click the Disabled indicator, and select Enable this channel.
Starting a channel
When your channel is offline, you will start your channel from the Workbench interface. Complete the following steps to start your channel:
- Hover your mouse over the program in Workbench, click the three dots to open the settings menu, and select Enable.
Note: Most instances will spin up within 5 minutes. If the output module message continues to display after 10 minutes, please contact TVU Support.

- TVU Channel opens to the Playout window. Click the Scheduler tab to access or view your channel’s schedule.
- Click the arrow in the top left corner of the interface to return to Workbench.
Stopping a channel
Only channel owners and administrators are allowed to stop a TVU Channel.
Note: Channels that are started display the green “Running” icon under the program name in Workbench.
To stop your running channel:
- If you are in the Playout or Scheduler interface, click the top left return arrow in the TVU Channel interface to return to Workbench.

- Hover your mouse over the running channel you would like to stop. Then, click the Disable icon .
- Click Confirm in the Stop the channel pop-up.
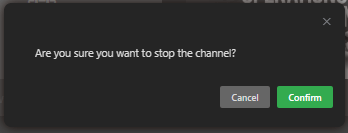
The program icon displays red when the channel has stopped.
TVU CHANNEL SCHEDULER:
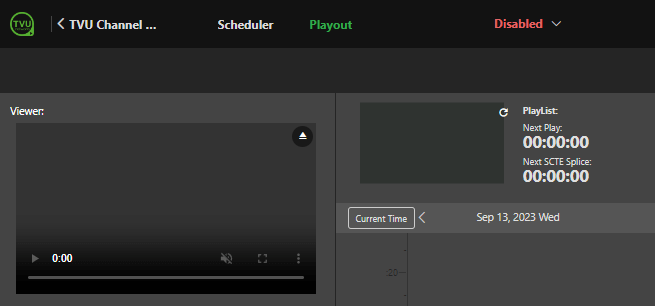
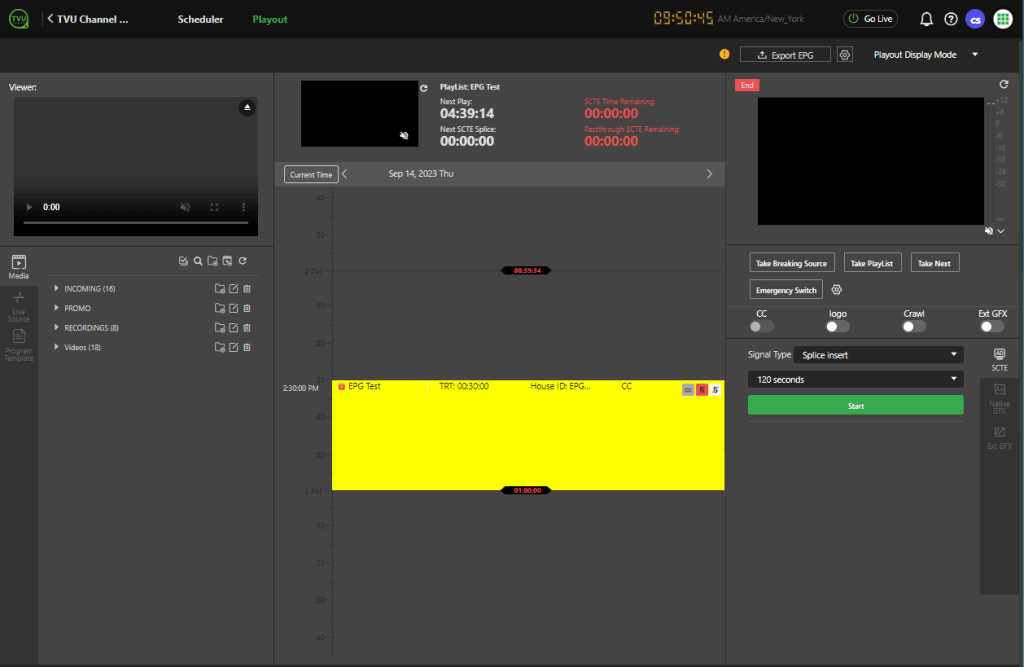
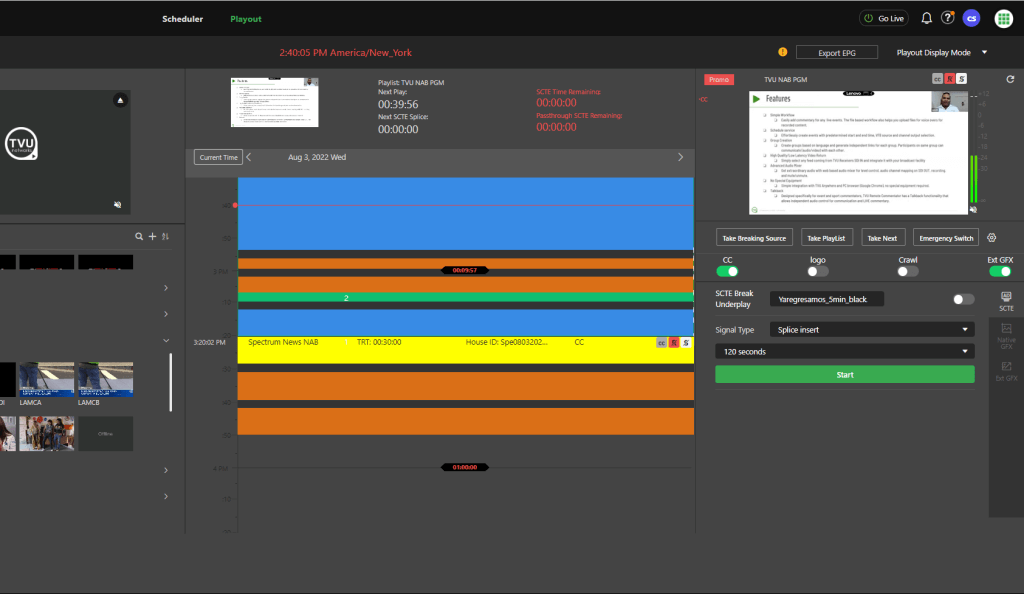
Scheduler interface overview
The Scheduler interface left panel allows you to access and set up Media, Live Sources, Program Templates, Schedule Templates, and perform Search and Replace functions by opening each tab. The right panel is where you schedule your programming calendar. You can view your calendar by Day, Week, or Month.
View the following video for a Scheduler interface overview.
The TVU Channel Scheduler window builds a programming schedule extending several weeks. The TVU Channel Scheduler interface allows users to create and save individual program templates that include SCTE breaks.
The program templates can further be collected into a Schedule template. Both Program and Schedule templates are saved in the channel owner file directory and are used to build an extensive programming schedule.
Scheduler controls and operations
The Scheduler window provides the following basic functions and controls:
- Media tab – The Media Tab contains the pre-configured, four-folder file structure where you will import, access, and store your media.
- Preview monitor – The preview monitor “Viewer” window displays a preview clip of any media source selected in the media folders or most live sources.
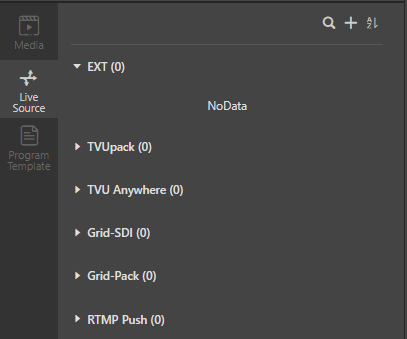
- Live Source tab – The Live source tab allows the user to import live sources into the EXT folder and use them in your program schedule. There are no limits to each channel’s number of live sources.
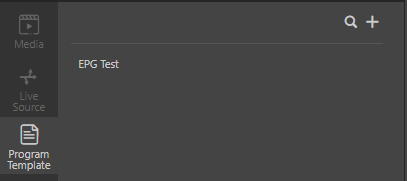
- Program template tab – The Program template tab allows a user to build and save a program schedule in advance.
- Schedule template tab – Use the Schedule Template tab to create, edit, and search for saved sequences of programs. The Schedule template allows operators to build out a daily or weekly schedule.
- Program schedule panel – The right program schedule panel shows the user a daily, weekly, or monthly view of the channel’s programming.
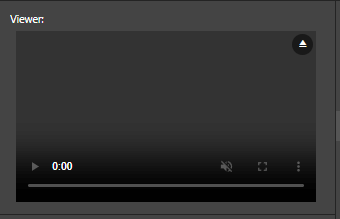
Media preview “Viewer”controls
The preview monitor “Viewer” window in the top left panel displays a preview of any media source you select from the media or live sources tab.
Note: Encoder sources will not preview in the viewer.
After a media source is selected, you can use the preview monitor controls to:
- Play
 and pause
  the media.
 - Turn the audio off and on
 .
. - View media in full-screen mode
 .
. - Remove the media from the preview monitor by using the Eject icon
 in the top right corner of the Viewer.
 - Click to open the settings menu to access Playback speed settings and Download media to a local drive in MP4 or MOV format.
Media folders
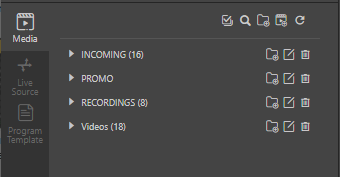
Media folders are available by clicking the Media tab in both Playout and Scheduler windows. The Media Tab contains the default folder structure: Incoming, Promo, Recordings, and Video. This is where you can organize, upload, and manage your media.
Each channel has a customized folder structure for a standard channel instance for every Channel user account:
- Incoming – The Incoming folder contains content coming from third-party commercial providers. This requires TVU integration with the third-party delivery system.
- Recordings – The Recording folder contains two sub-folders automatically created by the TVU drive: one for the edited file and one for the breaking news file.
- Videos – Add your local video files to this folder.
- Promos – The Promos folder is the repository for Commercials.
Live Source tab
The Live source tab file structure allows users to import external live sources into the EXT folder and use them in their program schedule. There are no limits to each channel’s number of live sources. In addition, the Live Source contains the pre-configured file folder structure where you will import, access, and store your media.

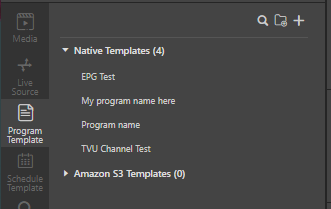
Program Template tab
The Program Template tab allows users to build and save a program schedule in advance. The Program Template configuration is prebuilt with automatic failover parameters; 10-second frozen video or 10 seconds of black with restoration after 1 minute.
When a Program Template is created, it is stored and accessible in the Program Template tab file list. Drag and drop the program template into the calendar panel to build a schedule. Refer to “How to build live and recorded program templates” to view the Creating a Program Template tutorial.
Schedule template tab
Use the Schedule Template tab to create, edit, and search for saved sequences of programs. The Schedule template allows operators to build out a daily or weekly schedule.
The user can select one of the recurring Schedule templates as their default template, whereby they can automatically populate a schedule to extend up to five weeks out.
Note: A drop-down settings menu is available to select “populate” to automate the process.
To create a Schedule Template, refer to “Creating a Schedule Template” to view the step-by-step tutorial.
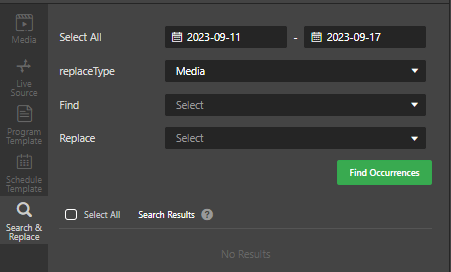
Search and Replace tab
The Search and Replace tab allows users to select a schedule date and quickly replace media or a live source in their schedule.
Schedule Template controls – Calendar panel
Save as schedule template icon – The save as schedule template icon saves the day’s current schedule as a schedule template.
Delete icon – The Delete icon deletes all programming scheduled for the entire day.
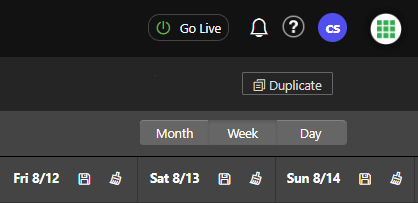
Go Live button – The Go Live button opens your channel’s output and allows the user to start streaming the channel’s output.

Calendar view settings – The calendar view buttons allow you to switch between daily, weekly, or monthly views of your programming.
Program schedule panel
The right program schedule panel shows scheduled channel programming. The user can choose a daily, weekly, or monthly view of the channel’s programming by selecting the Calendar view buttons.
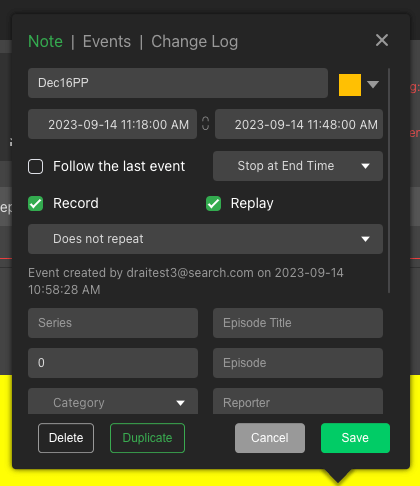
Program settings
To view a program’s settings, click on a scheduled program. To learn about editing program settings, refer to the “Notes tab – Setting recurrences” and “Events tab – Setting primary and secondary feeds” topics.
The Program Settings pop-up window displays and has four tabs:
- Note tab – The Note tab allows the user to view and edit a scheduled program’s information. The “Duplicate” button allows you to quickly select a programming segment on one day and schedule it on another day and time without creating a schedule template.
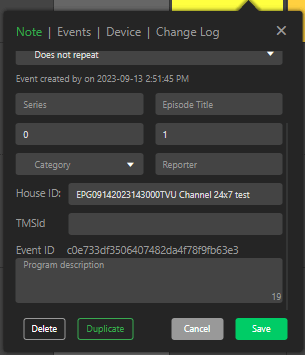
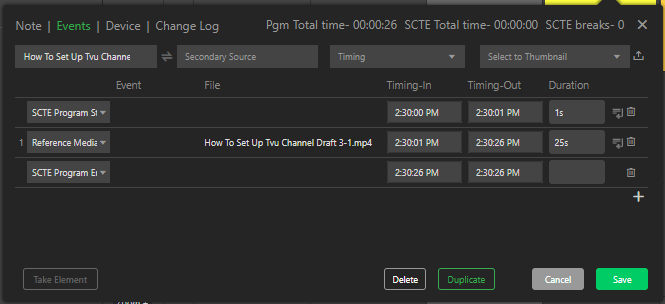
- Events tab – The Events tab displays the scheduled events for the selected program.
- Device tab – The Device tab displays the PID, Delay, and Bitrate.

- Change log – The Change log tab displays the user’s activity.

How to upload a video
Media is uploaded and stored in the Media tab file directory.
To upload and preview media into your file directory:
- Click the Media tab in the left panel.
- Click the Upload local video icon. To select multiple files, click the checkmark icon.
- In the Add Local Video pop-up window, Click the Folder field and select the folder in your Channel to which you want the content uploaded.
- Click + Upload to upload a local media file.
- Browse for and select a local media file and click Open.
- You will see an upload status indicator during the upload process.
- When the upload completes and is successful, the file name and a green check mark display under the Upload button.
- Channel automatically assigns the file name for uploaded media. Select the file in the Video folder to change the media name and click the Edit icon.
- In the Edit Media pop-up window, edit the Name field and click the Save button.
How to schedule manually
Once you have uploaded your content into the appropriate TVU Channel Media tab folder, you can program your channel in a few simple steps.
To manually program your channel:
- Click the Scheduler tab at the top of the window.
- Click the Schedule Template tab in the left panel.
- Select the desired file.
- Drag the file to the calendar panel and drop it into a desired calendar date and time.
- To run a program more than once, repeat the process and drag the file to the desired additional dates and times.
- If your program is part of a normal recurring schedule, refer to Setting recurrences.
How to schedule live events
TVU Channel allows you to import multiple live sources and add them to your schedules using the same method as prerecorded content.
To schedule live events:
- Click the Scheduler tab at the top of the window.
- Click the Live source tab in the left panel.
- Click the plus “+” to import a live feed or select a live source from the feed icons.
- Clicking on feed icons (outside of the edit pencil or trash can) will prompt a preview to begin in the Viewer.
Note: The Live source list shows live sources connected to your TVU Channel account. If you do not see a live source listed, contact TVU Support to have it added to TVU Channel.
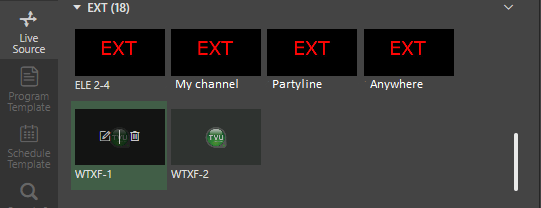
- When you have selected a source, drag its icon into an opening on the Schedule. This will create a 30-minute, one-time event.
- The start and end times display in your scheduled program. To edit further, click the event to open the Program settings window. You will be on the Note tab when you enter.
- Your video source’s name displays in the title field, so you will want to overwrite that to populate the EPG.
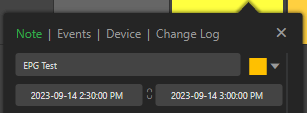
- Add a description at the bottom of the Event ID field.

Note: This will also be customer facing in the Electronic Program Guide, or EPG, that we use and share with partners.
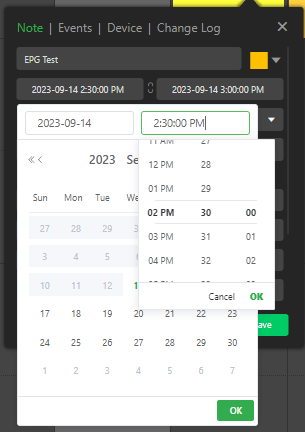
- You will also want to set your event’s start and end times here. Type in the fields or use the dials to scroll and set the desired hours, minutes, and seconds.
- Next, go to the Events tab, and in the upper right corner, there is a field labeled “Select” where you can set an image. This will be your event thumbnail in the front-end video player.
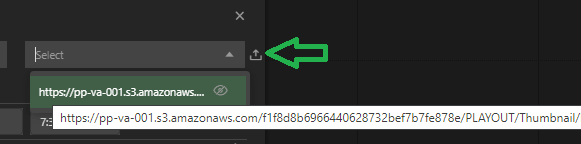
- Previously uploaded files appear in the drop-down menu. Hover over them to see their full filenames. Alternatively, you can use the upload icon
 to add a new image. Images should be 1280 x 720 but can be up to 1920 x 1280.
 - Return to the Note tab at the top, and your correct start and end times will display. Click the Save button to add this to the schedule.
Note: If you run into issues, your scheduled event may be overlapping another event. Temporarily shorten the event duration then, work to fix the issue.
Setting recurrences
To set up a recurring event:
- Click the event in the schedule, then click the Note tab.
- Click in the field that says Does Not Repeat.
- In the drop-down menu that opens, select whether you want this to recur: “Daily,” “Every Weekday,” or “Custom.” If you select Custom, a menu opens.
- You can set Custom recurrences by “Day,” “Week,” or “Month.”
- For “Week,” you can choose the days when the recurrence will happen.
- Click Confirm.
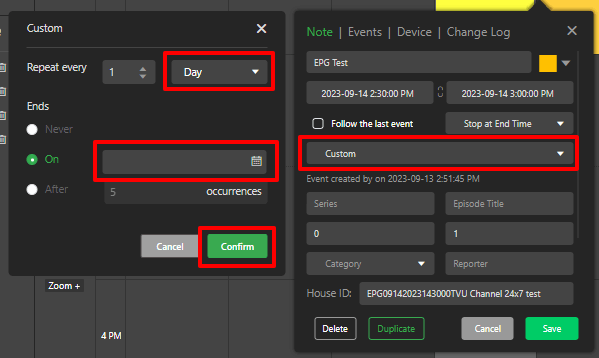
- “Week” will be commonly used. You can select which days the item should recur each week, whether this pattern ends, and, if so, after how many occurrences or on which date.
- After clicking Confirm on your Custom recurrence, the Custom setting menu will close, and your selections will be shown in the “Note” tab.
- Click the Save button.
Making changes to recurrences
IMPORTANT: The “Edit recurring event” pop-up displays when you change a saved recurrence. Your choices are:
- This event – Your changes apply only to the item you clicked into.
- This and following events – Your changes apply to this item and all that follow.
- All Events – Your changes apply to every one of these items on the schedule (e.g., in case you clicked into Tuesday but want these changes applied to Monday, as well).
- Click the event in the schedule, then click the Note tab.
- Click in the field that says Does Not Repeat.
- Make your change, click Confirm to save your selection, and then look in the scheduler to confirm your choices have propagated to the correct days/weeks.
Note: Schedules are only populated on the calendar a few weeks out.
Setting primary and secondary feeds
TVU allows you to have Primary and Secondary sources for your events to add redundancy.
To set primary and secondary feeds:
- Go to the Scheduler tab and click on a scheduled event.
- Click the Events tab, and in the “Secondary Source” field, choose another Media or Live source from the drop-down menu. There might be a slight pause while scrolling down to see more.
- Click Save.
Your station’s backup source can be added to the Live Source list and selected from this dropdown.
How to build live and recorded program templates
Templates allow you to create a program schedule for an entire or part of a day and then apply it to as many future days or days as you wish without recreating it each time. This is ideal for recurring live events like daily live shows and setting program blocks before the content is fully ready. Program templates allow direct editing of SCTE insertions and other functions.
Creating a Program Template
A Program Template allows you to save an event’s title, description, duration, thumbnail, and source as a template to be scheduled.
When building a new program schedule, consider the Primary and Secondary source configurations closely. The operators build the template content in the Program template window (shown below). Changes to templates will update all templates downstream and any program templates in the schedule template.
To create a Program Template:
- Click the Scheduler or Playout tab at the top of the window.
- Click the Program Template tab in the left menu.
- Click the Plus (+) icon and select “with an empty document.”
- Give your Program Template a Program Name, Duration, and Description.
- Select your Primary Source by clicking on Primary Source next to Live / Reference Media. Select a Secondary source if desired.
- For live sources, click Live and navigate to your desired source. For Media sources, click Media and navigate to your desired source, or search by typing in the name of your source.
- Select Secondary Source and repeat step 6 to select a Secondary Source.
Note: the Primary and Secondary source cannot be the same source.
- You can add a thumbnail by:
- Copying and pasting a URL, or
- Upload one from your computer
- To upload a Thumbnail from your computer, click the upload icon .
- Click the Upload button to select an image from your computer.
- Open the file and select it from the drop-down menu. (Hovering over the files in the pull-down will show their full file names.)
- Click Add and close the window.
- Click Save in the bottom right corner to close the Program Template editor.
Note: The EPG Thumbnail URL will appear in the EPG guide to enable downstream providers to use your thumbnail images if desired.
Note: if you reuse the same image for multiple programs you only need to upload it once, and it will appear in the drop-down for each Program Template you create.
- Your new Program Template will appear in the Program Templates Tab on the left menu, where you can click on the Edit icon to make changes or delete the Program Template.
Creating a schedule template
A Schedule Template sets your daily or weekly schedule to be repeated.
Once your Program Templates are created, create a Schedule template by following these steps:
- Click the Scheduler tab at the top of the window.
- Click the Schedule template tab and the plus (+) to create a new schedule. The Add a template pop-up window opens.
- Enter weekly in the Style field then, enter a schedule name, and in the Name field then, click Next.
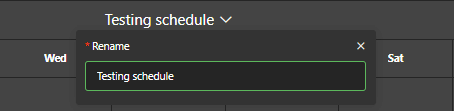
- The new Schedule template opens. If desired, you may rename your schedule template by clicking the caret next to the schedule name at the top of the window and renaming your schedule. When finished, click Save at the bottom of the window.
You are now ready to program your Schedule Template:
- To program your schedule template, find your Program Templates by clicking on the Program Template tab in the left menu.
- Drag and drop each Program into its respective time slot on the schedule.
- Once the Program is scheduled, you can edit the start and end times by clicking on the event and selecting the time you want to edit. When you’re done, click OK and Save.
- Once a full day (Monday) is scheduled, click Save (the floppy disk icon) next to your scheduled date.
- Name your Schedule Template (e.g. The Monday morning show) and click Confirm.
- Click the Schedule Template tab in the left menu and find the template you created. Drag-and-drop this template onto each day, Tuesday through Friday.
- Complete the schedule by dragging and dropping your weekend programs into Saturday and Sunday.
- Save your Weekly Schedule by clicking on the Save button (floppy disk icon) next to the date range on top of the schedule.
- Name your “Weekly” schedule and click Confirm.
- Next, you can set your Schedule Template as your recurring default by clicking the “Default Template Schedule” button (circle of arrows icon).
- Select the Recurring Schedule template you want to repeat from the drop-down menu and select your Start date. Leave the End date set to “indefinite.”
- Once you click Confirm, you’ll be able to see your schedule set on the calendar for the next five weeks.
How to duplicate and repeat programs and program templates
You can build a repeating TVU Channel playout schedule by duplicating programs and templates for programs. Use the duplicate features below, or drag and drop your recurring programming to the desired dates and times.
To duplicate and repeat program templates in TVU Channel:
- Click the Scheduler tab at the top of the window
- Click the Program Template tab in the left panel.
- Select a template in the file list and drag it to the calendar panel in the first desired display date and time slot.
- Select the program template you want to duplicate and click the Duplicate button.
- Click the date fields, change your time and date parameters, and click the Create button.
Duplicating programs
Use the following method to duplicate a program in TVU Channel.
- Click the Scheduler tab at the top of the window.
- Click the Duplicate button at the top right of the screen.
- In the Duplicate pop-up window, click the Select events drop-down menu and select the length of time you are duplicating: half hour, hour, or day. If none of these are desired, use a program template.
- Select the date and time you are duplicating and the date and time you want it repeated.
- Click Apply to save your settings.
Record setting
There are two automatic recording instances in TVU Channel, Record and Take Breaking Source. The Record checkbox in the program setting pop-up window is enabled by default and can be disabled.
- When the Record checkbox is enabled, it automatically creates a 10 Mbps cloud recording of a scheduled Live event. After the Live event airs, the recording is stored in the Media tab Recordings folder and is accessible in both Playout and Scheduler windows as a media source.
- The Replay setting triggers the Record function when enabled in the Channel Settings.
- The Record default setting can be edited by clicking on a program to open the Program settings pop-up window and manually deselecting or reselecting the checkbox.
Note: The checkbox is enabled by default. However, this option is not available for VOD type assets.
Record use case
The Recording of a live event can automatically play a copy of a live clip when nothing is scheduled to air in the playout timeline.
For example,
If you have a two-hour newscast (set for Record in the Program settings pop-up) that airs from 10 PM to 12 PM, after 12 PM, there is nothing scheduled until 6 PM. When nothing is scheduled, a recording of the two-hour newscast from 10–12 PM will replay, starting with a 30-second promo (which allows the recording to spin up). The recording will replay until the Playout Timeline’s next event.
The Replay setting triggers the record function when enabled in the Channel Settings.
If “Replay” is selected, then the use case is the same, but if “Replay” is not selected, then that source will record, but the replay will be of the last recording with “Replay” selected.
Take breaking source – recording
There are two automatic recording instances in TVU Channel, Record and Take Breaking Source. For example, when a live event is scheduled in the playout window below the red timeline, and you press the Take Breaking Source button in the right panel (or Ctl-B), TVU Channel automatically records and moves the 10 Mbps cloud recording into the Recordings folder.
The recorded clip can be reused whenever clicking the Take Breaking Source button.
Note: the record function cannot be disabled when taking a breaking source.
Refer to How to break into and rejoin programming for details about how to Take Breaking News sources.
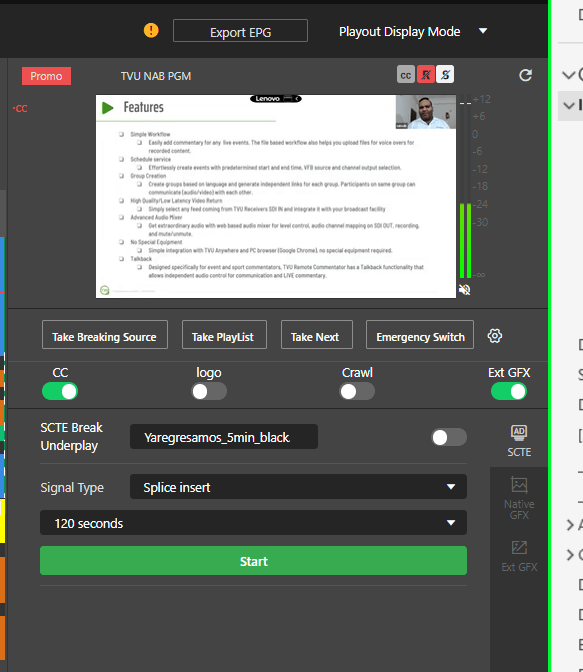
TVU CHANNEL PLAYOUT INTERFACE:
TVU Channel Playout interface overview
The Playout window is the control interface for TVU Channel. The Playout window visually represents outputs from your channel and enables a user to start and stop programming.
Playout controls and operations
Use the Media, Live Source, and Program Template tabs to add, edit, or search for prerecorded and live sources to drag and drop into your programming schedule.
The Playout window provides the following basic functions and controls:
- Preview monitor – The preview monitor “Viewer” window displays a preview clip of any media source selected in the media folders or most live sources.
- Media tab – The Media tab contains the pre-configured file folder structure. You can import media, edit media, and search your TVU Cloud folders and local computer/server for video files.

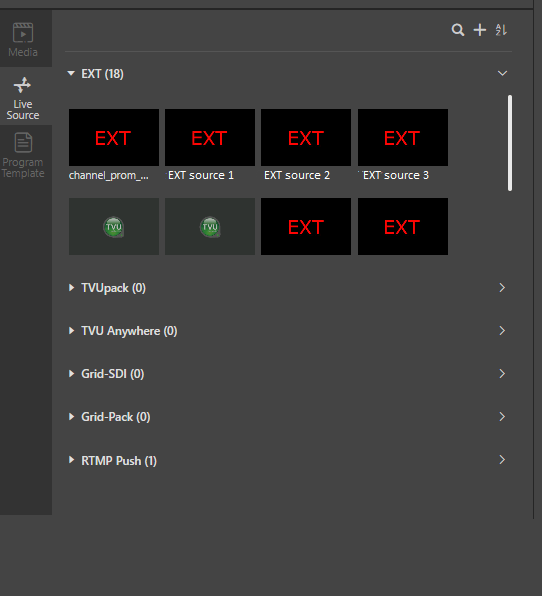
- Live Source tab – The Live Sources Tab displays the external IP, TVU Pack, TVU Anywhere, Grid SDI, Grid Pack, RTMP push media, and TVU Producer sources associated with your TVU Channel account. You can create program templates with live sources and drag-and-drop content from this folder into the calendar.

- Program template tab – The Program Template tab allows you to create, edit, and search saved individual programs with SCTE breaks for drag-and-drop use in the calendar.
Media preview “Viewer” controls
The preview monitor “Viewer” window in the top left panel displays a preview of any media source you select from the media or live sources tab.
Note: Encoder sources will not preview in the viewer.
After a media source is selected, you can use the preview monitor controls to:
- Play and pause the media.
- Turn the audio off and on .
- View media in full-screen mode .
- Remove the media from the preview monitor by using the Eject icon in the top right corner of the Viewer.
- Click to open the settings menu to access Playback speed settings and Download media to a local drive in MP4 or MOV format.
Media tab
Media folders are available by clicking the Media tab in both Playout and Scheduler windows. The Media Tab contains the default four-folder structure: Incoming, Promo, Recordings, and Video. This is where you can upload, move, and edit media in various folders within the left panel in the playout user interface. The folder structure is the same in the Scheduler and Playout user interface. Therefore, any changes made to media are reflected to all users.
Each channel has a customized folder structure for a standard channel instance for every Channel user account:
- Incoming – The Incoming folder contains content coming from third-party commercial providers. This requires TVU integration with the third-party delivery system.
- Recordings – The Recording folder contains two sub-folders automatically created by the TVU drive: one for the edited file and one for the breaking news file.
- Videos – Add your local video files to this folder.
- Promos – The Promos folder is the repository for Commercials.
Working with Media folders
After logging into your account, the Playout user interface opens. The folder structure is located in the left panel. Here, you can add and edit folder names, access, upload, delete, and move your media files.
Expanding folders: Click the carat ![]() icon to the right of the folder name.
icon to the right of the folder name.
Close folder: Click the carat ![]() icon to the right of the expanded list.
icon to the right of the expanded list.
Note: If a user changes a standard folder name or creates additional folders in the standard TVU Channel folder structure, the folder will not be seen and any media placed in that folder will not be accessible to other affiliates.
Live sources tab
The Live Sources Tab displays the external IP, TVU Pack, TVU Anywhere, Grid SDI, Grid Pack, RTMP push media, and TVU Producer sources associated with your TVU Channel account. You can create program templates with live sources and drag-and-drop content from this folder into the calendar.
Program template tab
In the Program Template tab, you can create, edit, and search saved individual programs with SCTE breaks for drag-and-drop use in the calendar.
Playlist preview monitor
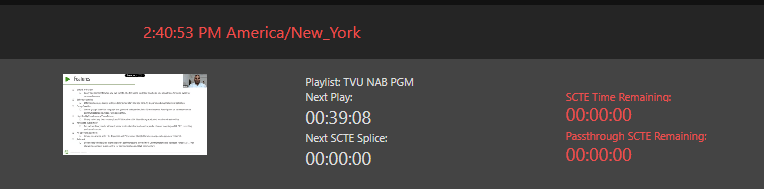
The Playlist monitor in the Playout tab shows the current time with time zone, timers to the next scheduled media to be played, and the next SCTE splice. The playlist monitor also includes a small video window that shows the currently scheduled playlist output. This is particularly useful when a breaking live source is temporarily shown instead of the scheduled programming.
Live program status panel
The Live Program Status panel shows the programming being played out at the current time (indicated with a red bar) and programs scheduled for the upcoming hour.
Program window
The program window in the right panel shows the current output of your Channel. This window can be refreshed with the refresh button on its top right.
Export EPG button
The Export EPG button allows you to download a local copy or update the current Electronic Program Guide as a JSON file downstream when a schedule is changed and automatically updated at the start of a new broadcast day.
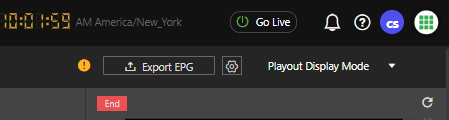
The yellow (!) icon to the left of the EPG button indicates a Warning that the provider will not accept the EPG file that includes time gaps. The information in the Warning message shows where the time gaps reside in your program.
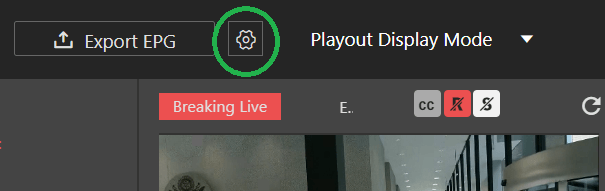
When taking breaking news as a source, clicking the cog to the right of the Export EPG button allows a user to give the EPG source a name, duration, and description.

To force the breaking source EPG information update for providers downstream:
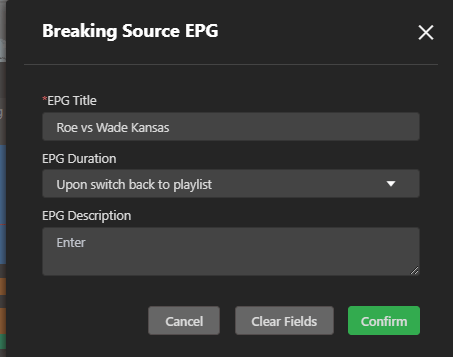
- Click the cog icon to open the Breaking Source EPG pop-up window.
- Enter the EPG source Title, Duration, and Description.
- Click Confirm to save your changes.
Display modes
There are two display modes available in the Playout window:
- Event Display Mode – The Event Display Playout mode lets you view the daily playlist by event type.
- Playout Display Mode – The Playout Display mode lets you view the daily playlist by program schedule.
Take Breaking Source, Take Playlist, Take Next, and Emergency switch buttons
Shortcut keys:
- Take Breaking Source – Ctl-B
- Take Playlist – Ctl-P
- Emergency Switch – Ctl-E
- Take Next – Alt-T (Option-T for Mac)
The Playout left panel includes the following controls – Take Breaking Source, Take Playlist, Take Next, and Emergency switch button functions:
- Take breaking Source button (Ctl-B): The Take Breaking Source button replaces the playlist output with a selected live source.
- Take Playlist button (Ctl-P): The Take Playlist button ends a Breaking Source live feed and returns to the current time in the playlist.
- Take Next button (Alt-T) or (Option-T for Mac): The Take Next button advances the playlist to the next scheduled program.
- Emergency Switch button (Ctl-E): The Emergency Switch feature allows you to immediately switch away from any undesirable broadcast content and replace it with a temporary video feed.
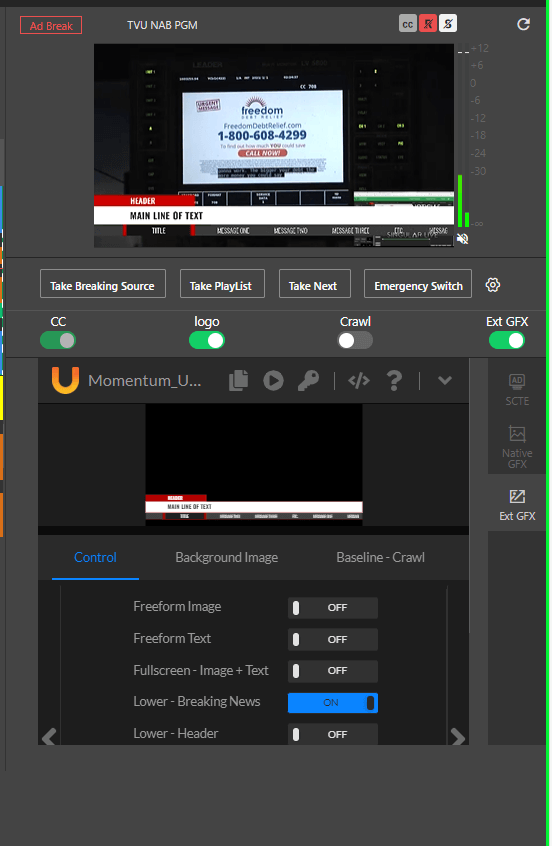
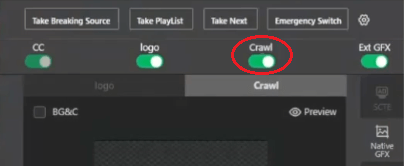
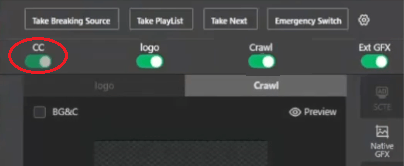
Closed Captioning, Logo, Crawl, Ext GFX, and SCTE controls panel
Shortcut keys:
- SCTE Break trigger – Ctl-S
- Logo switch – Ctl-L
- Crawl switch – Alt-C (Option-C for Mac)
Closed Captioning (CC), Logo, Crawl, Ext GFX, and SCTE controls panel operations:
- CC: The CC slider allows you to enable/disable closed captions, if available. This is a paid TVU Transcriber feature which will result in additional charges. Note that the CC slider, when unavailable, is indicated with a blocked icon.
- Logo (Ctl-L): The logo slider allows you to add, enable, and disable a channel logo image.

- Crawl (Alt-C) or (Option-C for Mac): The Crawl slider enables and disables a native crawl.
Ext GFX tab controls:

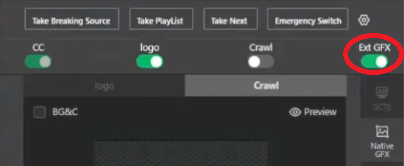
- Ext GFX: The Ext GFX slider allows you to enable and disable external graphics.
How to add a native graphic overlay
The logo panel lets users upload a native graphic logo overlay into individual or all programs on a TVU Channel.
To add and execute a graphic overlay:
- Click the Playout tab at the top of the window.
- Click the Native GFX tab in the right panel.
- Click the Logo tab.
- In the Logo Setting panel, click the Plus (+) icon to browse and upload a graphic (accepted file formats are jpg, jpeg, png, or gif format) no larger than 640×480.
- To select the graphic in the Logo panel, hover your mouse over the graphic and make your selection. When the graphic is selected, a checkmark appears in the top right corner of the thumbnail.
- Select a display position in the video and click the Save button.
- To add additional graphics, repeat the steps above.
- To take a graphic overlay live, enable the graphic by moving the logo slider to the right until it turns green.
How to add Singular.live graphics
The Ext GFX slider in the right playout panel enables users to upload (third-party HTML) external Singular.live graphic overlays into individual or all programs in TVU Channel.
Note: The user must use their Singular.live account to use this feature.
To add Singular.live graphic overlays:
- To enable this feature, go to channel settings in Workbench.
- Expand the Advanced tab and EXT Graphics tab, and select the token or URL option.
- Click Save.
Click the Playout tab at the top of the window.
- Click the Ext GFX tab in the right panel.
- Click the Control tab to set your graphic parameters

- To enable external graphics, move the Ext GFX slider to the right until it turns green.
How to add and execute native crawls
Native crawls can be manually added to your programs. Channel works with most third-party crawl providers, or you can manually type your desired text from the TVU Channel Playout user interface.

Add a new native crawl:
- Click the Playout tab at the top of the window.
- Click the Native GFX tab in the right panel.
- Click the Crawl tab in the right panel.
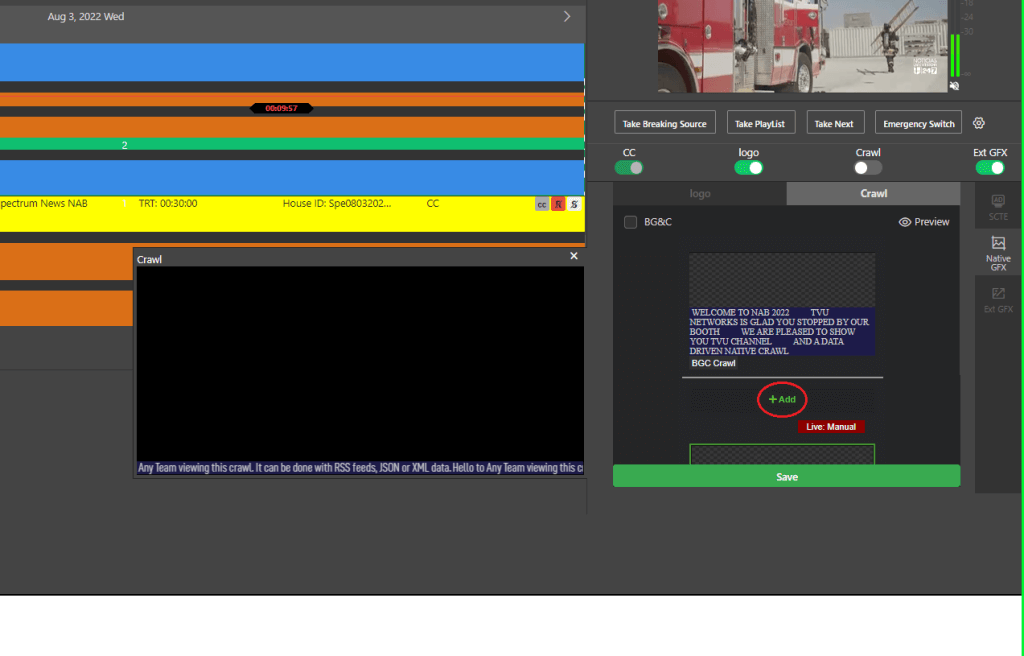
- In the Crawl panel, click + Add.
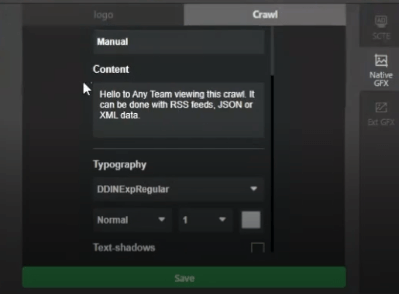
- In the Crawl settings panel, enter an Overlay Name in the field.
- In the Content field, enter your text for your crawl.
- In the Typography drop-down menu, select a text style and select any desired effects.
- In the Text direction drop-down menu, make a selection.
- Click the Save button. Then, click the Yes button to confirm your setting.
- To enable the ticker, move the crawl slider to the right until it turns green.
Edit an existing crawl
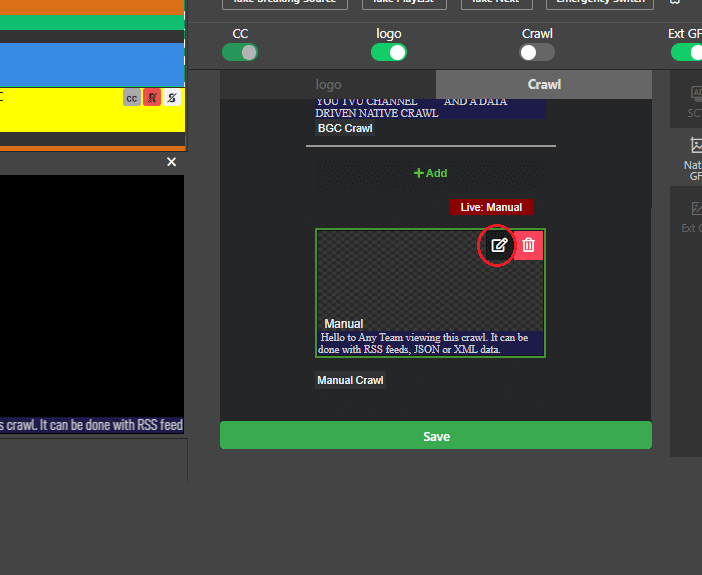
- In the Manual Crawl window, hover the mouse over the Text Ticker box and select the Edit icon. The default setting panel opens.
- Edit your text in the Content field or desired parameters in the Manual setting panel.
- Click the Save button. Then, click the Yes button to confirm your setting.
- Move the crawl slider to the right until it turns green to enable the crawl.
How to take your channel to air
Take a channel to “Air” and output to websites, apps, OTT, OTA, and more. The outputs of the channel owner appear to all of the collaborators. The collaborators see all of the same outputs for each channel.
Using an IP address and port number
To take your channel to air digitally via IP Address and port number:
- Go to the Workbench user interface by clicking on your channel name at the top left of the screen and then select the Channel you want to take to air.
- Click the three dots in the top-right corner of your new channel.
- Click Settings to open the Channel Settings pop-up window.
- At the bottom of the window, under Output, click +Add.
- Select ProMPEG from the drop-down menu.
- In the PROMPEG Settings pop-up window, enter an Output Name.
- Enter an IP address.
- Enter an outgoing Port number.
- Adjust the FEC row and column counts if necessary. The number of rows multiplied by the number of columns should be less than 100.
- Select a Resolution from the drop-down menu.
- Select a language code from the drop-down menu.
- Click Save button.

- Click the Go live button in the top navigation.
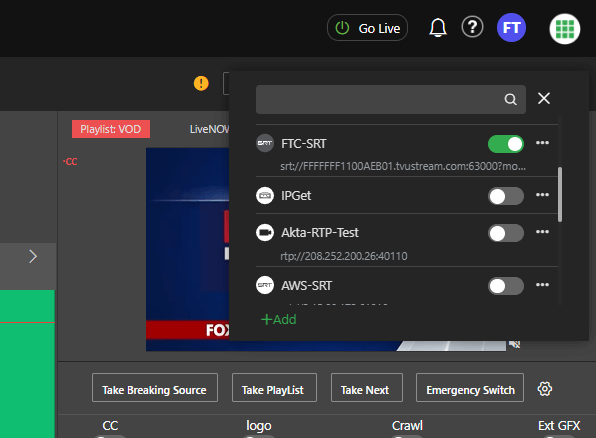
- The channel outputs display in the pop-up list.
- Select a Channel output and enable the output by pushing the slider to the right until it turns green. When enabled, a “Push success” message displays.
- Click the Save button.
How to enable Closed Captioning (CC)
Turning on the TVU Channel Closed Captioning capability enables TVU Transcriber to add real-time captions to your channel. This feature is a paid service. Contact TVU for more information.
To enable Closed Captioning in TVU Channel:
- In Workbench, click the three dots to open the Channel settings window.
- Click Advanced and expand the Closed Captions menu. Enable the Closed Captions feature and click Save.
- Click the Playout tab at the top of the window.
- In the right panel, move the CC slider to the right “on” position until green to enable Closed Captioning.

- Hover your mouse over the CC slider. The “red symbol” displays when this feature is not activated.
How to break into and rejoin programming
Break in and interrupt scheduled programming without having to reprogram your channel. A single click from the TVU Channel Playout user interface instantly replaces current programming with the live source of your choice. Channel automatically records all interrupts for future use.
To break into and rejoin programming:
- Click the Playout tab at the top of the window.
- To insert a live breaking news source, click the Live Source tab in the left panel.
- Click the EXT source folder to expand its contents.
- Single-click on a live source window; Click on the edges of the source image (avoiding the edit pencil and trash can icons).
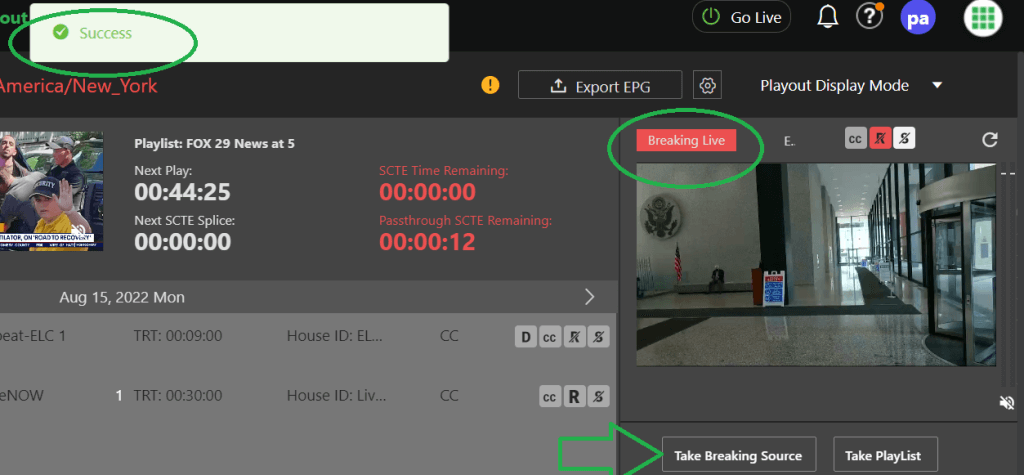
- Once you see your breaking news video in the left-panel Viewer, go to the video player on the right that shows your Channel’s output and click the Take Breaking Source button (Ctl-B) in the right panel.
- You should see a green check mark and “Success” notification. The red icon above the player will change to “Breaking Live,” and your video source will come on the playout.
- You can also update the title and description of your stream during breaking news for downstream partners, via the Electronic Program Guide. Above the output video player, next to “Export EPG,” click the cog icon.
- In the pop-up labeled “Breaking Source EPG,” fill in the “EPG Title” and “EPG Description” fields.
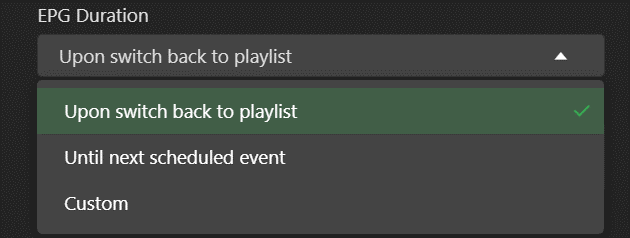
- For the duration, you can choose “Until next scheduled event,” a “Custom” point in time, or you can leave it “Upon switch back to playlist.”
- To “Export EPG,” click the cog
 icon.
icon.

- If it’s the last breaking news event, click the Take Playlist button in the right panel when the breaking news ends to return to your regularly scheduled content.
There’s also an automatic record of all breaking news, so if you need to replay it, you’ll find it in the Media folder under Recordings / BreakingLiveSource.
Note: If your breaking source goes to commercial, your channel should, too. You’ll see slate on your output and ads on your front-end video players, just like your regular breaks.
How to use the “Take Next” feature
The take next button automatically moves your live source to the next scheduled event.
To use the Take Next feature:
- If you need to change what is airing immediately, click Playout at the top of the window.
- Click the Take Next button (Alt-T) or (Option-T for Mac) in the right panel below the video player to jump to the next scheduled event.
- Add content to fill the unscheduled event time slot created by moving a future item into the present opening. You may also repeat the program as initially scheduled to occupy the unoccupied time slot.
Emergency switch
The Emergency Switch feature lets you immediately switch away from any undesirable broadcast content and replace it with a temporary video feed.
You’ll notice “Emergency Switch” is one of the options on the right side of the Playout, under your video output. This is a safe video that editors or Site Reliability Operations (SRO) personnel can use quickly in case of missing output or other issues. In addition, the Emergency Switch supports MP4, MOV, and JSON playback.
To set up the Emergency switch function:
- In the right panel of the Playout Tab, click on the cog icon.
- In the Emergency Setting window, use the drop-down menu to select a video file from your media folders or a live feed you want to use as your emergency switch video. You can also type to search by filename.
- Click Confirm. We have your station’s “Be Right Back” slate video as the initial default.
- Click the Emergency Switch button (Ctl-E) to immediately play the selected emergency content. You should see a ”Success“ confirmation and the “Emergency File” button in red.
- When ready, you can remove the slate by clicking the Take Playlist or Take Next buttons.
“We’ll be right back” slate
The “We’ll Be Right Back” slates are displayed during ad breaks when no ads run, including on Tubi.
Slates added or updated via this workflow will be reflected on the following products or platforms:
- O&O Sites and Apps (Website, News App & Weather App)
- Social Live Stream Destinations (Facebook & YouTube)
- Tubi.tv
Slate Specs:
- Resolution: 1280×720 minimum
- Format: MP4
- Bitrate: 6MB
- Length: 2 minutes minimum
Selecting and playing a slate
To select and play a slate:
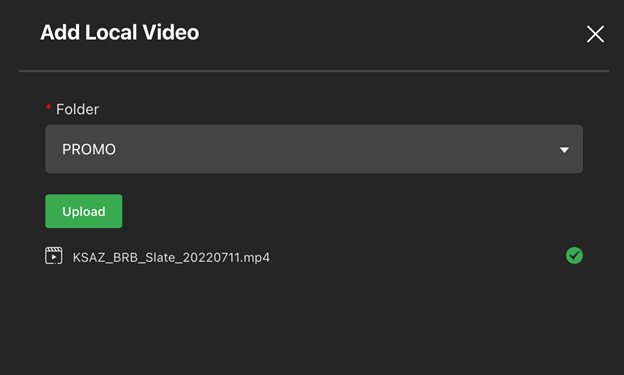
- Click the Media tab in the left panel.
- Click the Upload local video file icon.
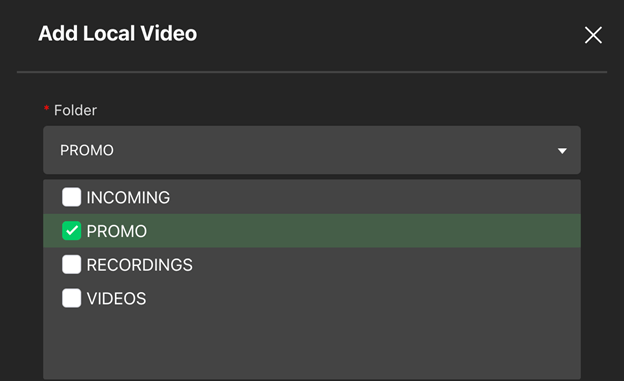
- The Add local video pop-up window displays. Click the Folder drop-down menu and select PROMO. This is where you will store the video slate.
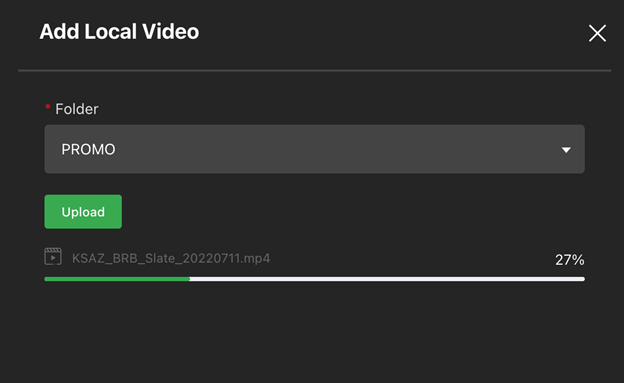
- Click the Upload button and browse to the video file on your local computer, then select the file and click Open.
- Once the file upload is complete, the file name and green checkbox display. Close the window by clicking the “X” in the top right corner.
- You will see a menu on the Playout page’s right panel under the video player. Click on SCTE.
- Next, click on the field next to “SCTE Break Underplay.”
- If a slate is already in use, you will see the filename here with an “X” button to the right. You can remove it or start typing to search by name for your new file. Select that file when it appears below.
Tip: Searching by name for your file is easier than trying to navigate to it using the folders initially shown below the search field.
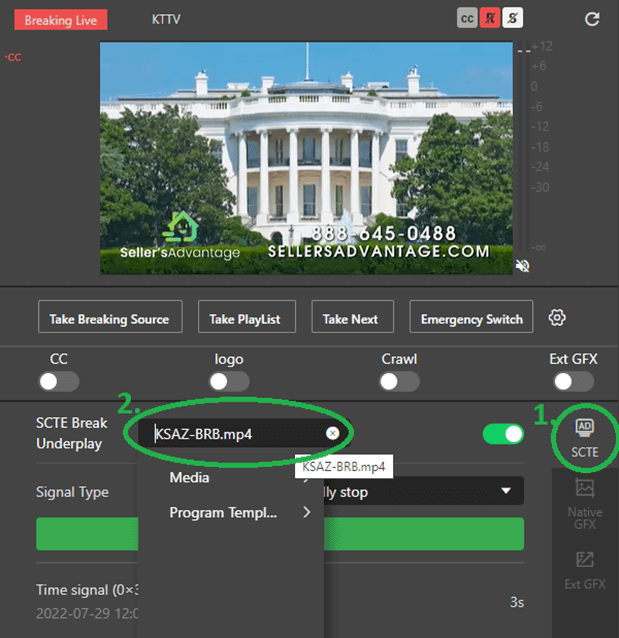

- Once your file is selected, enable the slate by toggling the switch to the right into the green “on” position.
Note: Do not click the green switch unless you want the slate to come on immediately.
SCTE break underplay clip
TVU Channel provides extensive and flexible support when a control room triggers an SCTE break (Ctl-S); the SCTE underplay clip plays for the break and then resumes scheduled programming.
- To enable an SCTE Break Underplay clip, open your channel settings window and expand the Advanced section.
- Click to expand the SCTE settings. Under SCTE type, select the Switch Underplay to Playlist checkbox.
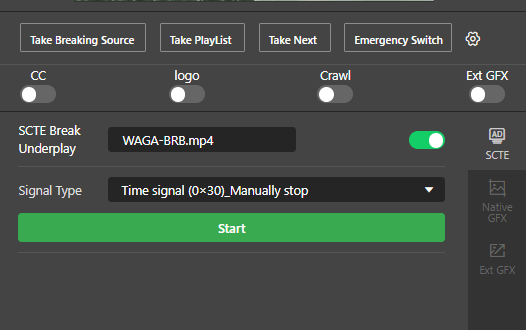
- Click the Save button and go to the TVU Channel Playout window.
- In the right panel, click the SCTE tab and select an SCTE Break Underplay clip.
- Select a Signal type from the drop-down menu.
How to add SCTE triggers to your schedules or templates
Most third-party ad insertion programs validate TVU Channel SCTE triggers. SCTE can be passed through to the CDN, scheduled, or added on the fly in real time. Once the commercial content duration is completed, the program resumes where it left off. For full details on maximizing the monetization through scheduled and pass-through SCTE triggers, please get in touch with TVU Support.
Adding SCTE triggers manually
To manually add SCTE triggers into your program:
- Click the Playout tab at the top of the window.
- Select the program you wish to add the trigger to.
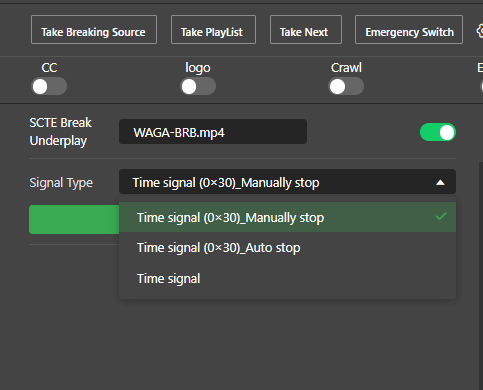
- Click the SCTE Settings Signal Type drop-down menu in the right panel to set the break length added.
- Click the Start button (Ctl-S), and the trigger will execute immediately.
Adding an SCTE timing list to a new program template
To create a program template and add an SCTE timing list, complete the following steps:
- Click the Scheduler tab at the top of the window.
- Click the Program Template tab.
- Click the plus (+) icon.
- Select with an empty document. The Program Settings window displays.
- Select the Media drop-down menu in the “Live/Reference Media field” and select Media or Live.
- Click the Select drop-down and choose a source in the list, or you may also enter a keyword in the select field to quickly locate a file.
Note: your primary and secondary sources cannot be the same source.
- The Program name field will auto-populate if you are using a media file. Then, if desired, you can edit the Program Name.
- To include an XML or CSV file from a VOD provider, click the Upload icon to upload a new file. Next, click the Timing list drop-down menu and choose the file.
- Your program and SCTE insertions populate in the bottom right panel.
- Enter a Program Description for the guide information if desired.
- Click the Save button.
How to export the programming guide
The TVU Channel Export Programming Guide feature allows you to share your programming schedule guide to various content delivery networks as an XML file with metadata about the channel, including name, program names, start and end times, and program descriptions.
Exporting an updated EPG file
To export an updated EPG file into a program schedule:
- In Workbench, click the three dots to open the Channel settings window.
- Click Advanced and expand the EPG menu. Then, configure your EPG settings.
- If desired, you can include a thumbnail with your EPG by inserting the URL in the provided field and then clicking Add.
- Click Save and continue to TVU Channel.
- Click the Playout tab at the top of the window.
- Click the Program Template tab in the left panel.
- Select a file from the list and click the Create by uploading files icon.
- In the Upload pop-up window, click the desired Upload button.
- Select the updated XML or CSV file on your local drive and click Open.
- Click Save at the bottom of the window. Then, click Yes to save your template changes.
Export, link to, and view an EPG file
To export, link to, and view an EPG file:
- Click the Playout tab at the top of the window
- Click Export EPG in the top right panel to export your XML file to your local drive.
- To copy the EPG link to the clipboard, click the link icon. Open a browser window and paste this link into the address bar to access the XML file via URL.
- The orange icon indicates a warning that there are time gaps in the EPG program schedule.
© Copyright 2023 TVU Networks Corporation. All rights reserved in all media.
Document Part Number: TVU Channel Quick Start User Guide Rev B EN 09-2023