Contents
- Introduction, setup, and base operation
- Features overview
- Guide contents
- Compatibility
- Step 1 – Installing the TVU Anywhere app on your iOS or Android device
- Step 2 – TVU Anywhere iOS and Android device registration
- Step 1 – Installing the TVU Anywhere app on an iPad, Mac Pro, or Windows device
- Step 2 – iPad, Mac Pro, and Windows registration
- Pairing your device with a TVU receiver
- TVU Anywhere operational controls and functions
- Operating the TVU Anywhere app
- Advanced settings
- Appendix A – TVU Token feature overview
TVU Anywhere Quick Start Guide
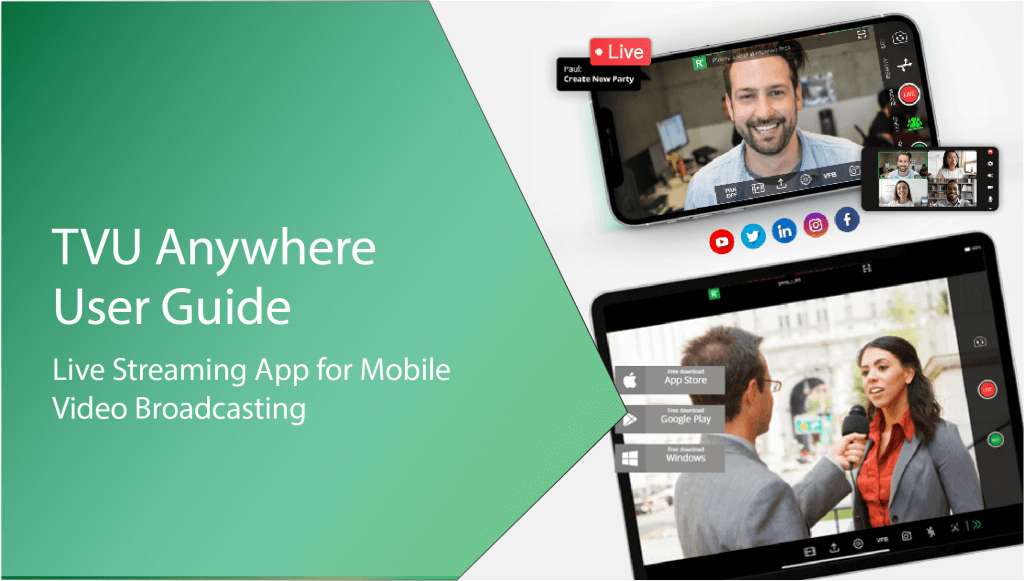
TVU Anywhere instantly turns your smartphone, tablet, or laptop into a transmitter for high-quality live transmission and streaming from remote locations.
Introduction, setup, and base operation
TVU Anywhere is a mobile live-streaming app delivering high-quality live transmission for video broadcasting in remote locations. Thousands of mobile journalists and live streamers use TVU Anywhere as their number-one broadcast app for Android, iPhone, iPad, Windows, and many other mobile devices.
TVU Anywhere overview
TVU Anywhere allows users to transmit full-HD video from anywhere using cellular bonding technology and HEVC encoding.
TVU Anywhere aggregates your mobile smart device’s 3G/4G/LTE/5G connection and available WiFi for high-definition wireless video transmissions using patented IS+ technology and HEVC encoding.
This provides a high bandwidth connection reducing lags, and giving your live broadcast the highest level of stability when streaming live video from your iPhone, Android, iPad, or any other mobile device.
Features overview
- Advanced theme: The TVU Anywhere app offers a new (advanced) theme with added features.
- User-friendly interface: Go live, monitor, and control the transmission from an easy-to-use interface. Key status information such as real-time transmission rate and live streaming are provided.
- Dual camera support: Simultaneous use of the front and rear of a smart mobile device allows a Picture-by-Picture (PBP) or Picture-in-Picture (PIP) transmission.
Dual Camera is supported on the following Apple devices: iPhone XS, XR, XS Max, 11, 11 Pro, 11 Pro Max, 12, 12 mini, 12 Pro, 12 Pro Max, 13, 13 mini, 13 Pro, 13 Pro Max, 14, 14 Plus, 14 Pro, 14 Pro Max, 15, 15 Pro, 15 Pro Max, 16, 16 Plus, 16 Pro, and 16 Pro Max, and iPad Pro 3rd, 4th, 5th, and 6th generations and M4.
- Return Video Feed (VFB): The return video feedback feature allows users to view a live feed from the studio or remote location for enhanced participation.
- Remote Pan-and-Zoom: A remote operator in the studio can control the camera’s focus, brightness, and also pan-and-zoom without intervention from the device user in the field. This provides unprecedented control over camera framing and exposure without degradation of HD picture quality.
- TVU Token integration: The Token feature provides a simple token-based system for easy management of user accounts. The Token feature is used in the field to pair your TVU Anywhere with your receiver without TVU support intervention.
- TVU’s Inverse StatMux Plus (IS+) technology: Aggregates your device’s cellular wireless connection and available WiFi to provide HD and 4K quality live video using HEVC video transmission.
- Simultaneous Streaming and Recording: Live stream video from TVU Anywhere while recording in the media directory of a smart device. Streams simultaneously to multiple social media sites from any smartphone or tablet.
- Integrated TVU Voice: Utilize integrated VoIP technology for two-way conversation between a TVU receiver at the studio and a smart device in the field.
- Support for DJI devices: TVU Anywhere can be enabled for use with DJI drones as a video source that can be streamed live back to the studio.
- Support for smart mobile devices: iOS, MacOS, and Android.
- Integrates with the Apple Center Stage iPad Pro (M1): AI camera tracking follows multiple subjects allowing operatorless productions.
– TVU Anywhere broadcasting app enhances your iPad live streams with integrated AI-based technology that automatically recognizes and tracks the subject as he or she moves.
– The Apple Center Stage feature for the iPad Pro with M1 chip, integrated within TVU Anywhere via API, frees on-screen subjects from the constraints of remaining in a fixed position, greatly improving the professionalism of a single-person live video production. - Integrates with TVU Partyline: TVU Partyline provides video conferencing and live briefing capabilities. When used with TVU Anywhere, all participants can:
– Join a TVU Partyline session from TVU Anywhere with a Web link.
– Interact and collaborate live from remote locations.
– Add pictures and video clips as a source (Anywhere iOS, MacOS, and Android.)
– Use the Picture-in-Picture (PIP) feature to add a pre-loaded image to the foreground and a background image (Android and iOS supported).
– The unread message indicator displays when you have a new message. - Integrates with TVU Producer: Easily integrate TVU Anywhere with TVU Producer for Cloud-based video production.
- Integrates with TVU Grid: For live video switching, routing, and distribution to multiple locations.
- Integrates with MediaHub: Supports VFB and VoIP from MediaHub.
- Security: TVU Anywhere offers the option of enabling AES encryption.
- Integrates with OBSbot 4K AI camera: Smart-streaming PTZ camera with AI tracking (USB-C) for MacOS.
Quick Start guide contents
This Quick start guide provides instructions to complete the following tasks:
- How to Download and install the TVU Anywhere app.
- How to contact TVU Support to complete your registration.
- How to pair your device with a receiver.
- How to operate the TVU Anywhere app.
- How to create a hotspot connection with a TVU Pack.
- How to integrate the TVU Anywhere app with a DJI device.
- How to use the Token feature with the TVU Anywhere app.
Compatibility
The TVU Anywhere app supports iOS, Android, MacOS, and Windows OS. (It’s recommended using the latest system version.)
The recommended phone models are as follows:
- Samsung: S7, S9, S10, S20, S21, S22, S23, S24, Note 8, Note 9, Note 20
- Huawei: Mate 10, Mate 20/20 Pro, Mate 30/5G, Mate 40, P20, P30, P40, and P50.
- iPhone: 7/7P, 8/8P, X/XS Max, 11/11Pro/11 Pro Max,12, 12 mini, 12 Pro, 12 Pro Max, 13, 13 mini, 13 Pro, 13 Pro Max, 14, 14 Plus, 14 Pro, 14 Pro Max, 15, 15 Pro, and 15 Pro Max. 16, 16 Plus, 16 Pro, and 16 Pro Max.
Installing the TVU Anywhere app – Smart mobile device
Complete the following steps to install the TVU Anywhere app.
Step 1:
Installing the TVU Anywhere app onto your iOS smart mobile device
The TVU Anywhere app is available free of charge from the app store.
To download and register the TVU Anywhere app:
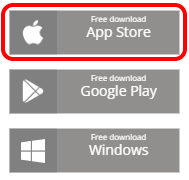
- From your mobile device, go to the App Store and enter TVU Anywhere Pro in the search field.
- Download and install the TVU Anywhere app onto your smartphone.
Installing the TVU Anywhere app onto your Android device
The TVU Anywhere app is available free of charge from the Google Play Store.
To download and register the TVU Anywhere app:
- From your mobile device, click the Google Play icon and enter TVU Anywhere in the search field.
- Download and install the TVU Anywhere app onto your smartphone.
Step 2:
TVU Anywhere iOS and Android registration
To finalize your TVU Anywhere registration:
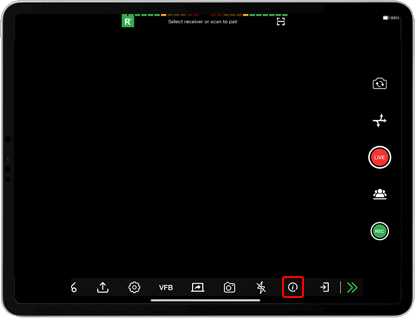
- Go to your Applications and launch the TVU Anywhere app. Note that the TVU Anywhere app icon for Android devices will not denote “Pro.”
- Press the double arrows to open the features bar.
- Press the info icon.
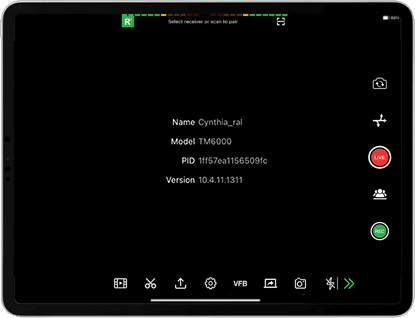
- Write down your device PID displayed in the pop-up window.
Contact TVU Support to complete your registration. You will need to provide the following information:
- The device PID
- The receiver(s) name and PID
- After the PID is successfully registered, you can begin streaming.
Complete the following steps to install the TVU Anywhere app:
Step 1:
Installing the TVU Anywhere app onto your iPad or Mac Pro
The TVU Anywhere app is available free of charge from the TVU Networks TVU Anywhere Product page at: tvunetworks.com/products/tvu-anywhere/
To download and register for the TVU Anywhere app:
- Click the App Store icon or https://apps.apple.com/us/app/tvu-anywhere-pro/id883099579 to download and install the TVU Anywhere app onto your iPad.
Installing the TVU Anywhere app onto your Windows device
The TVU Anywhere Pro app is available free of charge from the TVU Networks TVU Anywhere Product page at: https://www.tvunetworks.com/products/tvu-anywhere/
To download and register for the TVU Anywhere app:
- Click the Free Windows Download icon or click https://dl.tvunetworks.com/TVUAnywhere/TVUAnywhere.zip
- Download and install the TVU Anywhere app to your PC or laptop.
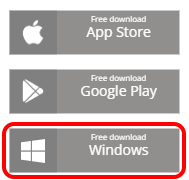
- Go to your Download folder and click the file to start the TVU Anywhere app installation.
Step 2:
iPad, Mac Pro, and Windows registration
To finalize your TVU Anywhere registration:
- Go to your Applications folder and launch the TVU Anywhere app.
- Press the double arrows to open the feature bar.
- Press the Info icon.
- Locate and write down your device’s PID displayed in the Info screen.
- Contact TVU Support to complete your registration. You will need to provide the following information:
- The device PID
- The receiver(s) name and PID
- After the PID is successfully registered, you can begin streaming.
Pairing your device with a TVU receiver
Email TVU Support at support@tvunetworks.com. TVU support will pair your TVU Anywhere app to the receiver receiving your stream.
In addition, TVU Anywhere integrates with the TVU Command Center Token feature. Activating the Token feature allows an administrator to pair with a list of registered receivers using the Command Center user interface.
Note: For more information about the Token feature, refer to “Appendix A of this Quick Start User Guide”TVU Token feature overview.”
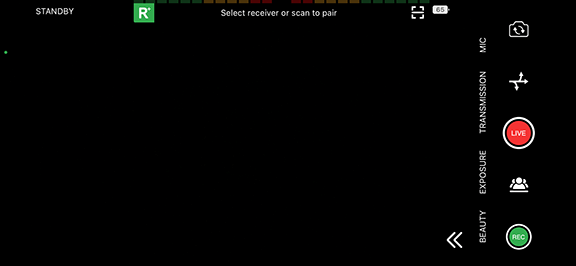
TVU Anywhere operational controls and functions
After launching the TVU Anywhere app, the interface will display the following operational controls and functions.
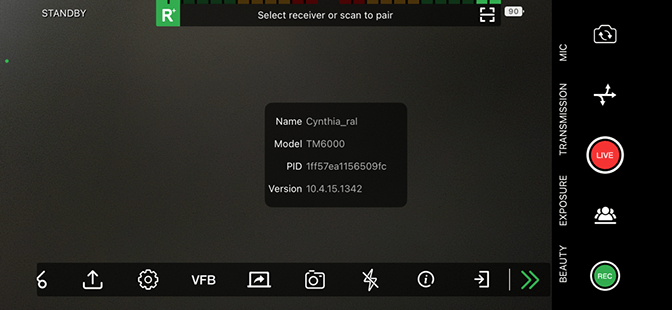
Select icon – Press the Select icon next to the battery indicator to open the Scan window and pair your device with a receiver.
Folding menu (double arrows) – Press the double arrows “>>” folding menu to open the feature menu icons.
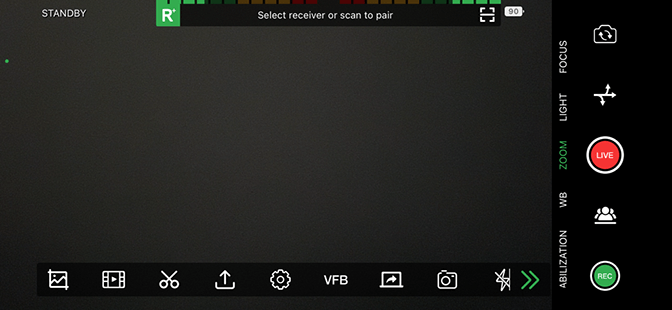
The feature icon selections are described as follows from left to right:
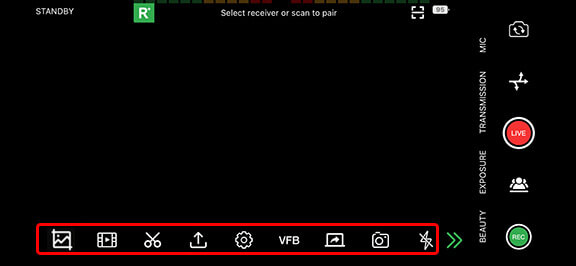
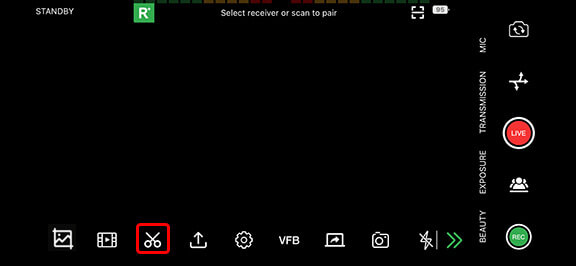
Crop icon – Tap the Crop icon to select part of the video image.
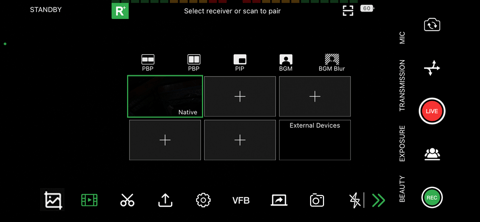
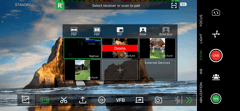
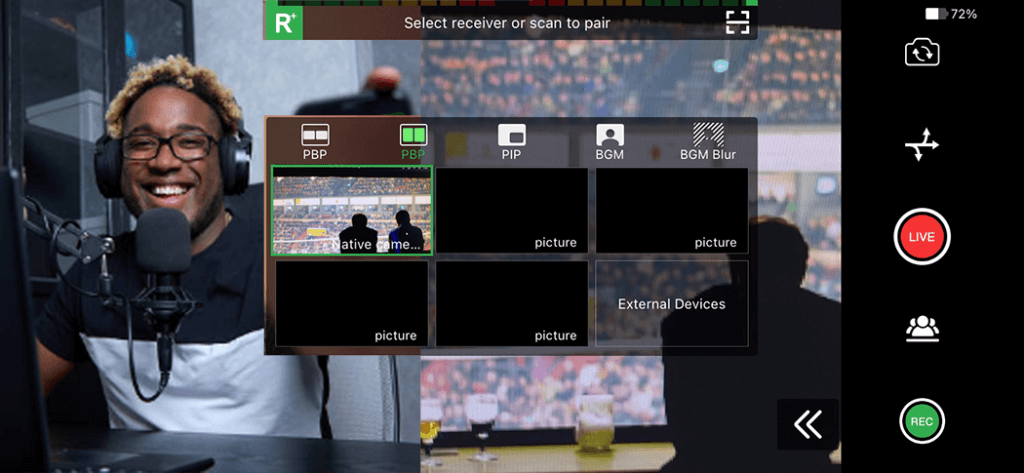
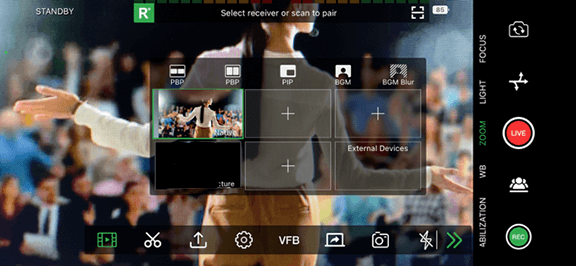
Filmstrip icon – Tap the filmstrip icon to open the alternate source menu.
The Filmstrip source selections include Native camera captures, pictures, and external device pairing. Features include PIP, PBP, BGM, and BGM Blur:
- Picture-in-Picture (PIP) icon – The PIP icon allows the user to transmit an overlay on top of their transmission.
- Picture-by-Picture (PBP) icon – The PIP icon allows users to transmit two pictures side-by-side.
- Background manager icon (BGM) – The BGM icon displays a subject with a full background.
- Background manager icon (BGM Blur) – The BGM icon displays a subject with a blurred background.
Create Video Clip icon – Press the Clip icon to create and edit a video clip from recorded videos and photos.
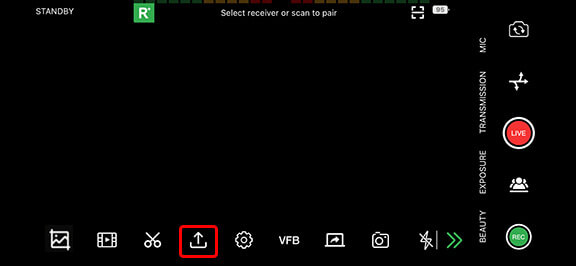
Upload icon – The Upload icon allows users to upload their video clips or pictures to a receiver.
Setting icon – Tap the Setting icon to open the Advanced menu operations such as Video, Audio, Record, MISC, About, and external device configuration and enablement options.
VFB icon – The VFB icon allows the user to initiate a return video feedback from a local SDI or Live source.
Screen Broadcast icon – Use the Screen Broadcast function to record everything on your screen, including notifications. Enable the Do Not Disturb function to prevent unexpected notifications.
Snapshot icon: The camera icon to add a native camera capture to your source menu. This feature allows you to capture an image in Live or Standby mode.
The right panel operational controls and features are described from bottom to top.

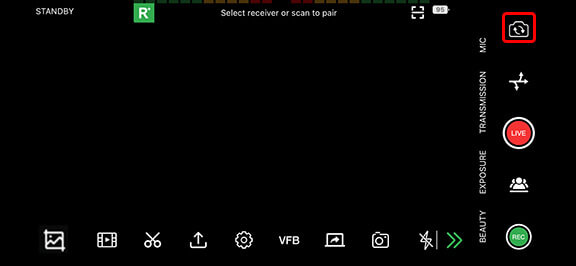
Record button – The Record video function records in Live or Standby mode.
Partyline icon – Press the Partyline icon to join or create a Party.
Live button – Press the Stop Icon to Start and Stop the Live video function.
Stream button – Use the Stream button to stream live.
Front and rear facing camera icon – Press this icon to switch between front and rear camera perspectives.
Stabilization – The stabilization feature allows users to capture video in standard, aggressive, or extreme environments.
White balance (WB) – The WB feature allows a user to adjust the white balance of their video.
Zoom – The Zoom feature allows a user to zoom into an image.
Light – The Light feature allows a user to adjust the screen brightness in order to save power.
Focus – To focus on a specific area of the screen, tap the area, and the camera will refocus in that area of the image.
Beauty icon – Adjusts the lighting of an object. This feature also enhances a person’s image by reducing facial imperfections.
Exposure – The Exposure feature allows a user to adjust the video exposure setting.
Transmission – The Transmission feature allows users to adjust the delay and bitrate when live.
Microphone – Select the desired mic ( embedded mic, earphone mic, or Bluetooth mic).
New functions
The latest functions include:
- Partyline (MacOS): displays a web-side participants list when screen share is highlighted. Supports Partyline stereo capture and playback.
- Partyline (Android/iOS): Supports remote control speaker, recording in CBR mode, and Timelock with Command Center, and displays party name on top of the Party ID when joining a meeting.
- Picture-in-Picture (PIP) with a preloaded picture as background.
- Picture-in-Picture (PIP) with the back camera as background.
- Two Picture-by-Picture PBP functions.
- Two Background Manager options (BGM and BGM Blur.)
- Support for DJI Drone (iOS based on DJI SDK v4.16.2) and DJI Drone (Android, based on DJI SDK v5.14.0).
- Support for Center Stage with the new M1 iPad Pro.
- Support for Accsoon M1 as an external video capture device for Android smartphones.
- Support for Accsoon SeeMo/SeeMo Pro/SeeMo 4kp30 as external video capture devices (iOS/iPadOS only).
- Streaming directly to social media platforms and other CDNs.
- Using the TVU One as a streaming source.
- The option to rename local files when uploading.
Choose your registered receiver
Complete the following steps to choose a registered receiver:
- Launch the TVU Anywhere app.
- Press the Select receiver or scan to pair drop-down menu.
- Select the paired receiver from the list.
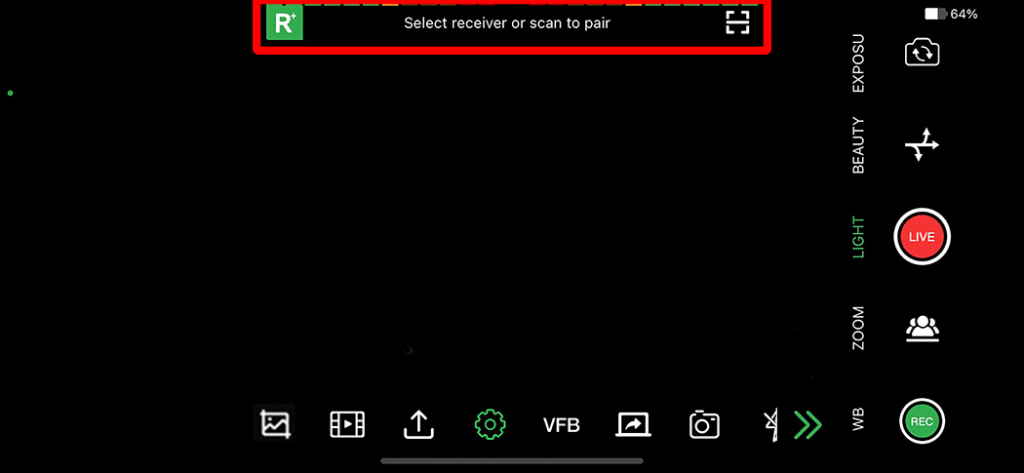
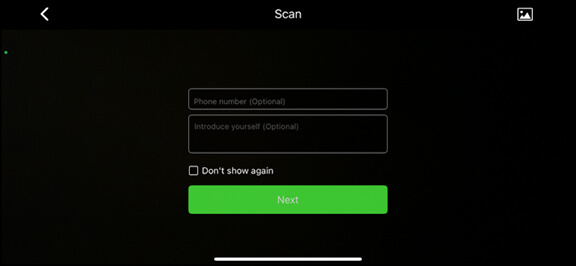
- If you did not select a receiver from the drop-down list, the Scan screen will automatically display.
- Enter any “optional” information and press Next.
- A second Scan screen will display. Continue with “Token pairing.”
Token pairing
To Scan or Enter a Token code to pair your smartphone with a receiver:
- To Enter a Token code, press the “123” icon.

- Enter your Token code and press Apply.
- To manually scan a Token code, press the Scan icon and allow the smartphone to scan the Token QR code.
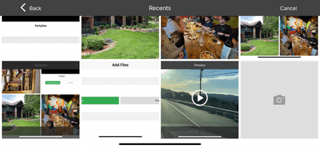
Selecting and playing recorded video into the stream
Below the menu bar is a grid of 6 boxes. Each box is a placeholder for a selected photo or video which can be added to the live stream.
To add a video for live playout:
- Press the double arrows to open the feature bar.
- Press the Filmstrip icon.
- Press the Plus (+) icon and select Video from the menu.
The saved video menu opens.
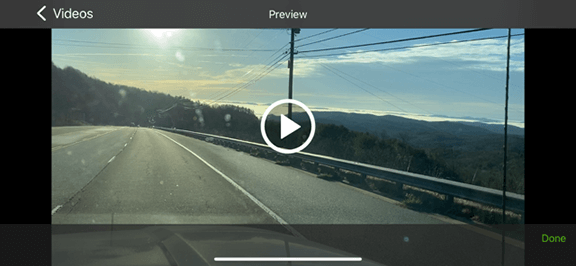
- Make your selection and press Done or the Back button to make another selection.

- To Play a video, tap the video thumbnail once, and it will play into the live stream. At the end of the clip, it will return to the camera feed.
Note: Playing a video will cancel the PIP or PBP setting and the stream will return to the last used primary camera.
- To delete a preselected video, press and hold one of the boxes that contain a video thumbnail. A red delete bar will appear.
Standby status indicator
After you have selected your receiver, the status indicator in the top left corner of the screen displays “STANDBY” until you go live with the receiver.

Going Live with a receiver
To take your video live with a receiver, press the red Live button.

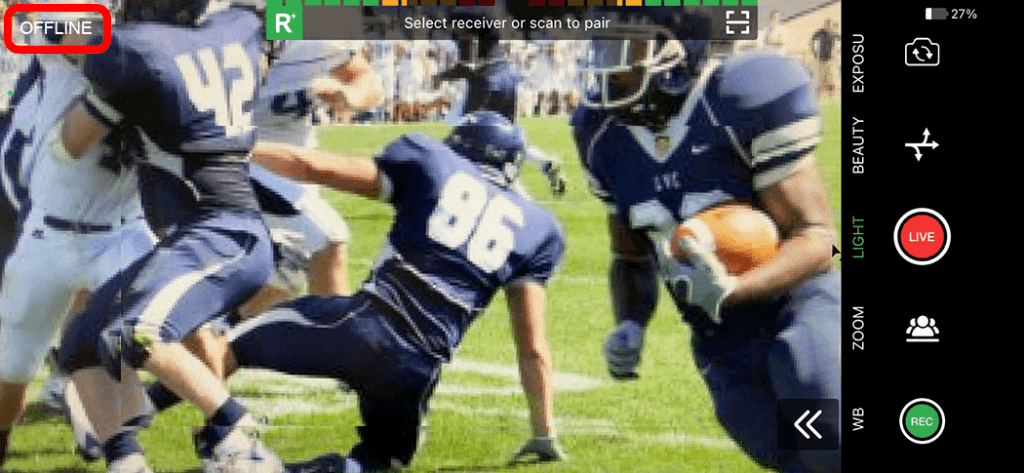
Live and Offline status indicators
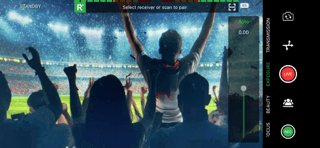
When you go live with the receiver, the status indicator changes to “LIVE” and displays the receiver you are transmitting to. In addition, the live streaming time and the transmission rate displays at the top-left of the screen. If the status indicator reads OFFLINE, TVU Anywhere is not paired with a TVU receiver, or the TVU receiver is not powered on, and you cannot transmit live video.
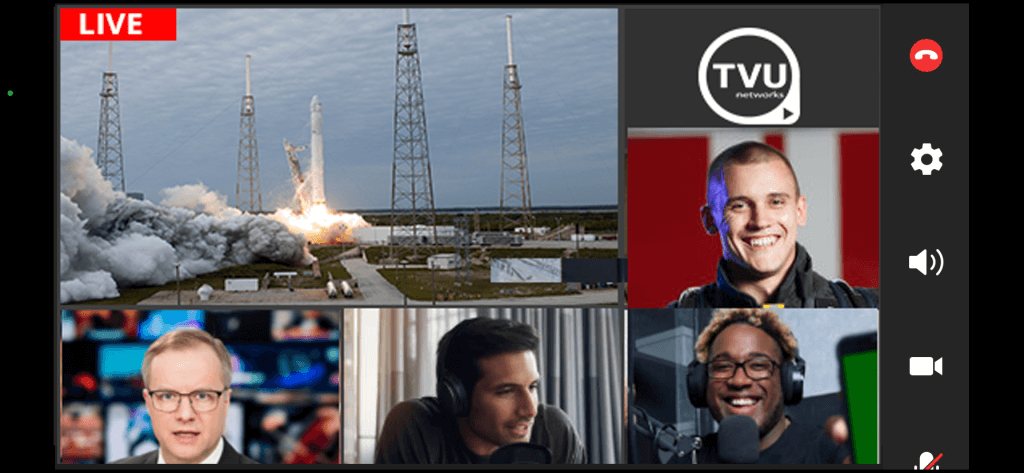
The “LIVE” status indicator displays in the top left corner of the app when the Live transmission begins, as shown in the following graphic.

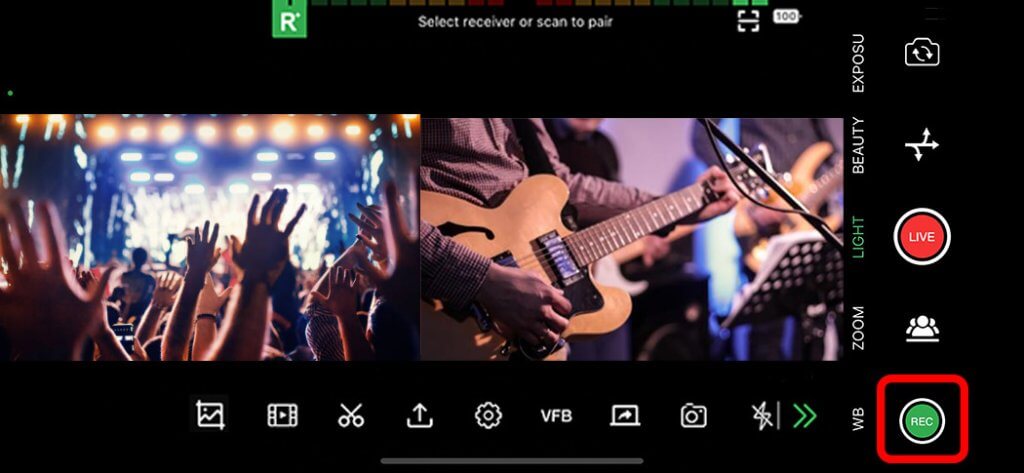
Record button
The Record video function can record in Live or Standby mode.
To record in live or Standby mode, complete the following steps:
- Press the green Rec button.
When you are recording, the Rec button turns to a green square, and a counter starts at the top left of the screen.
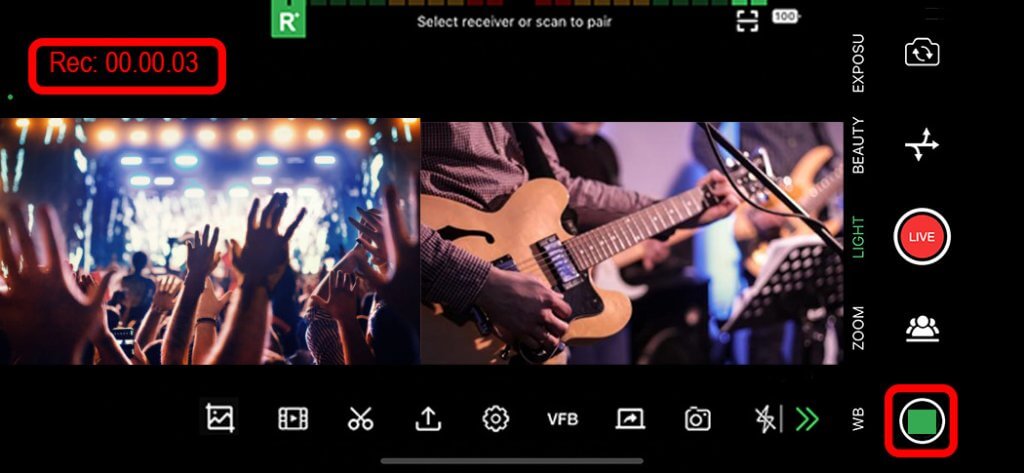
- To stop the recording, press the green square. Your recording is saved to your smart device.
Reverse facing camera feature
This feature allows a user to switch between front and rear camera perspectives.
To use the reverse-facing camera feature, complete the following steps:
- Press the reverse camera icon.
- Press the reverse camera icon again to return your camera to front-facing mode.
Stream feature
Note: The Stream feature is a paid feature and is available to users that sign in using their active TVU Producer account.
The Stream feature allows users to:
- Live stream an entire live Partyline video to Social Media platforms and other CDNs.
- Use TVU Anywhere as a streaming source.
To stream live video, complete the following steps:
- Press the Stream icon.
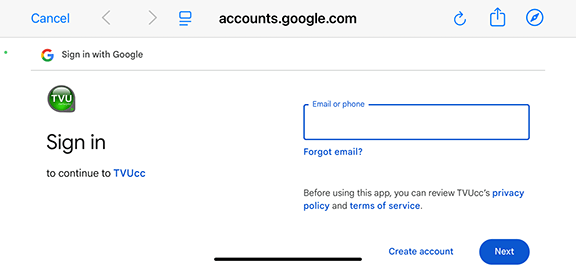
- Sign in using your TVU credentials.
- Follow the prompts to stream live.
Partyline capability feature
The Producer Partyline capability feature integrates with TVU Anywhere App version 9.0.42 and above. Partyline provides video conferencing capabilities between multiple or remote participants in a live production.
A production initiator sends the TVU Anywhere app user a web link in the field to pair their device to the Partyline session. The Participants can see a return feed on the main screen indicating what is being broadcast.
Partyline Support:
- Join a party using a Party ID or create a party and live
- stream the entire party video to Social Media platforms
- and other CDNs.
- Join a party by inputting the party ID.
- Active TVU Voice (VoIP) with Partyline when the app is
- running in the background.
- Prompt allows users to re-enter a Partyline session if
- exited unintentionally.
- Global control and Audio matrix.
- Stereo capture and playback.
The Partyline feature allows users to join or create a Partyline session.
Create a Party
To start a party:
- Press the Partyline icon.
- Press the Create New Party button and log in to Partyline with your user credentials.
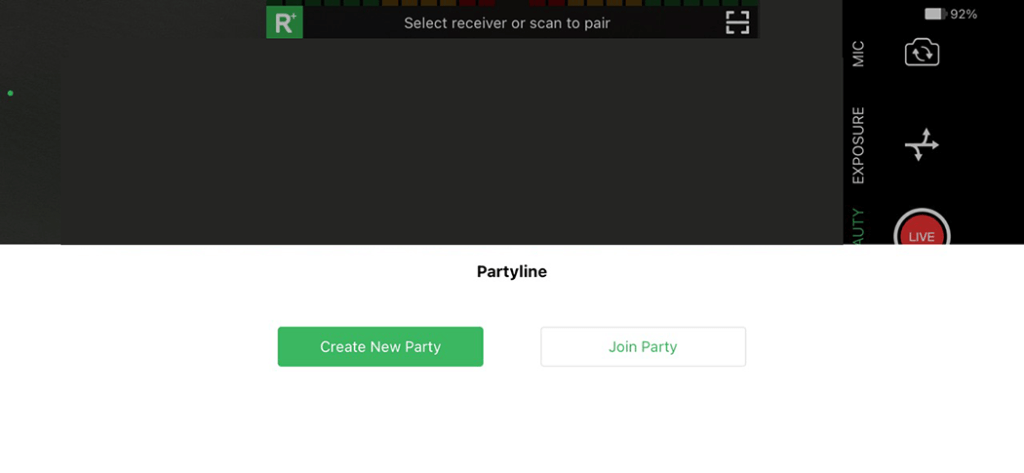
- Press the Invite link to copy the code. Send participants the code to join.
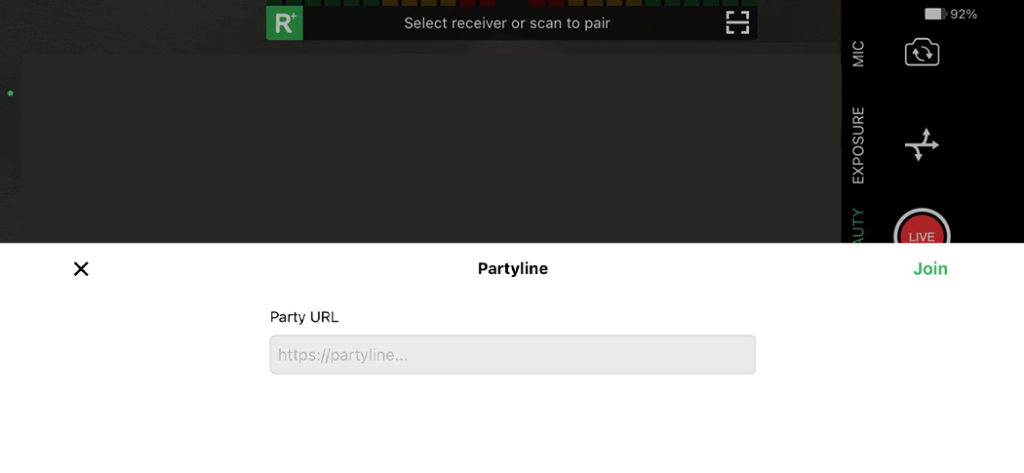
Join a Party
To join a Party:
- Open the TVU Anywhere app and press the Partyline icon.
- Copy and paste the Partyline URL sent by the host and press Join.
TVU Anywhere Partyline session example.
Adding overlay sources
The Add overlay sources icon allows users to add up to six sources. User’s can add URL, HTML streams, and the phone’s GPS information.
To add overlay sources:
- Tap the overlay source icon.
- Tap the Plus “+” in one of the six preview blocks.
- Choose a URL, HTML format or GPS from the menu.
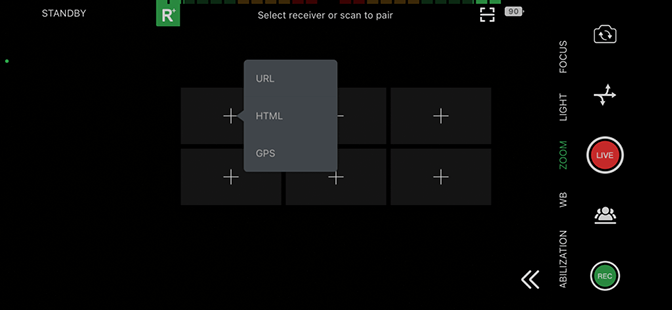
- Configure your selected source in the pop-up screen using one of the following URL Source, HTML source, or GPS information methods.
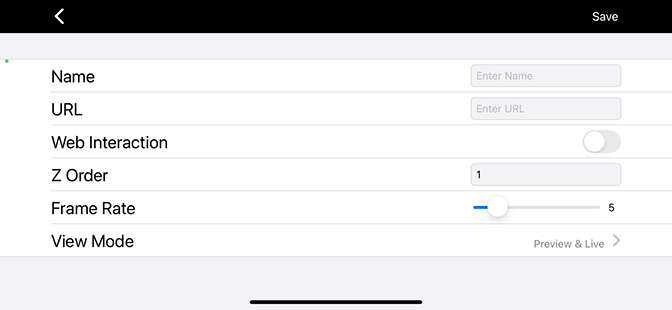
URL source
To configure a URL source:
- Enter a Name.
- Enter the URL.
- Enable Web interaction.
- Enter a Z order.
- Adjust the Frame Rate.
- Tap the View Mode “>” to select Preview or Preview and Live.
- Tap Save in the top banner.
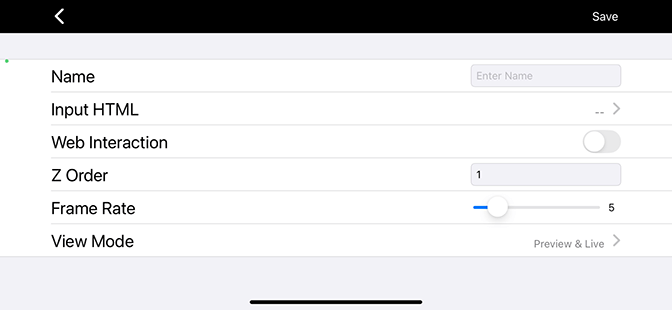
HTML source
To configure a HTML source:
- Enter a Name.
- Tap the “>” to enter or paste the Input HTML source code
- Enable Web interaction.
- Enter a Z order.
- Adjust the Frame Rate.
- Tap the View Mode “>” to select Preview or Preview and Live.
- Tap Save in the top banner.
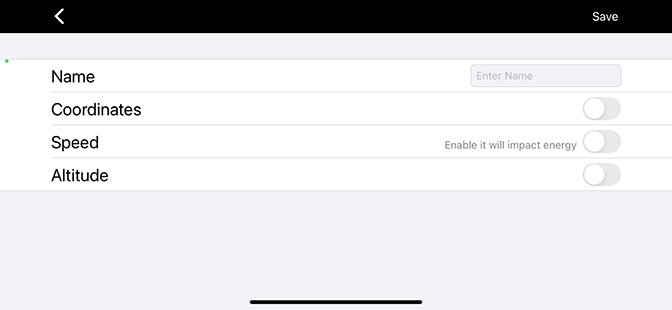
GPS information
To configure the phone’s GPS information:
- Enter a Name.
- Enable the Coordinates.
- Enable the Speed (This will impact the devices’ energy).
- Enable the Altitude.
- Tap Save in the top banner.
Using the dual-camera feature
The TVU Anywhere Dual camera feature is enabled when using the Picture-by-Picture (PBP) or Picture-in-Picture (PIP), and two Background manager (BGM) modes. These modes allow simultaneous use of the front and rear-facing cameras.
- Picture-in-Picture (PIP) with a preloaded picture as background.
- Picture-in-Picture (PIP) with the back camera as background.
- Two Picture-by-Picture PBP functions.
- Two Background Manager options (BGM and BGM Blur.)
Dual Camera is supported on the following Apple devices: iPhone XS, XR, XS Max, 11, 11 Pro, 11 Pro Max, ,13, 14/14 Plus/14 Pro/14 Pro Max, 15, 15 Pro, 15 Pro Max. 16, 16 Plus, 16 Pro, 16 Pro Max, and iPad Pro 3rd, 4th, 5th, and 6th generations and M4.
To use this feature, complete the following steps:
- Press the double arrows to open the feature bar.
- Press the Filmstrip icon to open the menu.
- Place your iPhone in a position to capture the front and rear-facing images.
- Press the PBP icon for side-by-side Picture-by-Picture, or the PIP icon to overlay video from the front camera onto the back camera video.
Note: The PBP or PIP icons display green when active.

- Press the BGM (Blur) icon to blur the background image.
- Click away from the menu to return to the main screen.
- To move the placement of the PIP image, press and hold the PIP video and drag it to a new position.
Create Video Clip feature
The Create Video Clip feature allows users to select and edit local photos and videos to stream live.
- Press the Create Video Clip icon.
- The Create Video Clip window will display.

- Press the Plus icon to select local photos or video. You will be prompted to allow access to your photo library. In settings, select an access level.
- Press Edit selected photos, then press Show selected.
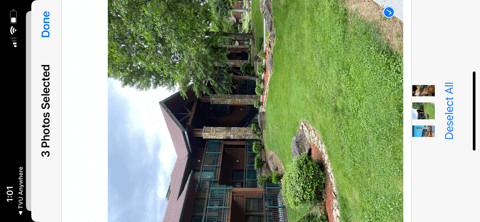
- Press Done.
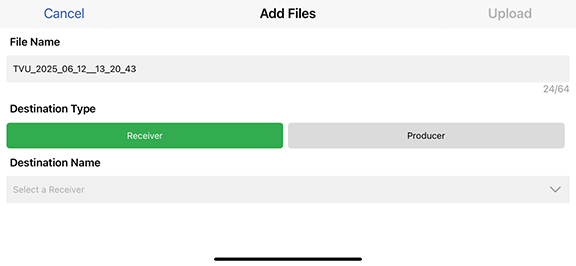
Upload feature
You can upload your recorded videos and pictures to a receiver using the Upload feature.
To upload your content to a receiver, complete the following steps:
- Press the Upload icon to open the menu.
- The Upload screen opens. Press the Plus (+) icon and select Album to upload your video clips or pictures to the paired receiver.
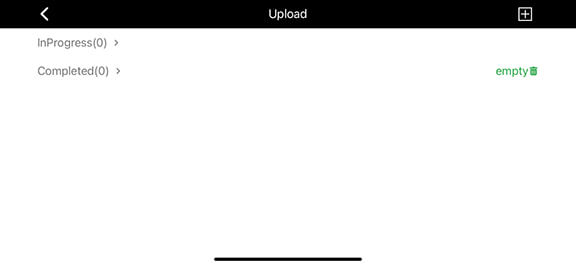
- Make your selection.
- In the Preview window, press the Done.
- Select a Destination Type. To rename your file, press the File Name field.
- To upload your video clips or pictures to the paired receiver, press Upload.
Advanced features
The Setting icon opens the Settings menu, where you can access Video, Audio, Record, MISC, About, and external device configuration and enablement options.
Refer to “Advanced settings” for Advanced feature use and controls.
- Tap the Setting icon to open the Setting menu.
- The Setting menu will be displayed.
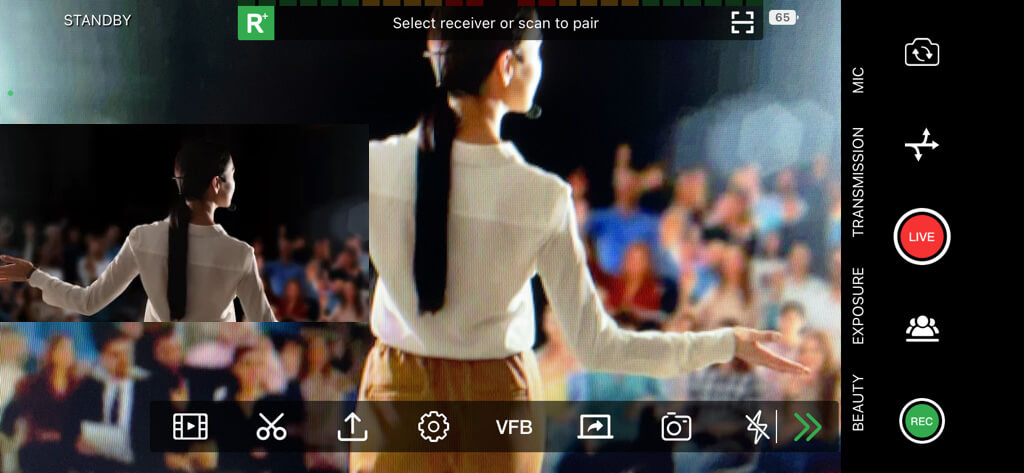
Return Video Feedback (VFB)
The VFB icon allows the users to initiate a return video feedback from a local SDI or Live source. The VFB feature allows the option to hide the local video preview when VFB takes the full screen.
To use this feature, complete the following steps:
- Press the VFB icon to open the menu.
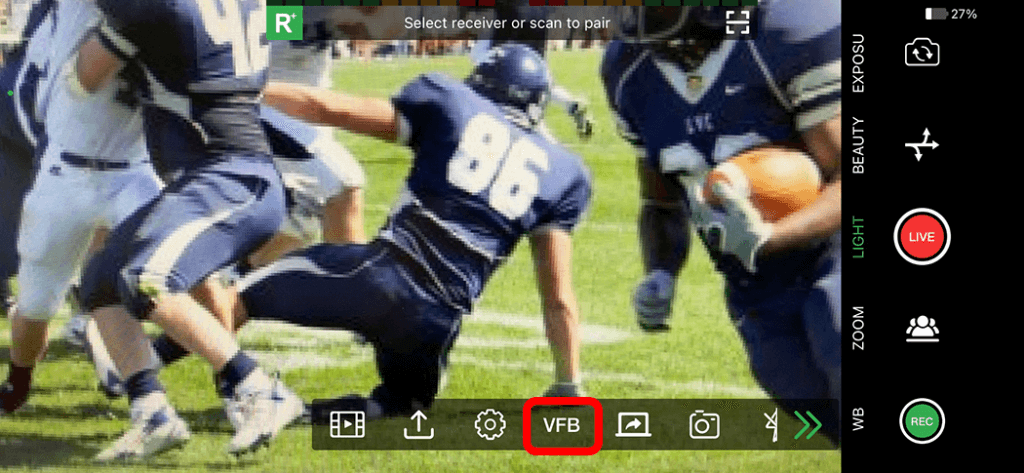
- Select the desired output and source from the pop-up menu, then press Start.
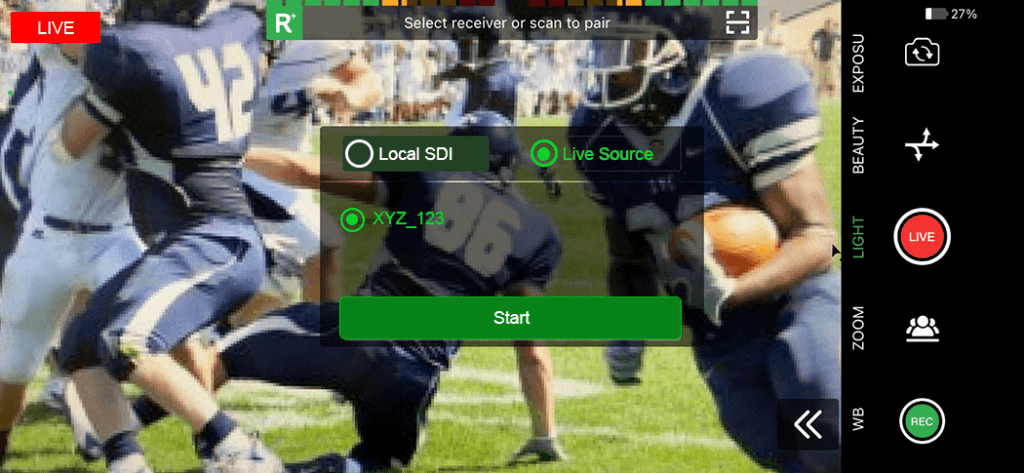
- Press the VFB icon in the function bar to stop the live transmission, then press the red Stop icon.
Screen Broadcast feature
Use the Screen Broadcast function to record everything on your screen, including notifications.
Note: To prevent unexpected notifications during the screen broadcast, enable the “Do Not Disturb” function in the TVU Anywhere Control Center interface.

To use the Screen Broadcast feature:
- Press the Screen Broadcast icon.
- Press Start Broadcast.
Snapshot feature
Use the camera icon to add a native camera capture to your source menu. This feature allows you to capture an image in Live or Standby mode.
To use the Snapshot feature:
- Press the Snapshot icon.
- The snapshot preview temporarily displays. Press the Snapshot icon again to replace the image if needed.
- Press the Filmstrip icon. Your image is displayed in the Native Camera source window.
Flash feature
The flash feature turns on the flash for extra lighting when needed.
To use the flash feature:
- To turn on the flash, press the flash icon.
- To turn the flash function off, press the flash icon again.
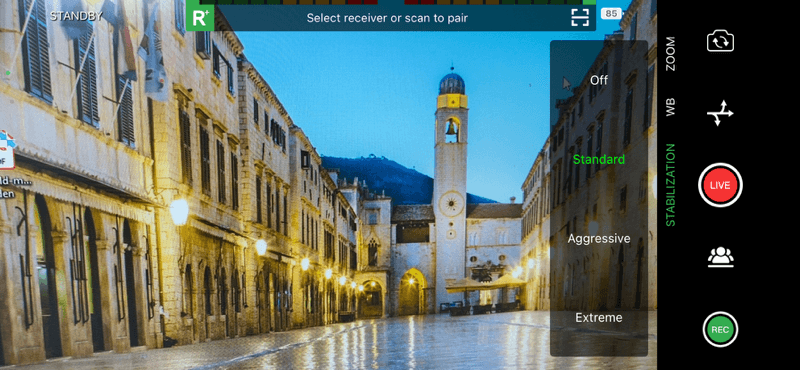
Stabilization feature
The Stabilization feature allows users to record video in standard mode or in aggressive or extreme environments.
To use the Stabilization feature:
- Press Stabilization in the vertical sidebar.
- Select your appropriate option.
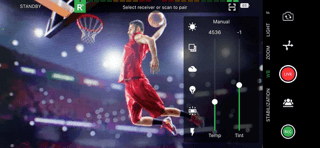
White balance (WB) feature
The WB feature allows a user to adjust the white balance of an image automatically or manually. Auto is the default setting. To switch to the Manual setting, tap Auto.
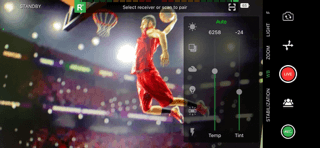
To manually adjust the WB:
- Press WB in the vertical sidebar.
- Use the adjustment bars to correct the white balance.
- To reset the white balance, press Reset.
Zoom feature
The Zoom feature allows a user to zoom into an image.
To use the Zoom feature:
- Press Zoom in the vertical sidebar.
- Use the adjustment bar to magnify your image.
- To reset the magnification, press Reset.

Light (Brightness) feature
The Light feature allows a user to adjust the brightness of the overall image.
To adjust the brightness:
- Press Light in the vertical sidebar.
- Use the adjustment bars to adjust the brightness.
- To reset the brightness, press Reset.
Focus feature
To focus on a specific area of the screen, tap the area, and the camera will refocus in that area of the image.
To use the Focus feature:
- Press Focus in the vertical sidebar. This feature is set to Auto by default.
- Tap the area on the screen that you want the camera to focus on.

- Press Auto to change to the Manual mode. This mode will allow you to adjust the focus manually.
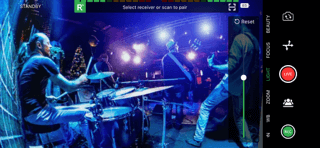
Beauty feature
The Beauty feature adjusts and applies a softened filter to the subject. This feature also enhances a person’s image by reducing facial imperfections.
The Beauty feature applies to 720P, 480P and 1080P30 settings.
To use the Beauty feature:
- Press Beauty in the vertical sidebar.
- To adjust the enhancement level, move the bar up to enhance the subject.

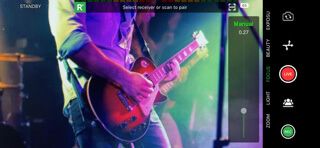
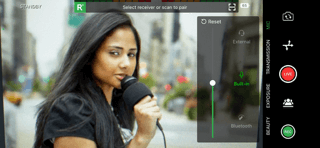
Exposure feature
The Exposure feature allows a user to adjust the exposure setting for the content. This feature is set to Auto by default.
To adjust the exposure:
- Press Exposure in the vertical sidebar.
- Tap Auto to display the Manual setting. Use the adjustment bar to adjust the exposure setting.
- To reset the exposure setting, press Reset.
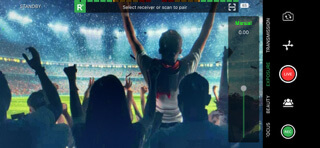
Transmission feature
The Trannsmission feature allows users to adjust the bitrate and delay during a live transmission.
To use the Transmission feature:
- When the transmission is Live, press Transmission in the vertical sidebar. The setting bar displays.

- Adjust the Delay and Bitrate sliders.
- Tap Reset to return to the original settings.
MIC feature
The MIC feature allows for the manual selection of the source microphone.
To use the MIC feature:
- Press MIC in the vertical sidebar. The MIC setting bar displays.
- Select the MIC type, Exterior, Built-in, or Bluetooth.
Advanced settings
This section explains TVU Anywhere advanced features in the Setting menu and how to use them.
Advanced features
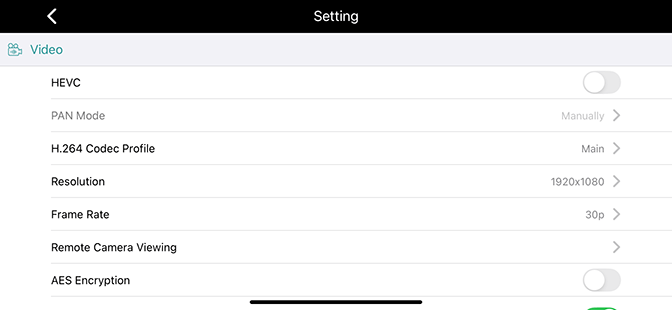
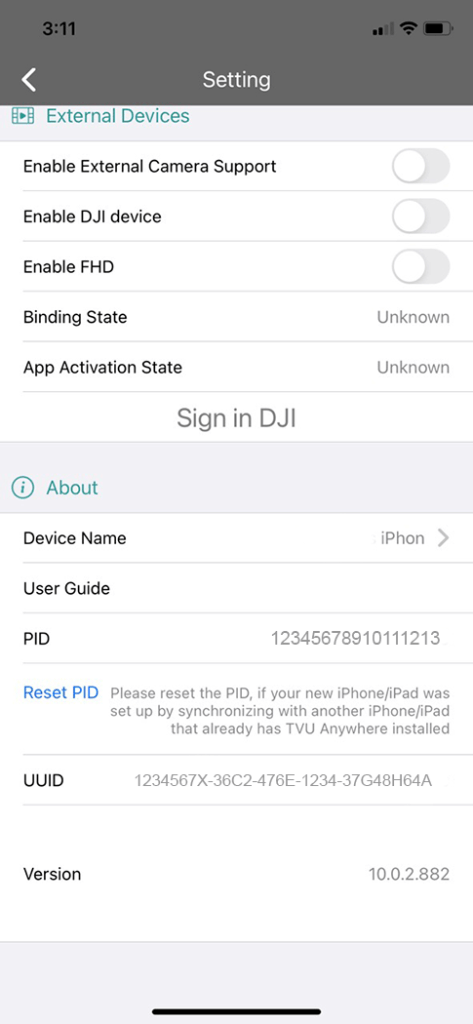
Settings information about your device, video, audio, recording, NTP, IS+, external devices, and DJI can be accessed from the Setting menu.
It is recommended that you review your settings and enable the features you would like to use by moving the slider to the right until it turns green.
To access the Setting menu:
- Press the Setting icon in the feature bar.
To set the resolution and frame rate for your transmission:
- In the Video panel, set the Resolution and Frame Rate that is optimal for the transmission.
- Enable or disable any other video related features for the transmission.
- Swipe the menu upward to access the Audio, Record, and MISC settings.
- To use the Partyline feature, enable the appropriate mic features in the Audio panel.
- This audio option allows users to use audio capturing for live transmission to a receiver. It can capture only the phone camera, and also mix the IFB (TVU Voice) audio in the capture, or audio that comes from Partyline if Partyline is enabled.
- In the Record panel enable the appropriate features.
- When enabling metadata, it adds metadata information to the recorded videos. It can be helpful for TVU Search or other purposes that require identifying what the video is about.
- In the MISC panel, enable the appropriate features.
- The Theme setting is automatically set to the theme you have chosen. To change Themes, disable the default setting and follow the prompts.
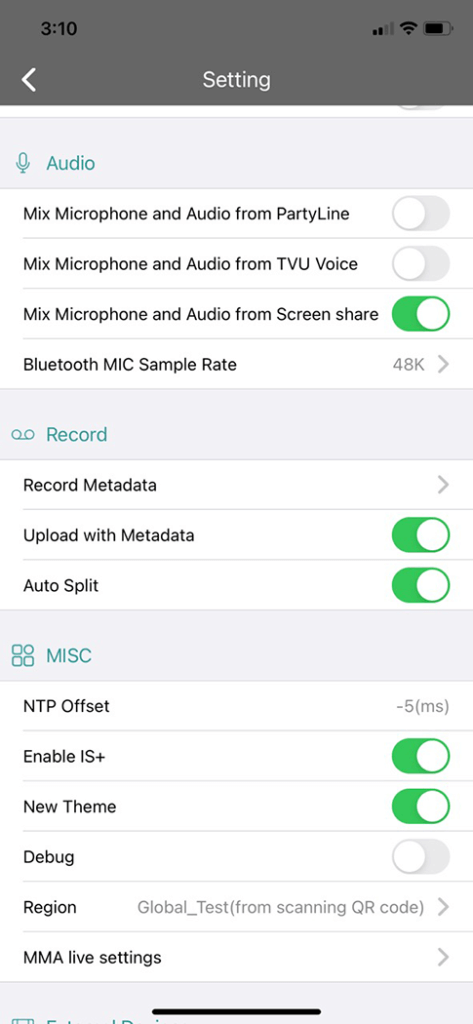
- In the Extrnal Devices panel, enable the appropriate settings. Refer to the specific External device procedures for setting up your device.
- The About panel provides your device, PID, and UUID information. tap the User Guide link to display an overview of the DJI and professional camera support you can use with TVU Anywhere.
Creating a hotspot connection to a TVU Pack
Complete the following steps to create a hotspot connection to a TVU Pack using the TVU Anywhere app:
- Launch the TVU Anywhere app.
- Tap the TVU One screen and swipe to the left until you see the QR Code screen.
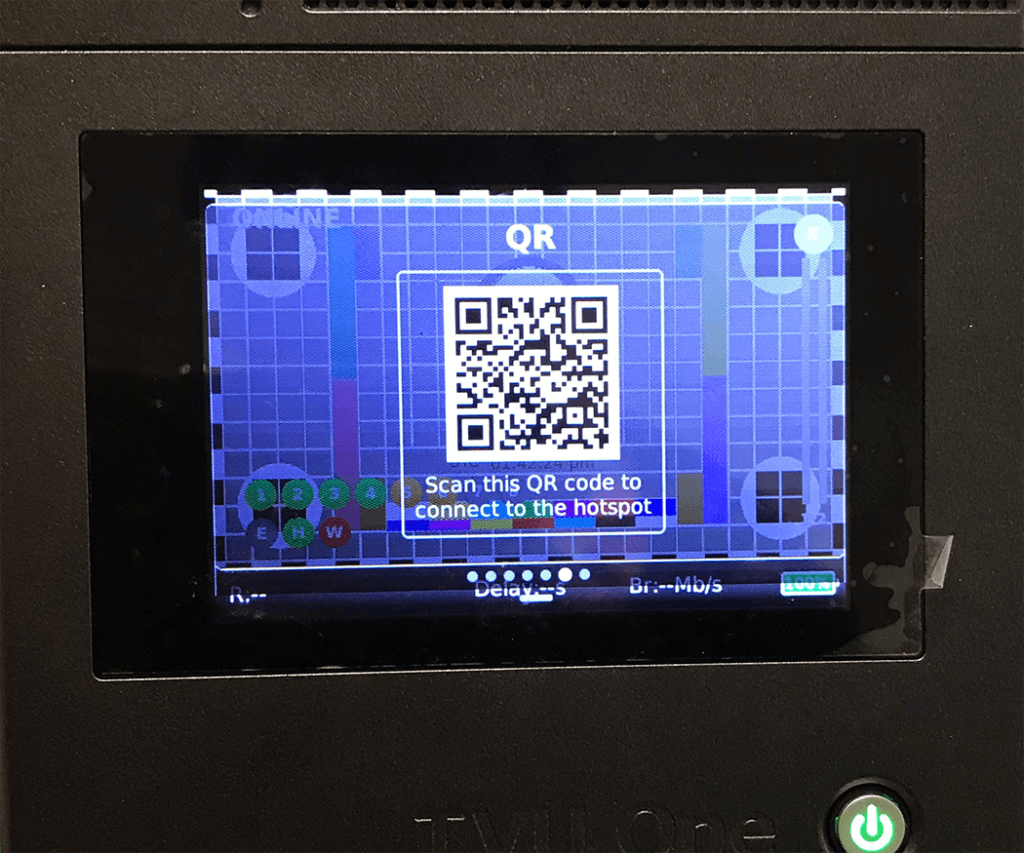
- Press the Scan icon in the TVU Anywhere app. Orient the QR code inside the app’s crop marks and press the Scan icon again.
Apple Center Stage integration
This feature allows operator-less Live Video Production with Apple Center Stage.
Users can Live stream from their iPad Pro using the built-in hardware and bring quality to a mobile broadcast or live video production.
TVU Anywhere broadcasting app enhances iPad live streams with integrated AI-based technology that automatically recognizes and tracks the subject as he or she moves.
The Apple Center Stage feature for the iPad Pro with M1 chip, integrated within TVU Anywhere via API, frees on-screen subjects from the constraints of remaining in a fixed position, greatly improving the professionalism of a single-person live video production.
The technology also reacts if an additional subject enters the shot (such as an interviewee) by automatically zooming out to capture the additional subjects and zooming back in again when the interview is completed. No external controls are required to operate Center Stage in TVU Anywhere.
TVU Anywhere DJI integration
This section describes additional TVU Anywhere applications, including:
- Enabling TVU Anywhere for use with DJI drones.
- Using the TVU Token feature.
- Pairing the TVU Anywhere app with a registered receiver using the TVU One QR code menu
Enabling TVU Anywhere for use with supported DJI drones
TVU Anywhere app (version 6.2.4.291 or later) supports the transmission of videos from a DJI drone. This section introduces the methods for connection, disconnection, and registration. If you have any questions, contact TVU Support at +1.650.440.4812.
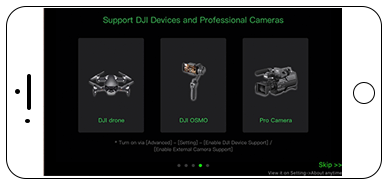
The new TVU Anywhere Theme provides an overview of the DJI Drone support.
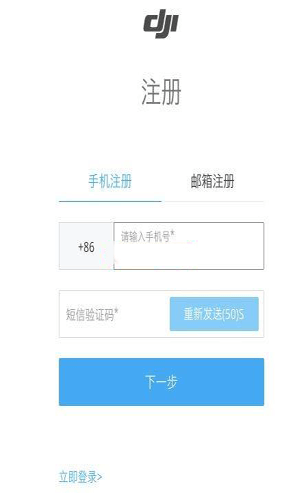
ATTENTION: DJI account registration is required when using a DJI drone in China.
DJI account registration and bound are required when using a DJI Drone in China. Failure to do so will result in the Drone’s video being unable to work with the TVU Anywhere app. You can go to the DJI official China website to register your DJI account using your phone number (do not use your e-mail address) as shown in the “DJI registration example (China).” The account information will be used when the device is active and will bind the DJI device to the TVU Anywhere app.
Supported DJI drone models and TVU Anywhere platforms
TVU Anywhere platforms:
- Hardware: iPhone 7 and above
- Software: iOS 10 and above
Supported DJI Drone (iOS based on DJI SDK 4.16.2):
- Mavic Pro
- Mavic Air 2
- Inspire1
Supported DJI Drone (Android, based on DJI SDK v5.14.0):
- DJI Mini 4 pro
- DJI Mini 3 Pro
- DJI Mini 3
Note: TVU Anywhere is not compatible with drone controller models that have an embedded display.
Using TVU Anywhere with a DJI drone
To use the TVU Anywhere app with the supported DJI drone, complete the following steps:
- Download and install the latest version of TVU Anywhere app to your phone.
- Turn on the DJI drone and drone controller.
Note: You may test the drone and controller with the DJI Go app.
- Connect the USB cable to the iPhone and drone controller. Then, launch the TVU Anywhere app.
- Enable the DJI device in the TVU Anywhere app.
Note: Video will automatically switch from the drone to the TVU Anywhere app once enabled. If the screen on the TVU Anywhere app does not display, make sure your DJI device is enabled in the TVU Anywhere app.
- If you are operating the DJI drone in China, verify that the DJI account is activated and bound. Click Sign in DJI and enter the account password for binding and activating, as shown below.
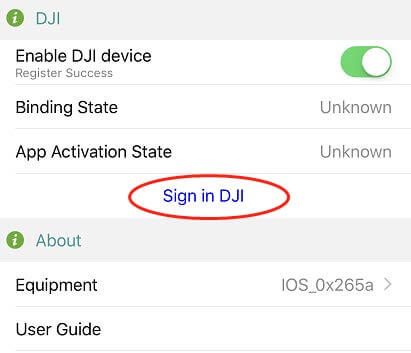
The Binding and application activation states will display as “Bound” and “Activated” if the operation succeeds, as shown below.

Using the Partyline capability feature
The Producer Partyline capability feature integrates with TVU Anywhere app version 9.0.42 and later. Partyline provides video conferencing capabilities between multiple participants or remote participants in a live production. By using the TVU Anywhere app, all participants (or talent personnel) can video conference with each other.
A production initiator sends the TVU Anywhere app user a web link in the field to pair their device to the Partyline session. The Participants can see a return feed on the main screen indicating what is being broadcast.
The Partyline capability feature uses Real Time Interactive Layer (RTIL) technology to provide video conferencing capabilities for remote live production. For more information, refer to the TVU Producer Partyline Quick Start User Guide.

Step 1 – Download and install the TVU Anywhere app onto your iOS smart mobile device
The TVU Anywhere app is available free of charge from the App store. To download and register the TVU Anywhere app, complete the following steps:
- From your mobile device, go to the App Store and enter TVU Anywhere Pro in the search field. Download and install the iOS TVU Anywhere Version 9.0.43 and later to your smartphone or laptop.
- Go to your Applications folder and launch the TVU Anywhere app.
- Press the double arrows to open the feature bar.
- Press the Information icon.
- Locate and write down your device PID displayed in the pop-up window.
- Contact TVU Support to complete your registration. You will need to provide the following information:
- The device PID
- The receiver(s) name and PID
- After the PID is successfully registered, you are now ready to begin streaming.
On Mac OS
Download and install the TVU Anywhere app version 9.0.0b111 or later to your Mac OS device.
Download and install the TVU Anywhere app onto your Android device
The TVU Anywhere app is available free of charge from the Google Play Store. To download and register the TVU Anywhere app, complete the following steps:
- From your mobile device, click the Google Play icon and enter TVU Anywhere in the search field. Then, download and install the TVU Anywhere app version 9.0.42 and later on your smartphone.
- Go to your Applications folder and launch the TVU Anywhere app. Note that the TVU Anywhere app icon will not denote “Pro.”
- Press the double arrows to open the feature bar.
- Press the Info icon.
- Locate and write down your device PID displayed in the pop-up window.
- Contact TVU Support to complete your registration. You will need to provide the following information:
- The device PID
- The receiver(s) name and PID
- After the PID is successfully registered, you are now ready to begin streaming.
Step 2 – Create or Participate in the party
The Partyline feature allows users to join or create a Partyline session.
Note: You will be prompted to sign in with your user credentials to create a new party. Anyone can join a party without signing in.
Create a Party
To create a new a party:
- Press the Partyline icon.
- Press the Create New Party button and log in to Partyline with your user credentials.
Participate using the TVU Anywhere app
The remote participant can now see this user interface on the TVU Anywhere app and can engage in a video conference with all other remote participants on the Partyline.
- Click the switch button To reverse the front and rear camera views on your cell phone.
- Click the camera ON to enable participants to see you. Click the camera OFF if you prefer not to be seen.
- Click the Microphone button to control the On and Off function of the microphone. When you click the Microphone button to Off, you are active and participants cannot hear you.
- Horizontally scroll the screen to view more participants.
- PIP mode – Click PGM or a participant’s source to enlarge their window. The enlarged picture and your picture displays in PIP mode. Click the screen again to exit PIP mode.
Appendix A – TVU Token feature overview
Pairing your device via the Token feature
Before TVU Anywhere can go Live, it must first be paired with one or more receiving devices. These pairings can be created on a self-service basis by utilizing the Token feature.
A Token comes in a numeric or QR code generated by your TVU system administrator and provided to you. Entering this Token code will automatically pair your device with the appropriate TVU output receivers.
Important information about device settings
When using the TVU Anywhere app, set your device to the “Do not disturb” mode.
Important: Setting your device to the “Do not disturb” mode while you are using TVU Anywhere will keep your TVU Anywhere app from closing in the event you receive an incoming call.
Accepting a Token using the TVU Anywhere app
To accept a Token using the TVU Anywhere app, complete the following steps:
- Obtain the Token code from your administrator.

- To Scan or manually enter the Token code, open your TVU Anywhere app. Then, click the Scan icon in the receiver bar.
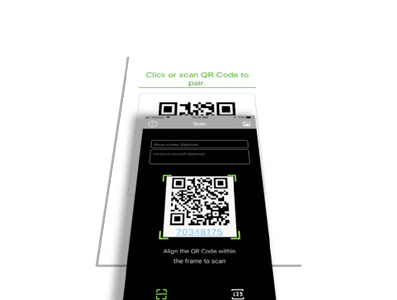
Note: There is a limit of 50 devices that can be used for each token QR code. You can accept the Token code using two methods. You may either scan a printed or displayed QR code, or enter the numeric token code manually. The manual method is highly recommended.
- The Scan window displays. Enter the phone number and introduction information in the fields at the top of the screen. This step is optional but highly recommended. Press Next.
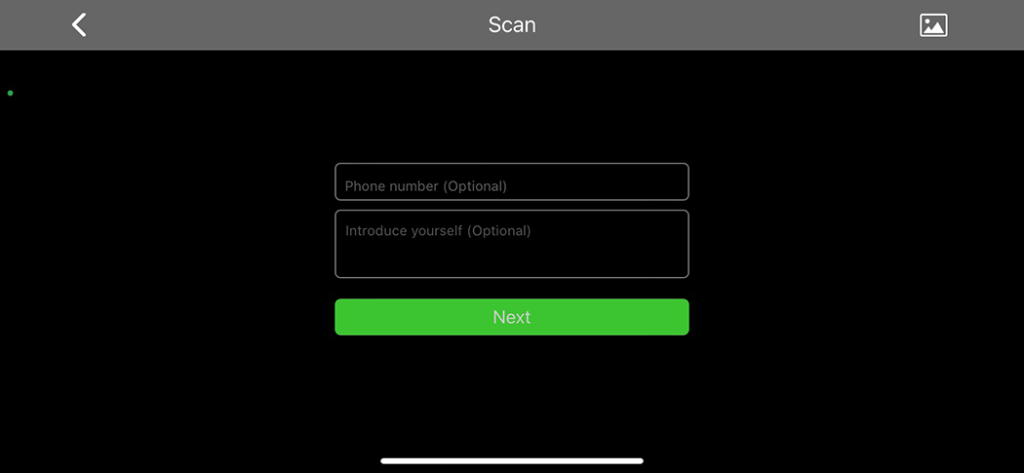
The scan window opens.
- Continue with “Scan the Token QR code” or “Manually enter the Token code.”
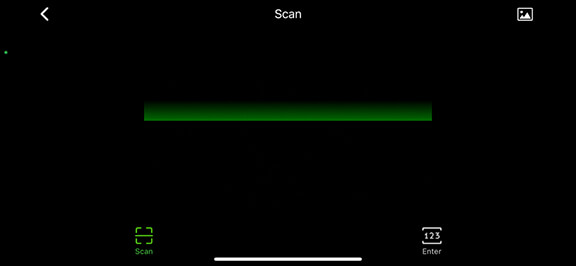
Scan the Token QR code
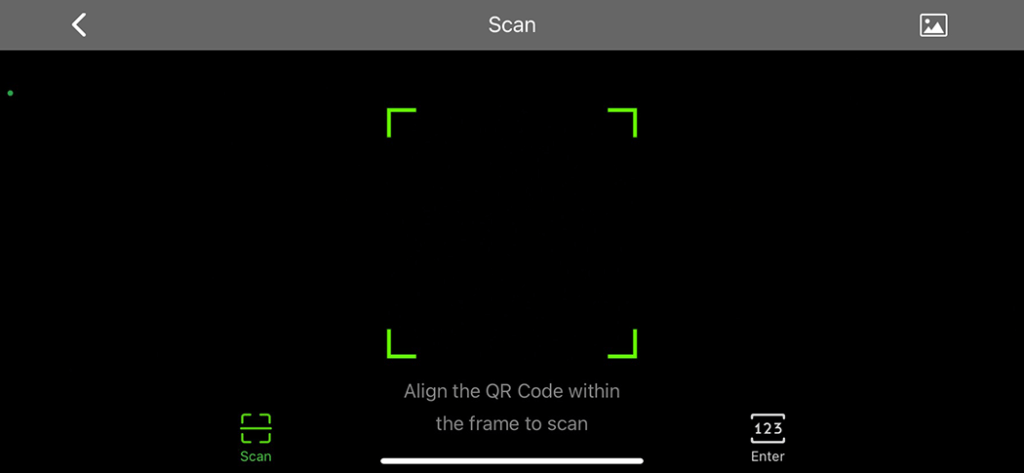
To scan your Token code, complete the following steps:
- Click the Scan icon in the function bar. Then, press the green Scan icon at the bottom of the Scan window.
- Align the Token QR code inside of the green frame. The app reads the QR code. A ‘Success’ pop-up displays.
- Your system administrator must approve your code before you can go Live.
- To go live, click the Live icon in the function bar. Press the red Live button in the right panel if you use the new theme.
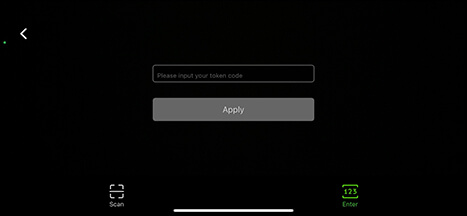
Manually enter the Token code
To manually enter the Token code, complete the following steps:
- Click the Scan icon in the function bar. Then, select the Enter 123 icon.
- Enter the phone number and introduction information in the fields at the top of the screen. This step is optional but highly recommended. Press Next.
- Enter the Token code in the license field and click Apply. A ‘Success’ pop-up displays.
- Your system administrator must approve your code before you can go Live.
- To go live, click the Live icon in the function bar. Press the red Live button in the right panel if you are using the new theme.
- The red Live indicator displays when live.
© Copyright 2026 TVU Networks Corporation. All rights reserved in all media.
Document Part Number: TVU Anywhere QSUG Rev G EN 04-2026