Contents
- Introduction, user experience, and behavior
- User Guide contents
- Features overview
- Quick Start Guide
- Step 1 – Sign up or register for a TVU Producer account
- Step 2 – Start your Producer session
- Basic Audio Mixer functionality
- Audio Control panel
- Advanced Audio Mixer functionality
- Advanced Audio Mixer interface
- Advanced Audio Mixer user experience behavior
- Purchasing TVU Producer
TVU Producer Advanced Audio Mixer User Guide
Easily capture and mix audio feeds in the cloud. Harmonize the sound like an orchestra conductor with the Advanced Audio Mixer. Adjust all audio input levels as well as the master output. Adjust pans (audio gain) for each channel. Mute each channel or select a solo monitor for fine-tuning.
Chapter 1 – Introduction, user experience, and behavior
To use the TVU Producer Audio Mixer requires a Producer subscription activation from TVU Support. Before you begin, refer to the TVU Producer System requirements below, then contact TVU Support to obtain your login credentials. TVU Networks recommends logging in to your TVU Producer account using your credentials and familiarizing yourself with the user interface, features, and functions.
TVU Producer Audio Mixer overview
The Audio Mixer is a dedicated interface embedded into the TVU Producer user interface. The Audio Mixer feature is built for audio operators to mix audio for the TVU Producer program separately from the video and graphics operations.
The Audio Mixer interface opens in a separate tab, allowing the individual operator to adjust the volume. The basic functions include adjusting each input source’s volume or fader level and mixing selected audio sources.
The Advanced Audio Mixer Panel allows a Producer user to manage all input levels and master output complemented with remote commentary in real-time. Advanced capabilities serve multiple collaborators or users working to produce a single live show. The operator primarily focuses on using all the advanced capabilities provided in the audio mixer.
System requirements (TVU Producer)
- A laptop with an i7 processor or above and 16 GB memory, and a minimum screen resolution of 1920 x 1080
- Internet bandwidth – 32 Mbps (download), 10 Mbps (upload)
- Windows 10 or later, Mac OS 10.0 or later
User Guide contents
This TVU Producer Audio Mixer Quick Start User Guide provides a general overview of each feature and instructions for setting up and using the TVU Producer Audio Mixer user interface.
This user guide provides details for the following topics:
- Setting up a TVU Producer account
- Logging in to TVU Producer
- TVU Producer Workbench Web interface overview
- TVU Producer Audio Mixer control panel introduction
- Basic and advanced Audio Mixer functionality
- Purchasing a TVU Producer
Features overview
TVU Producer’s Audio Mixer feature allows users to perform the following functions:
- Monitor each video and audio feed for production
- Adjust all audio input levels as well as the master output
- Adjust pans (audio gain) for each channel
- Mute each channel
- Assign channels for each group for simple management of multiple sources
Chapter 2 – Quick Start Guide
Step 1 – Sign up or register for a TVU Producer account
To sign up or register to use TVU Producer, complete the following steps:
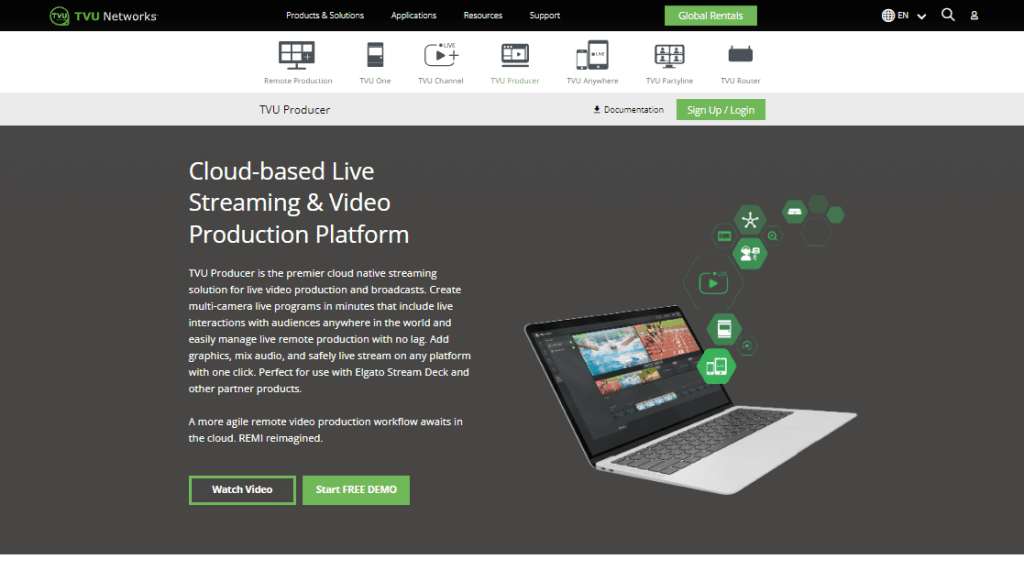
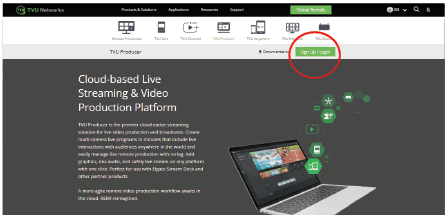
- Open a Web browser window and enter: tvunetworks.com/products/tvu-producer/
- Click Enter. The TVU Producer landing page displays.
- Scroll down the page and click the green Produce Now! 20 HOUR FREE TRIAL button. You may also click the green Sign Up/Login button at the top of the landing page.
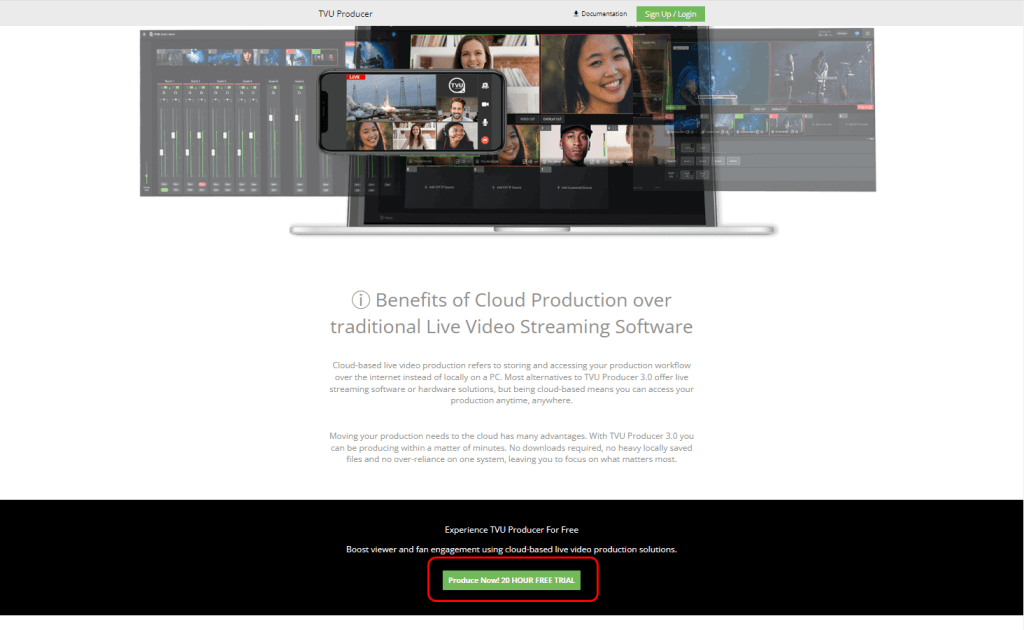
Note: The Free trial includes 20 hours of usage, including streaming. There is no credit card required and access is valid for 30 days. To purchase a TVU Producer, go to “Purchasing TVU Producer” for more information.
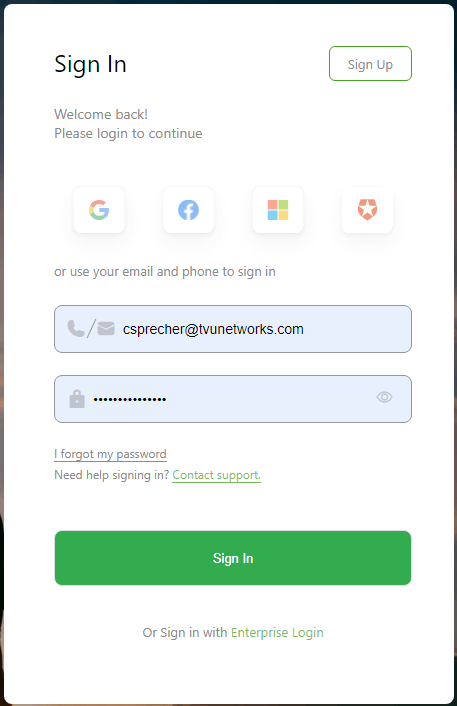
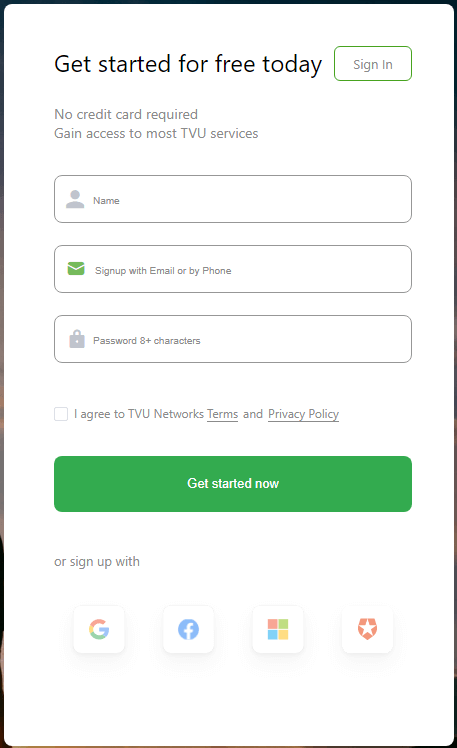
- The Sign in page displays. Click Sign Up to create an account.
- Enter your Name, choose to sign up using your email address or by phone, and enter a password. When finished, click Get started now.
- Check your e-mail to confirm your e-mail address.
Step 2 – Start your Producer session
To start the Producer session, complete the following steps:
- To launch Producer, open a web browser window and enter: producer.tvunetworks.com/producer/
- Click the green Sign up/Login button in the page’s top right corner.
The Producer Sign in pop-up window displays.
- To Log in to the TVU Producer Web user interface, enter the following information:
User ID: email address
Password: Password provided by TVU Networks Support
- Click Sign In. Then, the Producer Workbench user interface displays.
Creating a program
To create a program, complete the following steps:
- In the Workbench tab, click + Create a Program.
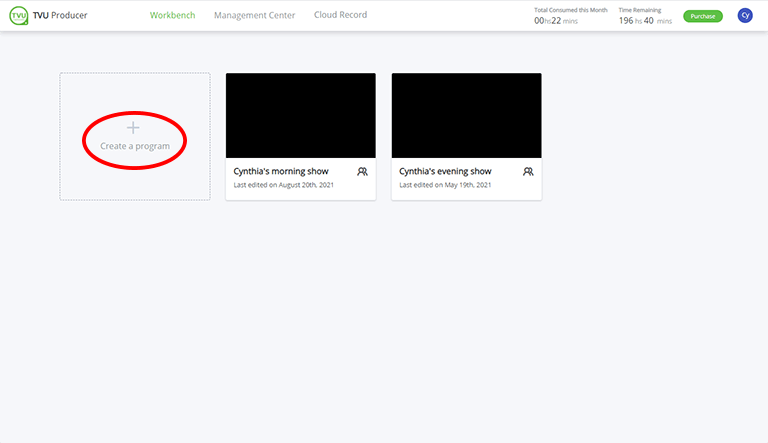
- In the Create a program pop-up window, enter a Program name for your production and click Next.

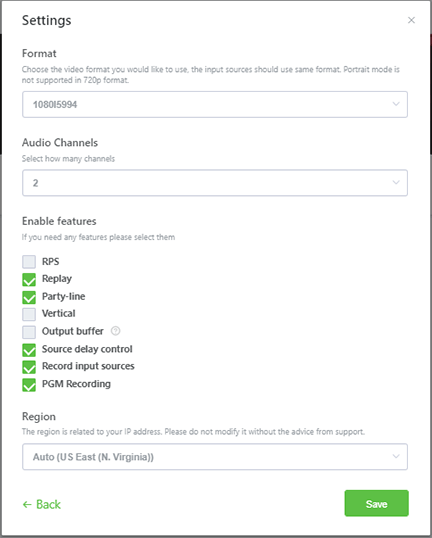
- Click the three-dot ‘…‘ icon in the program window and click Setting. The Settings pop-up window displays.
- Click the Audio Channel drop-down menu, select 2, 4, 6, or 8 output channels for your Producer project, and click Save.
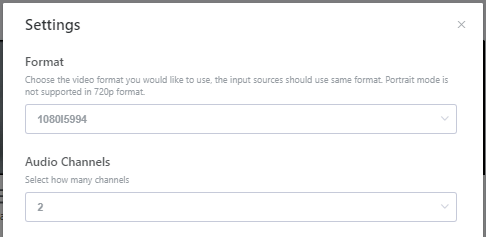
- In the Settings window, enable the desired features for your live production and click Save.
- In Workbench, click the Enter button to start your program in TVU Producer.
Basic Audio Mixer functionality
The Basic audio mixer functionality is embedded into the Producer User Interface. Each input source has a dedicated audio speaker icon that enables the operator to view, raise, and lower the volume of the audio channel.
Note: The basic audio mixer feature is enabled by default.
Audio Control panel
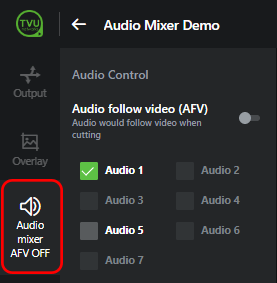
To open the Audio Control panel, click the Audio mixer icon in the left panel.
By default, the audio control is set to AFV – ‘Audio Follow Video’ mode. The audio channel assigned to the specific input video source is taken to the program output or ‘On air.’
The producer operator can switch the ‘Audio Follow Video’ to the OFF position by moving the Audio Control slider to the left, enabling more than one audio channel to be mixed or chosen together to go on air.
Advanced Audio Mixer functionality
To switch to the ‘advanced’ audio mixer functionality, complete the following steps:
- Click the Audio mixer icon in the left panel. The Audio Control menu displays.
Note: the menu options for the advanced Audio Mixer functions display.
- Click Copy at the bottom of the Audio Control panel.
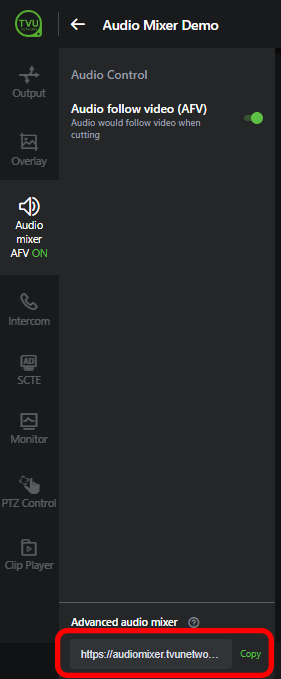
- Open a browser window, paste the URL in the address bar, and press Enter. Alternatively, you can click the URL to open the advanced version of the Audio Mixer in a new browser window.
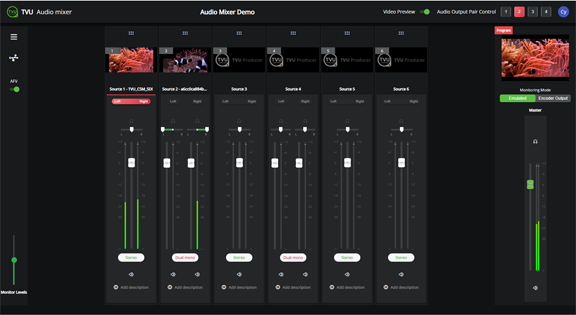
Advanced Audio Mixer interface
The TVU Audio mixer user interface displays.
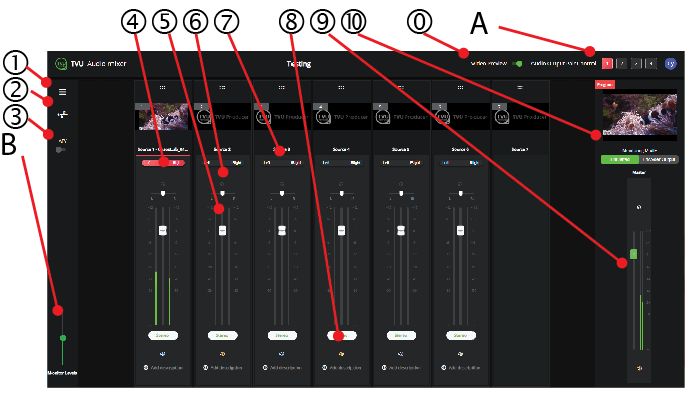
The Advanced Audio Mixer has the following controls:
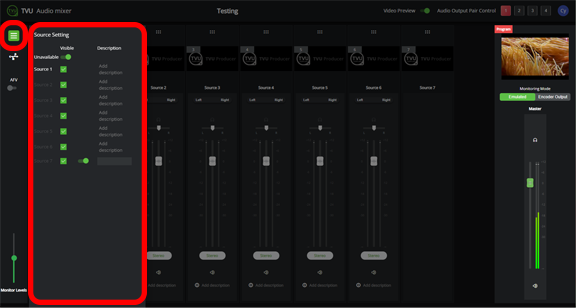
(1) Audio Mixer source settings menu
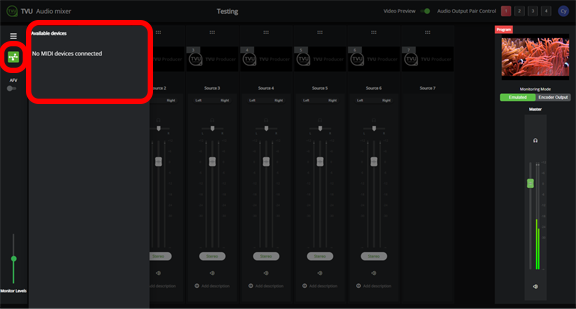
(2) Audio Mixer MIDI device menu
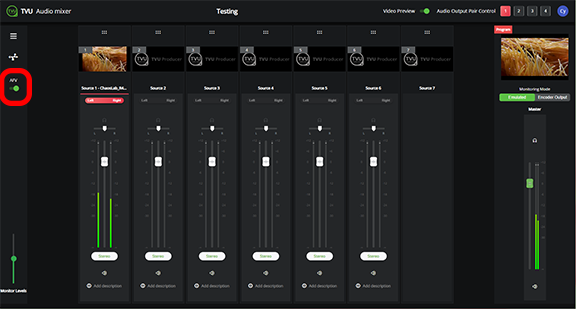
(3) Audio Mixer AFV toggle
(4) Headphone control or sound monitoring
(5) Fader level control
(6) Pan control
(7) Audio usage Indicator and audio enable/disable, displays red or grey
(8) Mute icon
(9) Master audio-level setting
(10) Monitoring modes
(0) Video Preview toggle
(A) Audio Output Pair Control
(B) Monitor Level setting
All of the audio mixing controls are available for the event. The audio mixer engineer can work with up to 4 output pairs. Each output pair has a dedicated independent audio panel. Each input source can have up to 4 audio pairs. Each pair can be controlled independently.
Left panel controls:
The Audio Mixer source settings menu displays visible and unavailable sources. In this menu, you can add a description to each source that will display at the bottom of each input source.
The MIDI device menu displays available and connected MIDI devices.
AFV is disabled by default for the remote commentator. All the commentators that join are enabled and mixed to the output pair number 1 by default.
Multi-audio channel feature
This feature supports 2, 4, 6, or 8 embedded output audio channels in Producer. The Audio mix option in Producer allows up to 4 pairs of audio channels to be configured by selecting a number in the Audio Output Pair Control feature in the Audio mix panel. This feature is useful for multi-language outputs.
A user can independently adjust the volume of the audio output channels assigned to each pair. The volume for each pair of output channels can be adjusted or muted using the Master output level control slider in the Audio mix panel.
To set up multiple audio output channels in Producer, complete the following steps:
- Select a source in the Producer User Interface and click the Audio Mixer icon in the left panel. The Audio Mixer panel opens.
- Click the URL at the bottom of the panel to open the Audio Mixer interface.
- At the top-right corner of the interface, locate the “Audio Output Pair Control.” Channel setting number 1 is selected by default.

- Click the Left-Right button in the audio source panel to select the audio source channels you would like to pair to setting 1.
Note: Refer to “Advanced Audio Mixer user experience behavior” for information about stereo and dual mono settings.
- Adjust the individual source audio settings for channel 1. Then, adjust the Master audio level in the left panel to the desired setting.
- Click channel setting 2 and repeat steps 4 and 5, respectively, and so on, to pair up to 4 channels (with a maximum of 8 outputs).
- To adjust your audio channel paired settings, click the appropriate Audio Output Pair Control channel number to display your settings.
Advanced Audio Mixer user experience behavior
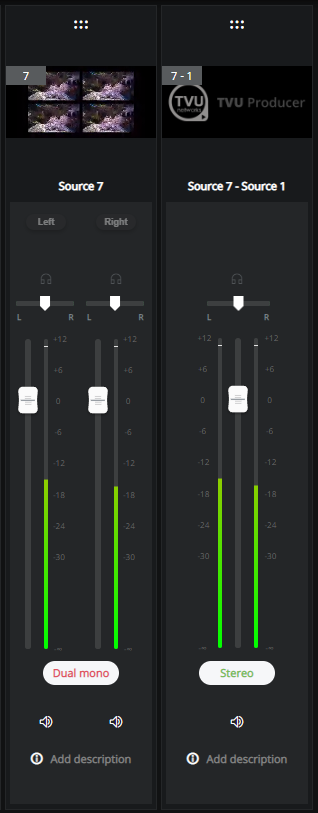
The following two types of audio sources are supported in the Advanced Audio Mixer interface:
Stereo – Stereo has one channel and includes one fader, pan control, and audio level indicators. When stereo is selected, both left and right indicators illuminate together to indicate one channel.
Dual mono – Dual mono has a left and right channel and includes two fader controls, two pan controls, and two audio level indicators. When dual mono is selected, both left and right indicators illuminate separately to indicate two channels.
The ‘Stereo and Dual-mono channel examples’ figure shows the Stereo and dual mono channels:
- Source 1 indicates Stereo (one channel)
- Source 2 shows Dual mono (left and right channels)
The Fader level indicator ranges from -∞ to +12
Note: The following stereo and dual-mono channel example is shown to highlight the differences.
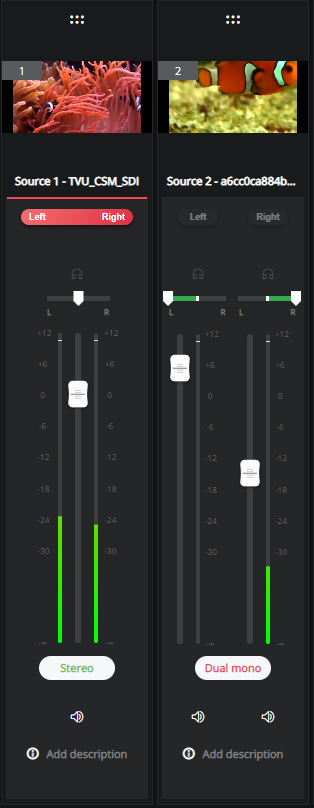
Audio usage indicators display in red at the bottom of the panel.

Stereo audio source
The Stereo audio source has only one fader and one balance control (or Pan control), as shown below.
- The fader level indicator range is from -∞ to +12.
- Balance control ranges from 0 to 100. The balance is set to 50 (middle).

Dual-mono audio source
The Dual-mono audio source has two faders and two pan controls. One fader is for the left channel, and the other is for the right channel. The two channels operate independently.
- Each channel has an independent fader level indicator showing ranges from -∞ to +12.
- The pan control slide ranges from 0 to 100. The left pan control setting is 0. The right pan control setting is 100.

Headphone control and sound monitoring
The headphone icon allows the operator to monitor a specific audio channel.

Fader level control
The fader level indicators show the appropriate status from the basic mixer. When the Audio Mixer displays for the first time, the fader level indicators must be set to the appropriate volume or gain even though sound monitoring is switched.
This will provide real-time results to the audio operator to ensure all audio channel volumes are correctly working. The operator can then adjust the gains of specific audio channels as desired.

Audio usage indicator and enable/disable functions
The audio usage and enable/disable indicator button at the top of the panel (turns red or grey).
The Audio usage button (one for each channel in the input source) indicates which audio channels are used or enabled.
- When the audio switch is ON or enabled, it turns red
- When the audio switch is OFF or disabled, it turns grey
When live sources are switched, the audio usage indicator (in red) is applied to the newly switched input source and the channels. If PIP is enabled on a live source, both these input sources that will program output will indicate usage when their left and right channel indicators turn red.
Note: If AFV is enabled, the audio usage is read-only. Customers cannot enable audio on more than one channel.
Note: If AFV is disabled, the operator can click on the audio usage button to switch between grey (disabled) to red (enabled) or red (enabled) to grey (disabled).
If the customer changes the audio usage on two different channels to Red, those two audio channels will go to program output.

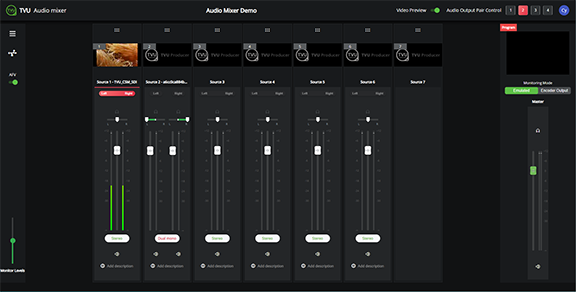
Audio control for quad mode
When the quad mode (input source 7) is selected, it behaves like any other source.
The audio usage indicator is ON for source 7 (and is only lit up for source 7), and whatever the presetting was for its original source still applies.

Monitor level control
The Monitor level control in the audio mixer controls the volume of the Audio Mixer tab in the chrome browser.

Mute control
The Mute control allows the end-user to silence the audio channel completely. This will also silence the channel output audio.
Note: Mute can be used in both use-cases, when AFV is ON or OFF.
When AFV is ON, the user can mute the stereo source channel or both dual-mono source channels. When the mute icon is switched ON for the ‘Source’ chosen to go to Program output, the master volume is also muted.
In the following example, AFV is enabled. Video source 6 is chosen to go to the program output. When both channels are muted for this specific audio source, the master volume is entirely muted on the program output. Group audio is not enabled in the following ‘Use-case example.’
Mute functionality works similarly if AFV is OFF and the Group Audio feature is enabled.
In the use-case example, the user can choose to use the mute functionality associated with the group directly. When using the mute icon associated with Group 1 or Group 2, the user can mute all of the audio sources assigned to Group 1 or Group 2.
The user can also mute one of the audio channels chosen for Group 1, which will only silence that specific audio channel.
Group Audio feature
The Group Audio functionality is enabled only when AFV is OFF. Users cannot choose groups in AFV mode.
The Group Audio feature enables users to assign audio channels to specific groups. Two groups are supported in the Audio Mixer Panel.
To use the Group Audio feature, complete the following steps:
- Open the Advanced Audio Mixer panel.
- Assign each of the desired audio channels in each respective audio source (whether it is a stereo source or dual mono) to group 1 or group 2.
- Choose the desired channels and assign them to either group 1 or group 2.
Note: Selecting audio channels for specific groups can be completed initially without enabling the group audio functionality.
- To change the Group Audio setting, go to the Group 1 or Group 2 selection in the program output panel. Then, click the ON button in the Audio panel located above Group Audio.
Note: Users can switch either group or both groups simultaneously to manage and control all of the audio channels and sources associated with a specific group.
- If desired, a user can dynamically assign new channels to either of the groups.
Note: the ‘ON” Audio Button can be enabled only after assigning at least one audio channel. If the user has not assigned any audio sources to either group, the user cannot switch ON the group audio.
In the following ‘Channel and input source example,’ channel 2 of input source 1 is assigned to Group 2. In addition, the two audio channels of the input source 3 are also assigned to Group 2. The User interface will now allow the user to switch ON the Group 2 control and then reduce the fader levels of all the associated channels using the Group fader controls.
Note: Enabling the group feature will not have any impact on the current master volume functionality.
Purchasing TVU Producer
After registering for the 30-day trial described in “Step 1 – Sign up or register for a TVU Producer account”, a user can purchase Producer online using PayPal. To purchase a TVU Producer subscription, sign in to your trial account and click the Purchase button in the top main navigation bar.

We empower publishers, broadcasters, and enterprises to deliver the broadcast to the widest audience on any platform, anywhere on the globe, by transforming your PC into a live production control room. You can innovate and create your live event into a unique next-generation experience.
There are two ways to purchase TVU Producer:
- Online
- By contacting TVU Sales by Phone at +1 650.440.4812 or email: support@tvunetworks.com
The TVU sales team can set up a monthly pricing schedule for customers that do not prefer to pay online.
© Copyright 2023 TVU Networks Corporation. All rights reserved in all media.
Document Part Number: TVU Producer Audio Mixer QSUG Rev C EN 10-2022