TVU Anywhere Lite Fast Track Guide
TVU Anywhere Lite instantly turns your smartphone or tablet into a transmitter for high-quality live transmission and streaming from remote locations.
Introduction, setup, and base operation
TVU Anywhere Lite is a lightweight version of TVU Anywhere, which turns your phone into a powerful live video transmitter capable of delivering a broadcast-quality video picture from any location.
TVU Anywhere overview
Field reporters, remote news anchors, citizen journalists, and streamers can go live to their audience with the press of a button and cover news, events, interviews, and human interest stories. TVU Anywhere Lite uses all available cellular and WiFi connections together with TVU’s patented IS+ technology for a reliable picture no matter the transmission environment and utilizes HEVC/H.265 encoding for efficient data usage.
Compatibility
- iPhone – Requires iOS 12.0 or later.
- iPad – Requires iPadOS 12.0 or later.
- iPod touch – Requires iOS 12.0 or later.
- Apple Vision – Requires visionOS 1.0 or later.
- Android – Smartphones
Step 1 – Downloading and installing the TVU Anywhere Lite app
- From your mobile device, click the Google Play icon or App Store icon and enter TVU Anywhere Lite in the search field. Download and install the TVU Anywhere Lite app onto your smartphone. TVU Lite supports iOS and Android smartphones.
Note: The TVU Anywhere Lite app has a different PID than the TVU Anywhere Pro version. You can install both versions on the same phone.
Note: This procedure applies to both Android and iOS devices.
- Open the TVU Anywhere Lite app.
- Press the Advanced (gear) icon to open Settings.

- The settings window has three panels:
- Video
- Misc
- About
- Scroll down to About.
- Locate your device PID and press the copy icon.
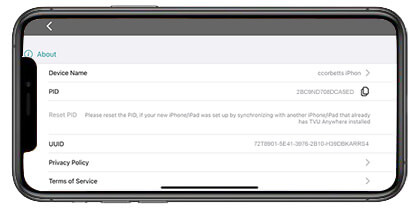
- Provide this PID number to TVU support at support@tvunetworks.com to connect you to the correct receiver.
- Press the back “<” icon to return to the main screen.
Quick Start guide contents
This Quick start guide provides instructions to complete the following tasks:
- Downloading and installing the TVU Anywhere app
- Contacting TVU Support to complete your registration
- Pairing your device with a receiver
- Using the TVU Anywhere app
- Creating a hotspot connection to a TVU Pack
- TVU Anywhere DJI integration
- Accepting a Token using the TVU Anywhere app
Step 2 – Choose your registered receiver
- Press the Select receiver or scan to pair bar to select a receiver from the drop-down menu.

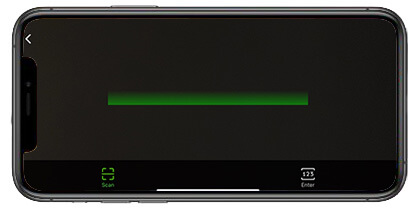
- If you did not select a receiver from the drop-down list, the scan screen will automatically display. Continue with “Token pairing.”
Token pairing
This section provides the steps to install the TVU Anywhere app on your smart mobile device.
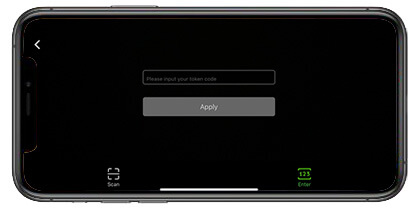
- To enter a Token code, press the “123” icon.
- Enter your Token code and tap Apply.
- To manually scan a Token code, press the Scan icon and allow the smartphone to scan the Token code.
Step 3 – Going Live
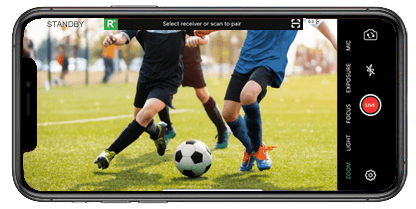
After you have successfully paired your device to a receiver, the status indicator in the top left corner of the screen displays “STANDBY” until you go live with the receiver.
Live button
When you go live with the receiver, the status indicator changes from “STANDBY” to “LIVE” on the top left of the screen. The Live button turns to a red square. The receiver you are currently transmitting to displays on the top of the screen. In addition, the live streaming time and the transmission rate are displayed at the top of the screen.
If the TVU Anywhere Lite app is not paired with a TVU receiver or the TVU receiver is not powered on and you cannot transmit live video.
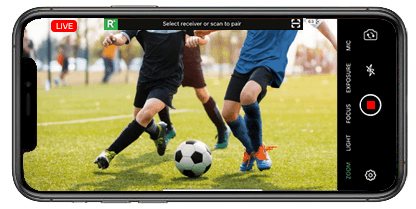
Stopping Live
To stop going Live, press the red square. The “LIVE” status button and “STANDBY” will display again.
TVU Anywhere Lite features
The TVU Anywhere Lite app allows you to access and use eight additional features.
Reverse facing camera feature
This feature allows a user to switch between front and rear camera perspectives.
- Press the reverse camera icon.
- To return your camera to front facing, press the reverse camera icon once again.
Flash feature
The flash feature is used to turn on the flash for extra lighting when needed.
- To turn on the flash, press the flash icon.
- To turn the flash function off, press the flash icon again.
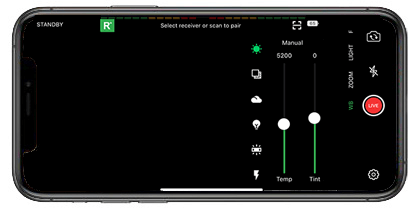
White balance (WB) feature
The WB feature allows a user to adjust the white balance of their video.
- Press WB in the sidebar. The WB defaults to Auto.
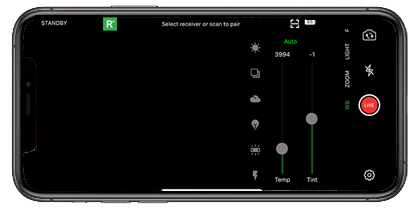
- To manually correct the WB, press Auto to switch to Manual.
- Use the adjustment bars to correct the white balance.
- To reset the white balance, press Reset.
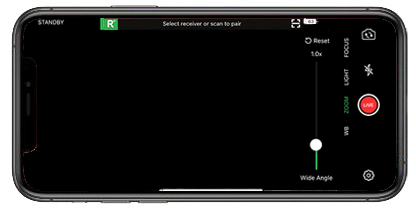
Zoom feature
The Zoom feature allows a user to zoom into an image.
- Press Zoom in the sidebar.
- Use the adjustment bar to magnify your image.
- To reset the magnification, press Reset.
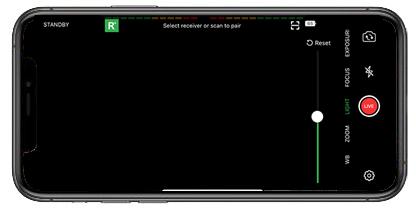
Light (Brightness) feature
The Light feature allows a user to adjust the brightness of the overall video.
- Press Light in the sidebar.
- Use the adjustment bars to adjust the brightness.
- To reset the brightness, press Reset.
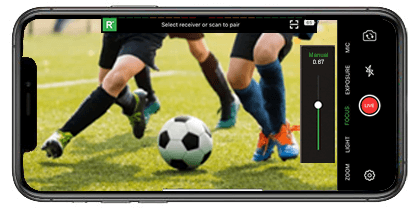
Focus feature
To focus on a specific area of the screen, tap the area, and the camera will refocus in that area of the image.
To use the Focus feature:
- Press Focus in the sidebar. This feature is set to Auto by default.
- Tap the area on the screen that you want the camera to focus on.
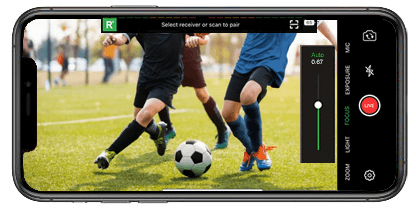
- Press Auto to change to the Manual mode. This mode will allow you to adjust the focus manually.
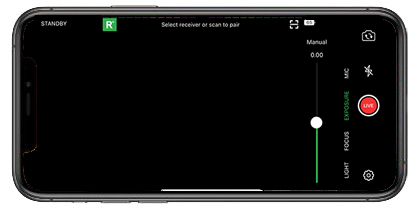
Exposure feature
The Exposure feature allows a user to adjust the video exposure setting.
To adjust the exposure:
- Press Exposure in the sidebar. The exposure default is Auto.
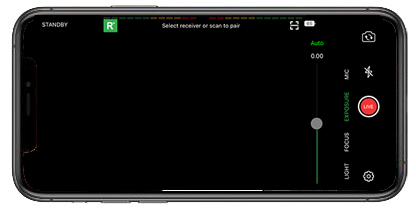
- To manually correct the exposure, press Auto to switch to Manual.
- Use the adjustment bar to adjust the exposure setting.
- To reset the exposure setting, press Reset.
MIC feature
The MIC feature allows for manual selection of the source microphone.
- Press MIC in the sidebar. The MIC setting bar displays.
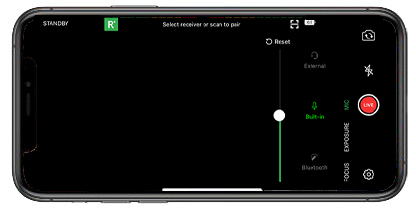
- Press an Exterior, Built-in, or Bluetooth type.
© Copyright 2025 TVU Networks Corporation. All rights reserved in all media.
Document Part Number: TVU Anywhere Lite Fast Track Guide Rev A EN 06-2025