Contents
- Overview
- * User role types
- – TVU Home features
- – System requirements
- – Getting started
- * TVU Home Quick Start Guide – Owners role
- – Dashboard interface – Owner controls
- – Members tab controls
- – Usage tab
- – Resources tab
- – Adding Agent devices to Cloud services
- – Port mapping
- – SDI Slot reservation
- – Elastic IP tab
- – Manage Bearer Token tab
- – TAMS Stores tab
- – TAMS Multi-Store support
- – Integrating with Workflows
- – Partner credentials
- – Billing tab
- – User billing group setup
- – Purchasing tokens
- – Seat-based Premium Subscriptions
- – Token User Group creation
- – Transferring Tokens between Token User Groups
- – Transferring Tokens – Affiliate Group
- – Low-balance alerts
- – Auto-Recharge
- – Access App management
- * TVU Home Quick Start Guide – Member role
- – Dashboard interface – Member controls
- – Members tab controls
- – Quitting the group
- – Resources tab
- – Adding Agent devices to Cloud services
- – Port mapping
- – Elastic IP tab
- – Bearer Token tab
- – TAMS Stores tab
- – Billing tab
- * TVU Home Quick Start Guide – Admin role
- – Dashboard interface – Admin controls
- – Members tab controls
- – Usage tab
- – Resources tab
- – Adding Agent devices to Cloud services
- – Port mapping
- – Elastic IP tab
- – Manage Bearer Token tab
- – TAMS Stores tab
- – Billing tab
- – Purchasing TVU Tokens
- – Transferring tokens – Affiliate Group
- * TVU Home Quick Start Guide – Finance role
- – Dashboard interface – Finance controls
- – Members tab controls
- – Updating your Subgroup workspace
- – Updating Subgroup User information
- – Resources tab
- – Adding Agent devices to Cloud services
- – Port mapping
- – SDI Slot reservation
- – Elastic IP tab
- – Bearer Token tab
- – Managing API Bearer Tokens
- – TAMS Stores tab
- – TAMS Multi-Store support
- – Integrating with Workflows (MediaMesh / Workflow Builder)
- – Partner credentials
- – Billing tab
- – User billing group setup
- – Purchasing tokens
- – Seat-based Premium Subscriptions
- – Token User Group creation
- – Transferring Tokens between Token User Groups
- – Transferring Tokens – Affiliate Group
- – Low-balance alerts
- – Auto-Recharge
- – Access App management
TVU Home Quick Start User Guide
TVU Home overview
Note: This User Guide supports the TVU Home version v1.0.104 and above.
TVU Home is a user-facing platform that anyone with TVU credentials can sign in to and use. The Home landing page enables users to access services, recent objects (e.g., TVU services), and status. Users with owner roles can set up and manage user groups and subgroups on the management dashboard. TVU Services and user roles can be assigned, managed, and monitored from this dashboard.
Users sign in to the TVU Home landing page and click the Manage > Members tab. They then navigate to their management dashboard to view all members assigned to their group or subgroup and have full editing rights to their own user information.
User role types
This version of TVU Home allows users to familiarize themselves with the platform and explore basic features, controls, and functions across the following four user role types. Each role is explained in a separate section of this Quick Start User Guide.
Owner
The owner has administrative access to the members and groups they set up. Owners can set up user-level and sub-level groups, invite members, assign member roles, manage permissions, and monitor user-level TVU account content by group assignment. Tokens can be purchased, and token usage can be monitored from the management dashboard’s Billing tab. Key additions include Token User Groups for multi-department balance allocation, Seat-based Premium Subscription Management, a centralized Partner Credentials vault, SDI Slot Reservation controls for agents, and expanded Producer Usage Analytics.
Member
Within the Group workspace, a Member can view users and their assigned roles. Each group member can change their avatar (profile image), reset their password, and view which TVU services are assigned to them. In addition, the group member can quit at any time if desired.
Admin
The Admin role only has administrative access to Member users and the groups they set up.
Admin users can set up user-level and sub-level groups, invite members, assign member roles, manage permissions, and monitor user-level TVU account content by group assignment. As an Admin, you can add or remove users from your group, entitle a service, or revoke a user’s service from their management dashboard.
Finance
The Finance role only has administrative access to their account and to Member users in the groups they set up. Tokens can be purchased, and token usage can be monitored from the Home management dashboard Billing tab. Key additions include Token User Groups for multi-department balance allocation, Seat-based Premium Subscription Management, a centralized Partner Credentials vault, SDI Slot Reservation controls for agents, and expanded Producer Usage Analytics.
TVU Home features
- TVU Home page – The TVU Home landing page provides direct access to recent services, such as TVU Producer, Partyline, Commentator, TVU Channel, and TVU Search without logging in to each service. The Recent Objects panel displays the user’s account activity directly from the Home landing page.
- TVU Services navigation – Users can click the TVU Services navigation (waffle) icon to quickly open a service that is not currently displayed in the Recent Services section on the Home landing page.
- Manage tab – The Manage tab has four sub-tabs:
Note: Sub-tabs that display are dependent on the users role assignment. Refer to the respective Quick Start chapter for more information.
- Members tab: The Members tab opens the Group management dashboard and displays controls based on the Owner, Member, Admin, or Finance user role type. For example, an Owner’s management dashboard will display different controls than the Member’s dashboard.
- Usage tab: Users can view their hourly usage history by date, product, and service name.
- Resources tab: The Resources tab enables Agent device management, box pool folder setup and configuration, and Agent software installation for authorized roles.
- Billing tab: Accessible to owners and finance users. TVU Home enables account owners and finance users to manage their TVU Token purchases, usage, and balances. Members can view their Token purchases, usage, and balances. Token purchases are initiated by the Owner and Finance roles.
System requirements
Compatibility:
- iPad – Requires iPadOS 12.0 or later.
- Mac – Requires macOS 12.0 or later.
- Windows 8 and higher (Chrome browser)
Getting started
Any TVU account holder has free access to TVU Home. This Quick Start User Guide includes a section for each user role type, explaining their respective management dashboard interface features and controls.
Note: Setting up Agent resources is the only paid feature in TVU Home.
TVU Home Quick Start Guide – Owner role
Signing in to TVU Home
There are two methods an account “Owner” can use to sign in to TVU Home:
- If you are signed in to a TVU service, click the Services (waffle) icon and select Home in the menu.
- Open a web browser and enter: https://home.tvunetworks.com
The Home login page will display.
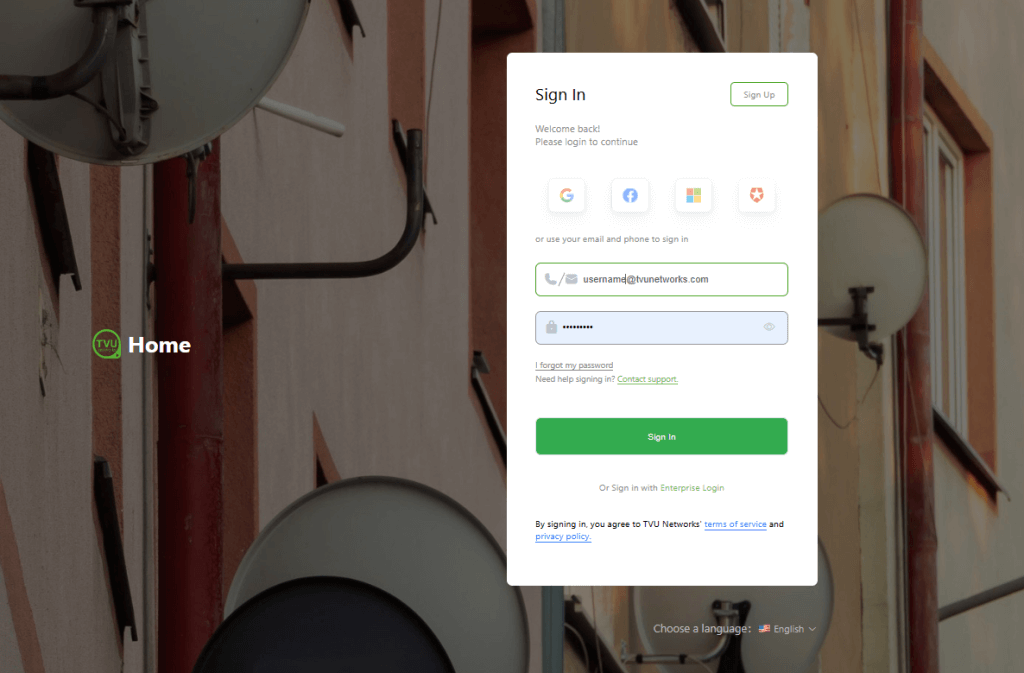
Sign in with your account credentials:
- Enter your email and password.
- Click Sign in.
TVU Home – Landing page
The “Welcome to TVU Home” landing page is displayed after you successfully sign in to TVU Home.
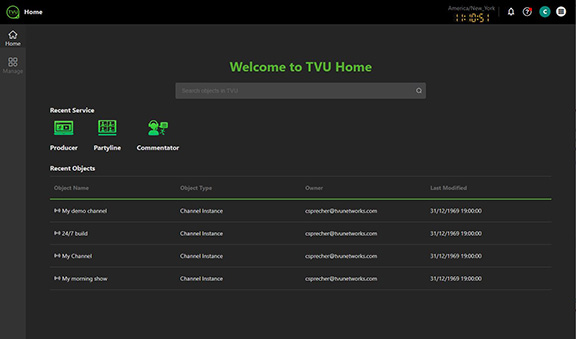
The Home landing page for the owner role includes:
- TVU Home page: The TVU Home landing page provides direct access to recent services, including TVU Producer, Partyline, Commentator, TVU Channel, and TVU Search, without logging in to each service. The Recent Objects panel displays the user’s account activity directly from the Home landing page.
- TVU Services navigation: Users can click the TVU Services navigation (waffle) icon to quickly open a service that is not currently displayed in the Recent Services section on the Home landing page.
- Manage tab: Members and owners can use this tab as their primary tool for member and owner-related tasks. Click the Manage tab to access the Members, Resources, Usage, and Billing tabs.
- Members tab: Opens the Group management dashboard and displays controls based on the Owner user role type.
- Usage tab: Users can view their hourly usage history by date, product, and service name.
- Resources tab: The Resources tab enables Agent device management, box pool folder setup and configuration, and Agent software installation for authorized roles. A box pool folder can store multiple boxes, each of which is a physical device on which you have installed the Agent software.
Owners can assign Elastic IP, create and manage Bearer Tokens, and TAMS Stores by clicking the appropriate tab in the Resources Management page. - Billing tab: Accessible to owners, members, Admins, and finance users. TVU Home enables account owners, Admins, and finance users to manage their TVU Token purchases, usage, and balances. Members can view their Token purchases, usage, and balances. Token purchases are initiated by the Owner and Finance roles.
Dashboard interface – Owner controls
Account owners have administrative rights to their members’ accounts. Account owners can:
- Manage a group and a subgroup workspace.
- View Usage time, storage status, and router usage.
- Add users and sub-users.
- Add resources and services.
- Invite new members.
- Assign roles to each member.
- Add members to other subgroups.
- Designate a new group owner
- Delete or disable a member’s access.
- Authorize, manage, and monitor a member’s TVU services.
- Purchase tokens, view usage, and balances.
- Create Token user groups
- Purchase and assign seat-based Premium subscriptions
- Securely store and manage encrypted third-party license credentials across supported partner platforms
- Segment their organization’s total token balance into dedicated, named pools with independent access, deduction rules, and alerting thresholds
- Add Agent devices to the Cloud service.
- Reserve and monitor Agent SDI input/output slots
- Assign Elastic IP addresses to a specific region.
- Create and manage Bearer Tokens.
- Create and manage multiple TAMS Stores.
Members tab controls
The Members tab opens the Group management page. When you sign in as an account owner, you can manage your members on the Group page by clicking the Manage > Members tab.
Note: A group can have multiple owners.
The Members tab allows you to:
- Edit your Group Name and add group information
- Add a new user
- Add a profile picture (avatar)
- Add subgroup workspaces
- Add an email domain to your group
- Assign roles to sub-users
- Manage all aspects of your group
- View TVU Token purchases, usage, and balances
- View Elastic IP addresses by a specific region.
- Create and manage Bearer Tokens.
- Create TAMS Stores.
Updating your Group information
To update your Group information:
- Click the Manage > Members tab.
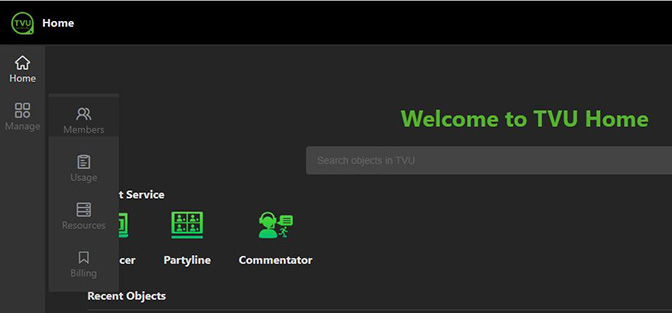
- The Group management dashboard will display.
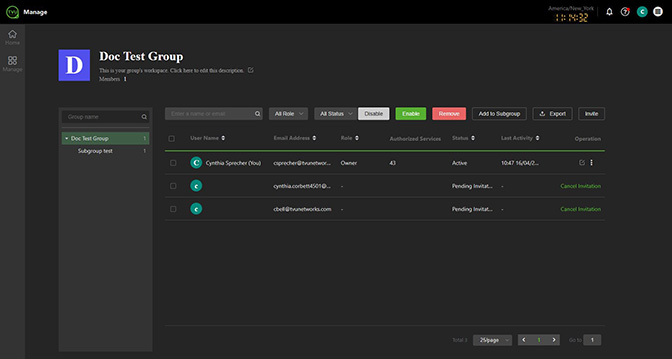
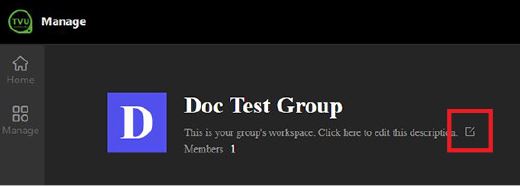
- Click the edit icon below the Group name.
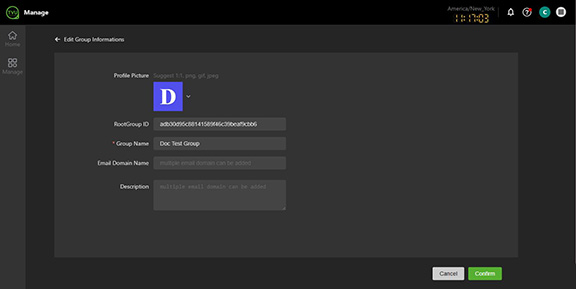
- The Edit Group Information page opens.
- Enter a Group Name and page Description.
- To update your Profile picture, hover your mouse over the picture and click the Edit icon.
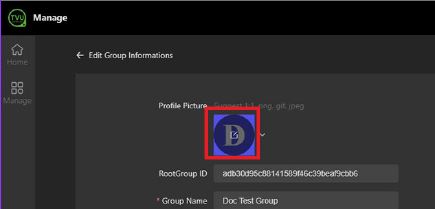
- The Add Profile Picture pop-up will display.
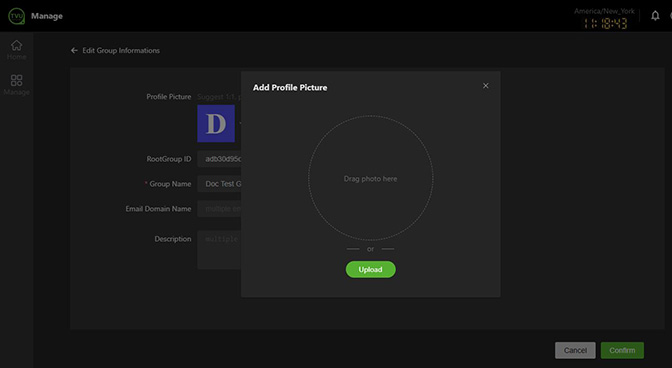
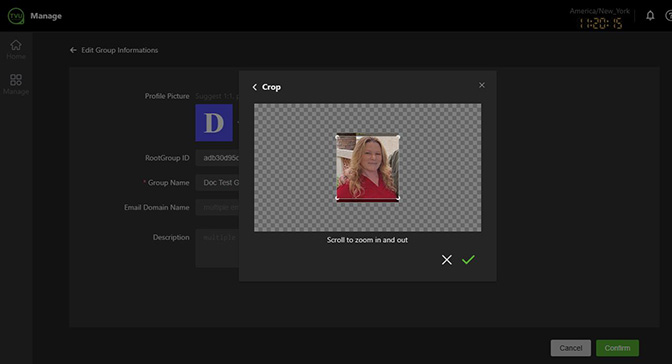
- Drag or Upload a 1:1 image in png, gif, or jpeg format.
- Click the green check mark to save your Avatar picture.
- Click the green Confirm button.
- Scroll down to the Authorized Services panel and select the Optional Services that apply or disable services.
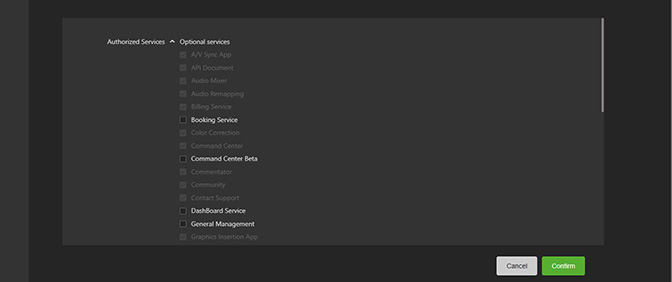
- Click the green Confirm button.
Creating a subgroup
When you create a subgroup, it becomes part of your group workspace. You can invite group members as sub-users into this workspace and assign roles to each user.
To create a subgroup:
- Click the Manage > Members tab.
- Hover your mouse over Subgroup, then click the Plus.
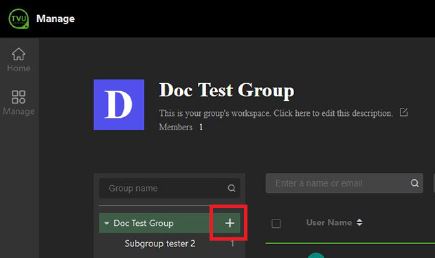
- The Create a subgroup window will display.
- Enter a subgroup name, your email domain name (if you want to assign a domain to the subgroup), and a description of your subgroup (optional).
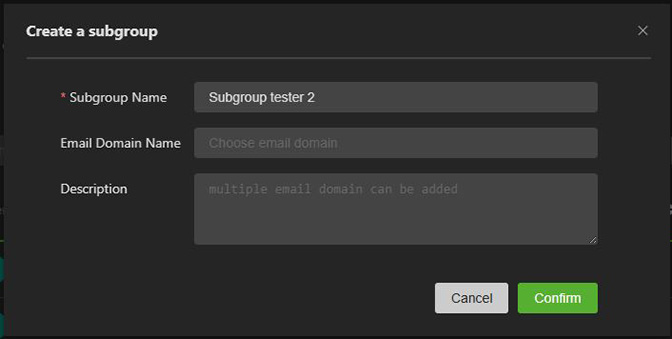
- Click Confirm.
- The new subgroup is displayed under your Group name.
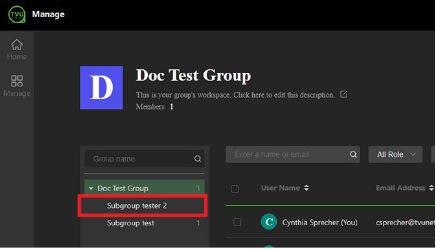
- To configure and manage Subgroups, click a Subgroup in the left panel to open the Subgroup page.
- You can now invite users to your group and assign them to subgroups.
Adding yourself to a subgroup
To add yourself to a subgroup:
- Select your Group Name in the left panel.
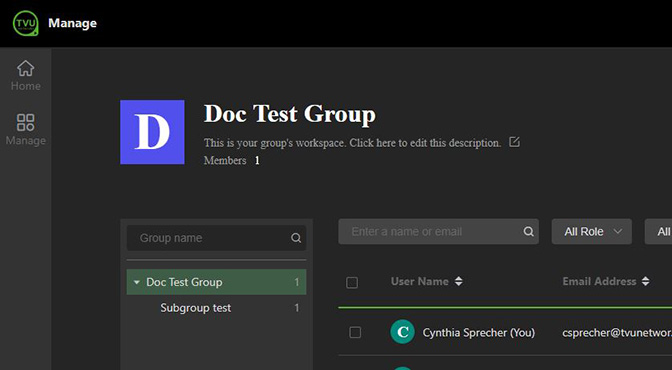
- Highlight (You) in the user list.
- Click the three-dot icon in the Operation column.
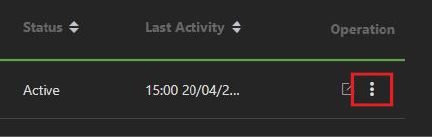
- Click Add to other subgroup.
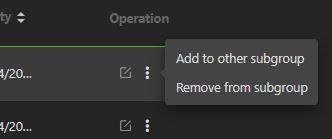
- The Add to subgroups window will display.
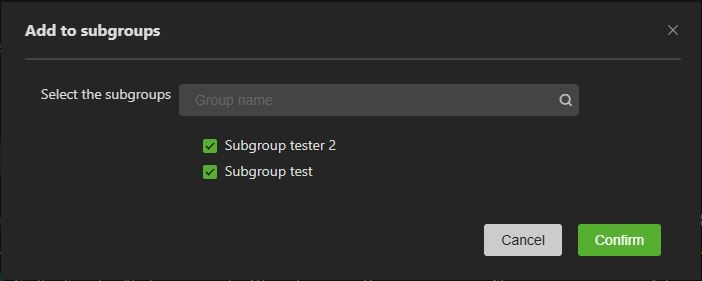
- Click the desired subgroup checkbox, then the Confirm button.
Inviting users to your group
After you have created your subgroups, you can invite users to your group and subgroups.
Note: The invitation procedure only accepts users with or without an active TVU account.
To invite a user to your group:
- Click to highlight your Group Name.
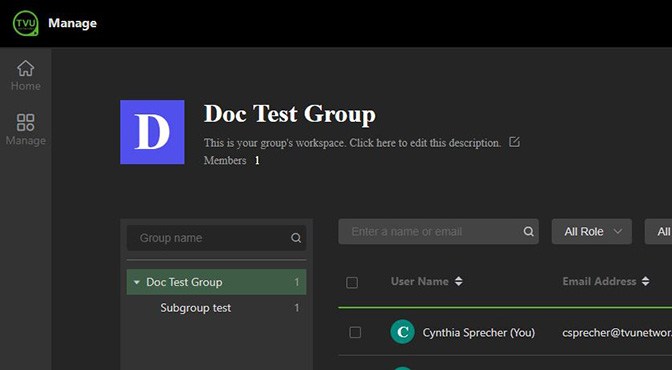
- Click the Invite button.
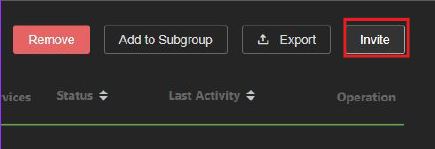
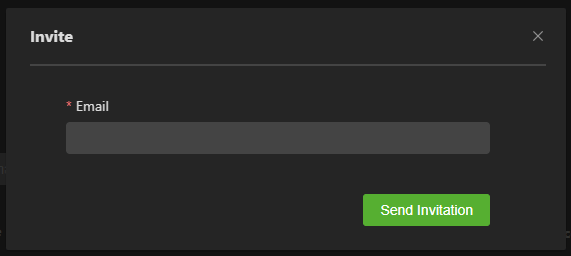
- The Invite window will display.
- Enter the user’s Email address you want to invite to your group, then click Send Invitation.
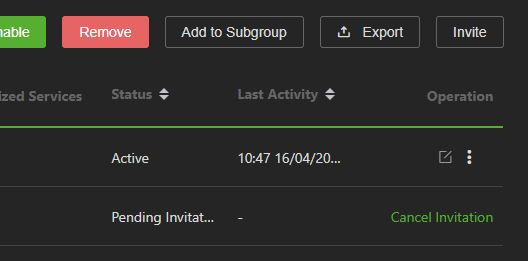
- The dashboard will display the invited user and a “Pending Invitation” notification in the dashboard status column until the invitation is accepted.
- The owner can cancel the invitation by clicking the green Cancel Invitation in the Operation column.
- The invited user receives an email to accept the invitation. After accepting the invitation, the TVU Home page will open. The new user clicks the Bell icon at the top-right of the page to complete the process, then clicks the Join or Ignore button.
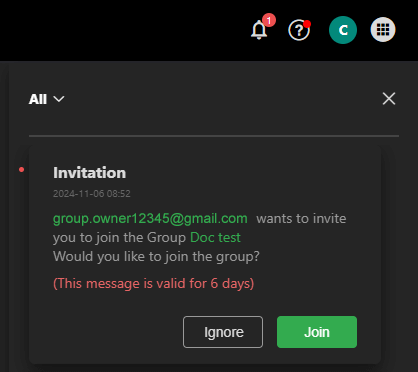
After joining the group, the user’s name is displayed in the user list. Users can click the edit icon on the Groups page to edit their user information.
Note: The group owner receives a Bell icon notification when the user has joined the group.
Reassigning group ownership
When a current owner leaves the group, the owner can designate a new group owner from within TVU Home.
To designate a new group owner in TVU Home:
- Click the Manage > Members tab.
- Locate the replacement owner in the members list, then click the Role drop-down menu.
- Select Owner from the list.
- The owner can click the three-dot icon in the Operation column and select Add to other subgroup or Remove from subgroup.
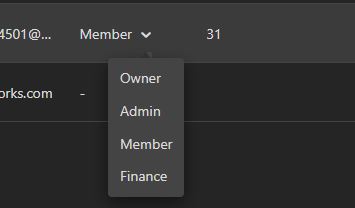
Adding a role to the new user
Owners can assign a Member or Admin role to a new user. The Admin role allows co-admin rights, whereas the Member role does not.
To add a role to the new user: click the user’s Role drop-down menu and select Admin or Member.
- Click Manage > Members tab and highlight your group name.
- The new member appears in the Group list on the Manage page.
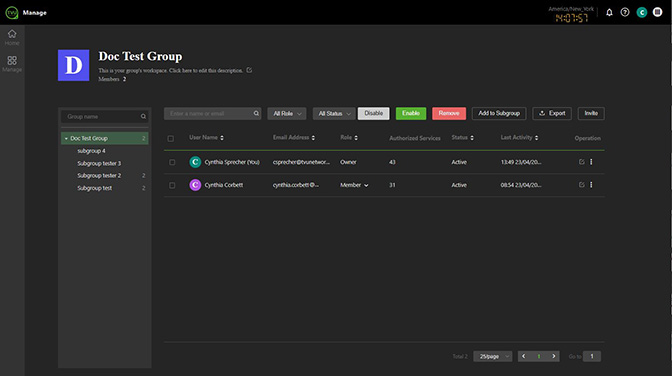
- Click the user’s Role drop-down menu and select Admin or Member.
Note: Choosing Admin allows the user administrative rights.
Adding members to other subgroups
To add a user to a subgroup:
- Click the three-dot icon and select Add to other subgroup.
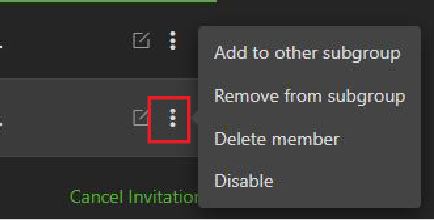
- Select the Subgroup checkbox in the Add to Subgroup window, then click Confirm.
Editing a member’s access
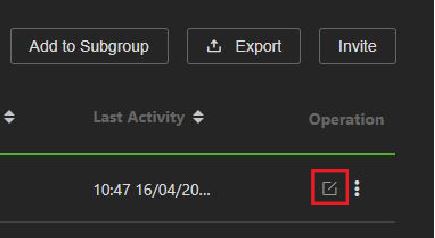
To edit and manage a Subgroup member’s access:
- Click the Manage > Members tab and locate the member’s name. Click the Edit icon in the Operation column.
- The Edit User Information window will display.
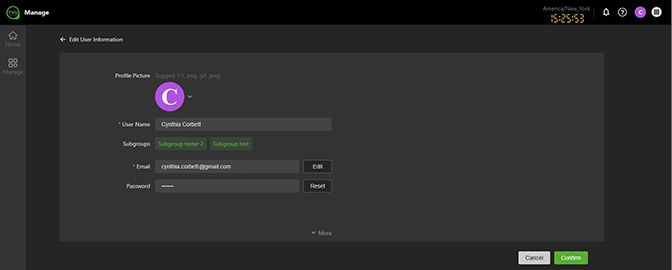
- Configure the Subuser’s information, then click Confirm.
- When finished, click ‹— Edit User Information at the top of the page to return to the Subgroup page.
- To remove a Subgroup member, click the three-dot icon and select Remove from subgroup.
Deleting or disabling a member’s access
To delete or disable a user in a group:
- Click the three-dot icon and select Disable or Delete member from the menu.
- If you need to batch Enable or Disable a group of users, select each user’s checkbox and click the Disable or Enable button.
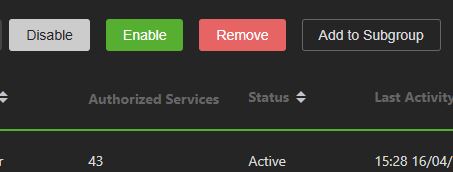
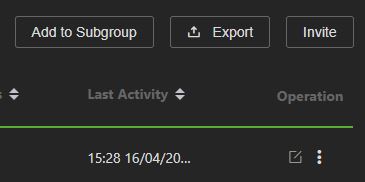
Authorizing, managing, and monitoring a member’s services
As a group owner, you can authorize access to services and manage group and subgroup users from the Manage > Members tab. Users and their activity are easily monitored and sorted and can be exported to Excel by clicking the Export button.
Usage tab
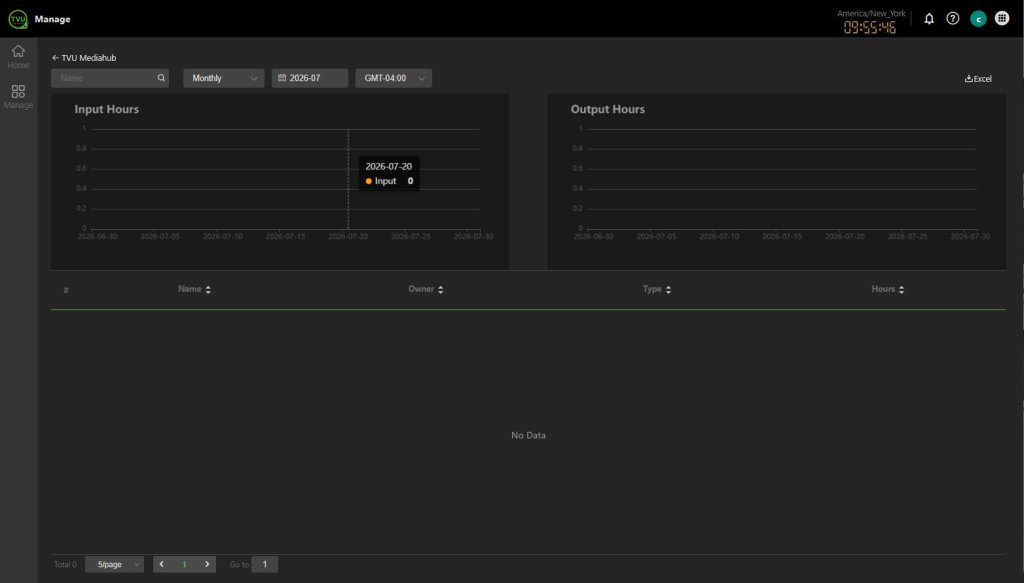
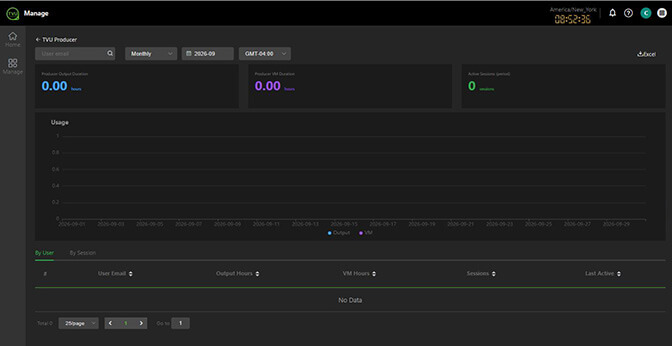
The Usage tab displays the TVU MediaHub, TVU Channel, and TVU Producer Usage time overview. Users can select a specific date range to display by clicking the calendar icon at the top left of the screen.
- Click the Manage > Usage tab.
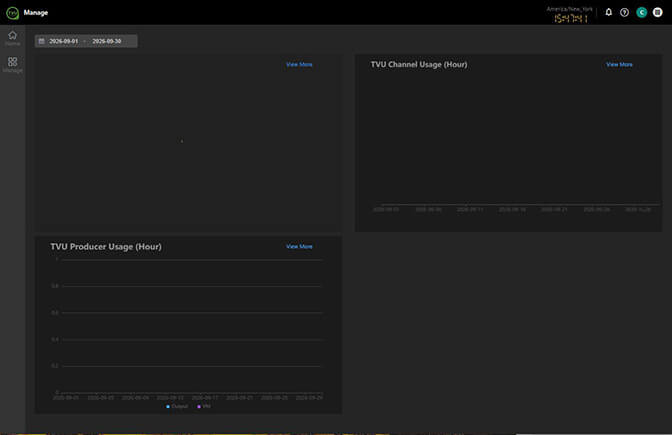
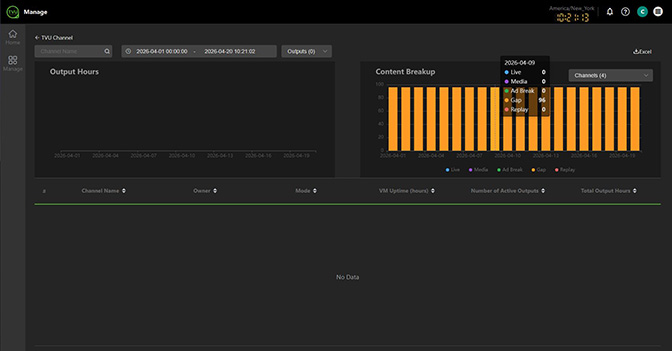
- Click View More to display usage information.
- Hover over the charts for more information.
Resources tab
The Resources tab allows users to manage an Agent device, set up and configure a box pool folder, and install Agent software.
Note: A box pool folder can store multiple boxes, each of which is a physical device where the user has installed the Agent software.
The Resources tab allows Agent software to be installed on a device. The Agent integrates with MediaHub instead of using cloud-based resources. The agent can be installed on a user’s resource to run programs.
The Resources tab opens the Manage page. This page enables owners to access the Agent Devices, Elastic IP, Manage Bearer Token, and TAMS Stores pages.
The Resources > Agent Devices tab allows users to manage an Agent device, set up and configure a Box Pool folder, and install Agent software.
Note: A Box Pool folder can store multiple boxes, each of which is a physical device where the user has installed the Agent software.
The Resources > Agent Devices tab allows Agent software to be installed on a device. The Agent integrates with MediaHub instead of using cloud-based resources. The agent can be installed on a user’s resource to run programs.
- The Resources > Elastic IP tab allows owners to create and view Elastic IP assignments by region.
- The Resources > Manage Bearer Token tab allows owners to create and manage Bearer Tokens.
- The Resources > TAMS Stores tab allows owners to create TAMS Stores.
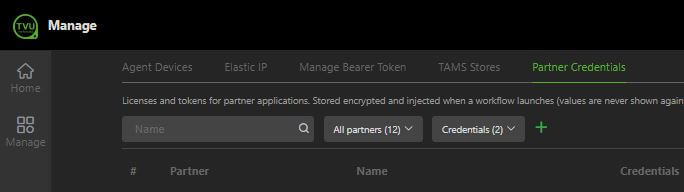
- The Resources > Partner Credentials tab allows users to assign licenses and tokens for partner applications. They are stored encrypted and injected when a workflow launches.
Adding resources and services
The Resources tab is where Owners can create Box pool folders and view, add, configure, and manage Agent devices.
To add resources and services:
- Click the Manage > Resources tab.
- The Manage page opens and displays Resources.
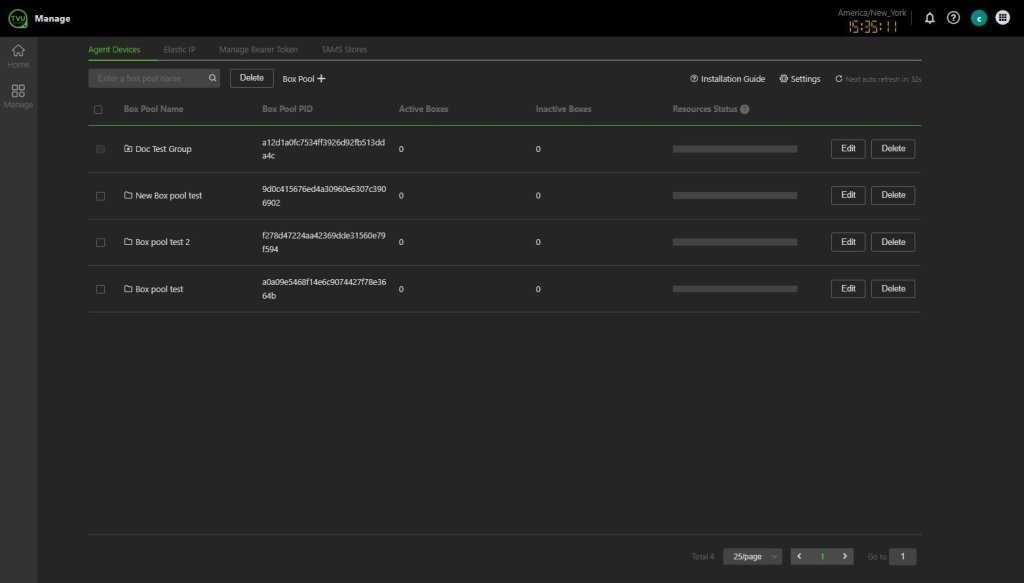
- To add a new box pool folder, click Box Pool +.
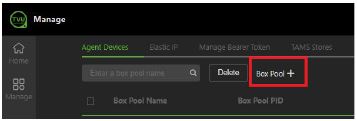
- The Create a new box pool window will display.
- Enter a Box Pool Name and click Confirm.
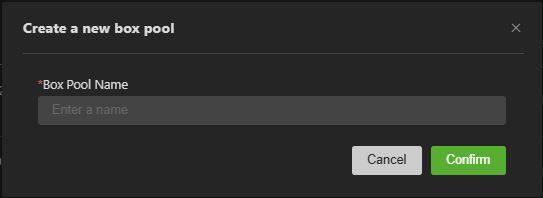
- Your new box pool folder has been added to the Agent Devices list.
- To delete a box pool, click the Delete button.
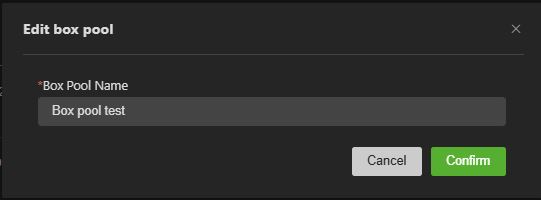
- To rename the box pool, click the Edit button.
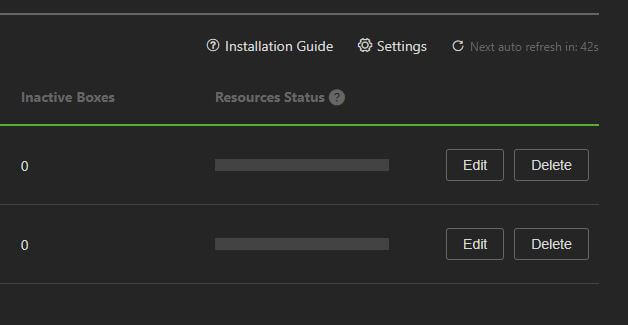
- The Edit box pool window will display.
- Enter a new box pool name and click Confirm.
Adding Agent devices to Cloud services
IMPORTANT: You can only select a device as BYOR in MediaHub after the Agent is successfully installed on it.
After your agent is fully installed, configure it by following these steps, then use it in MediaHub by selecting BYOR under Resources.
To download and install the Agent:
- Click the Manage > Resources tab, then click the Installation Guide link.
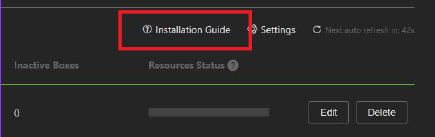
- The Agent installation guide pop-up window will display.
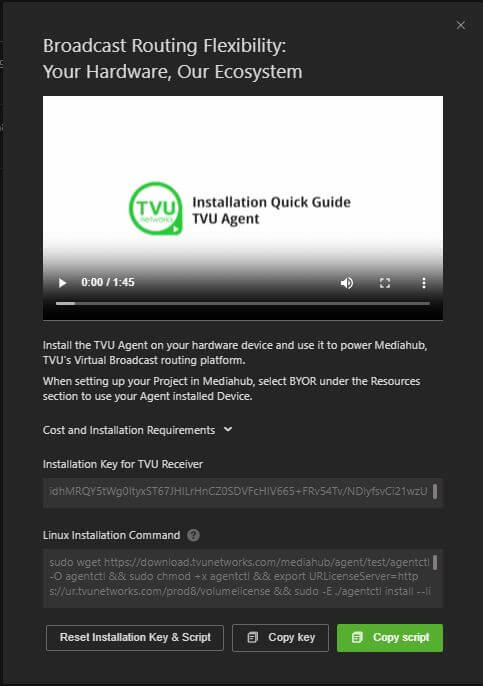
- Review the Installation Quick Guide TVU Agent video tutorial.
- Click the Copy script button and paste the script into your Linux Command line. Run the script to install the Agent on your device.
- To obtain the Installation key, click the Copy key button.
- To Reset the key and script, click the Reset Installation Key & Script button.
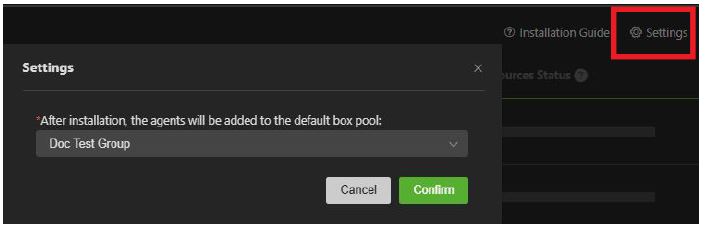
- After installation, the Agents will be added to the default Box Pool. To select a default Box Pool, click the Settings icon, select a Box Pool from the menu, and then click the Confirm button.
Port mapping
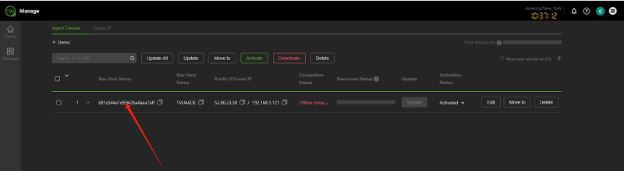
To map your box pool in TVU Home:
- Click the Manage > Resources tab.
- The Manage page opens, displaying your Agent Devices.
- Click the Box pool that requires mapping.
- Click the Box pool checkbox that requires mapping in the Box Pool.
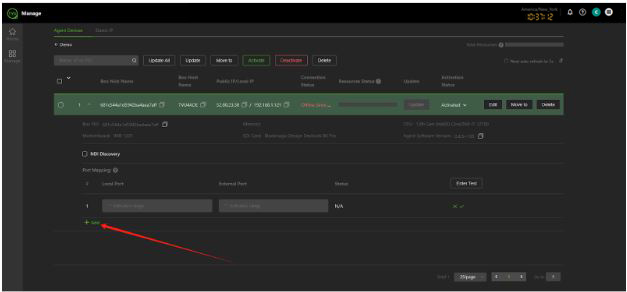
- Click the + Add button.
SDI Slot reservation
SDI Slot Reservation allows administrators and operators to configure, allocate, and manage dedicated SDI input and output slots on on-premise TVU Agent hardware directly from TVU Home.
This feature ensures predictable hardware resource management, prevents SDI port collisions across downstream services (such as TVU MediaHub and Workflow Studio), and provides real-time visibility into physical and virtual slot occupancy.
Key Features & UI Behaviors
- Dedicated SDI Port Mapping & Reservation: Assign specific SDI input/output channels on TVU Agent nodes to designated workflows or sources.
- Auto-Refreshing Occupancy Status: The interface automatically monitors and updates the live operational status of each SDI slot in real time without requiring manual page refreshes.
- Edit-Lock Protection During Active Use: When an SDI slot is actively processing or ingesting video in a running graph/production session, editing and reconfiguration options are automatically disabled to prevent accidental signal interruption.
- Contextual Status Tooltips: Hovering over disabled or locked slot controls displays informative tooltips indicating the current usage state (e.g., explaining why a slot cannot be modified while actively routed).
Slot Status Indicators
| Status | Visual indicator | Description | Allowed actions |
| Available | Green / Unlocked | Slot is idle and available for routing or reassignment. | Configure, Edit, Reserve |
| In Use / Occupied | Blue / Active | Slot is currently allocated and actively carrying a live SDI signal. | View Details (Edit Locked) |
| Disabled / System Reserved | Grey / Locked | Slot is unavailable due to system-level reservation or unsupported mode. | View Tooltip |
Step-by-Step Configuration Guide
To Access Agent Hardware Resources:
- Log in to TVU Home with an Owner or Admin role.
- Navigate to Manage in the left navigation sidebar and select Resources.
- Locate the target agent machine in the Agents / Edge Devices list and click to view its configuration panel.
Configuring and Reserving an SDI Slot:
- In the Agent details view, locate the SDI Slot Configuration section.
- Review the list of available SDI hardware channels (e.g., Slot 1 through Slot 4/8).
- Select an Available slot and specify its operating parameters (e.g., Signal Format, Direction/Input/Output mode, and Target Service).
- Click Save / Apply to commit the reservation.
Modifying or Reallocating an SDI Slot:
- Verify the slot status
- If the slot is Available, click the Edit icon to adjust port configurations.
- If the slot is In Use, the edit option will be greyed out. To modify it, first stop or unroute the active task/source in MediaHub or Workflow Studio.
- Once the active stream terminates, the slot occupancy status automatically updates to Available, unlocking the edit controls.
Elastic IP tab
The Elastic IP tab enables users to assign an Elastic IP to a specific region.
To assign an Elastic IP:
- Click the Manage > Resources tab.
- Click the Elastic IP tab.
- Click Elastic IP +.
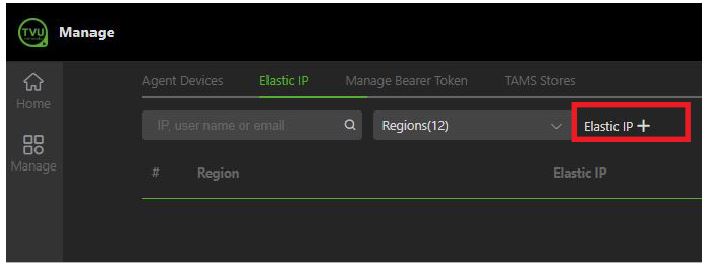
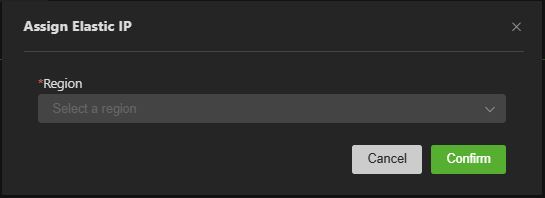
- The Assign Elastic IP window opens.
- Select a Region from the drop-down menu.
- Click Confirm.
Manage Bearer Token tab
The Manage Bearer Token tab provides a second contextual entry point for users to create and manage their bearer tokens directly from their profile.
To create and manage a Bearer Token:
- Click the Manage > Resources tab.
- Click the Manage Bearer Token tab.
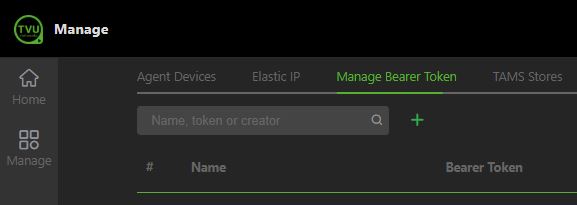
- Click the green “+” plus.
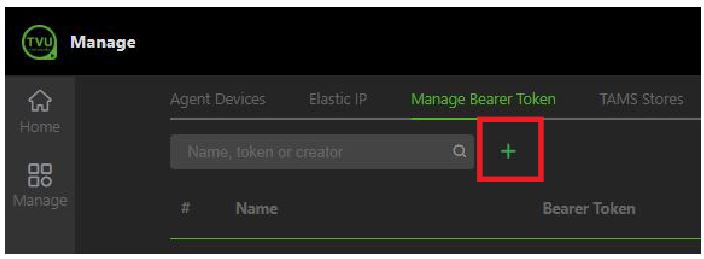
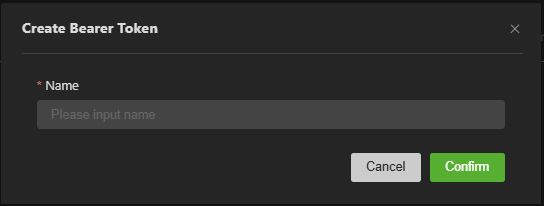
- The Create Bearer Token window opens.
- Enter a Name and click Confirm.
- The new Bearer Token appears in the list.
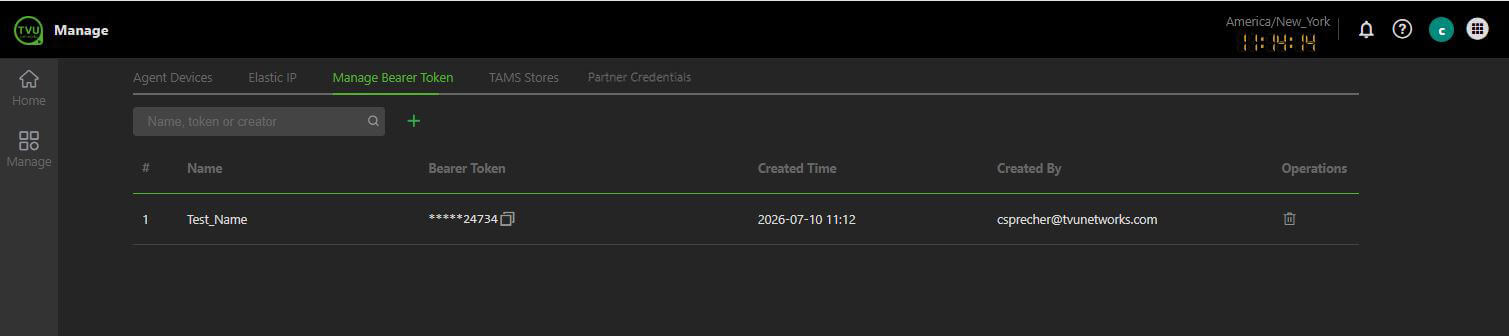
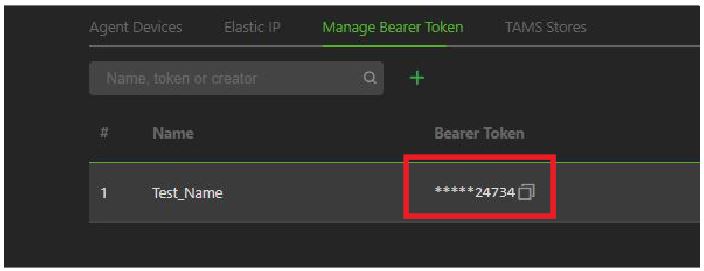
- To copy the Bearer Token, click the Copy icon.
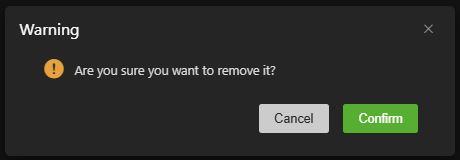
- To delete the Bearer Token from the list, click the Trash icon in the Operations column.
- Click Confirm in the pop-up Warning message.
Managing API Bearer Tokens
This guide outlines the complete workflow for generating, scoping, managing, and revoking API Bearer Tokens within the TVU Home portal—either via the dedicated Resources management page or through the User Profile quick-access menu.
Overview and Access Paths: API Bearer Tokens allow secure, programmatic authentication to TVU APIs and services (e.g., Command Center, MediaHub, RPS, and Device Management).
You can manage tokens via two navigation methods:
- Dedicated Management Page: Click Manage > Resources > Manage Bearer Token tab. Best for Full administration, auditing all workspace tokens, and bulk operations
- User Profile shortcut: Via Profile Avatar (top-right) > API Tokens / Developer Settings. Best for Quick generation and personal token management.
TAMS Stores tab
The TAMS tab enables users to manage and configure TAMS Store credentials. Use the TAMS-integrated services to reference a centrally managed store rather than requiring per-node authentication setup.
To create and manage a TAMS Store:
- Click the Manage > Resources tab.
- Click the TAMS Stores tab.
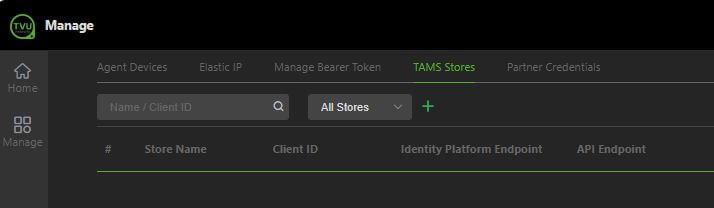
- Click the green “+” plus.
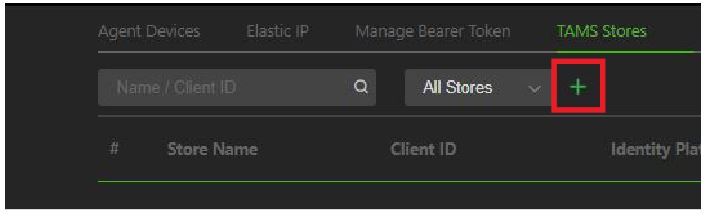
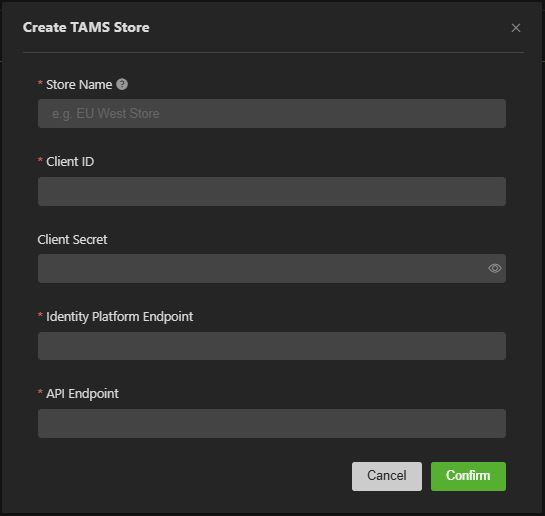
- The Create TAMS Store window opens.
- Enter a human-readable label in the Store Name field to identify this store within your group. The name must be unique.
- Enter the remaining required fields. The Client Secret field is optional.
- Click Confirm.
- The TAMS Store appears in the list.
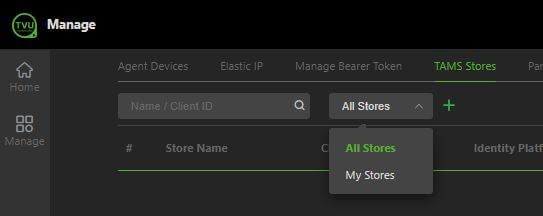
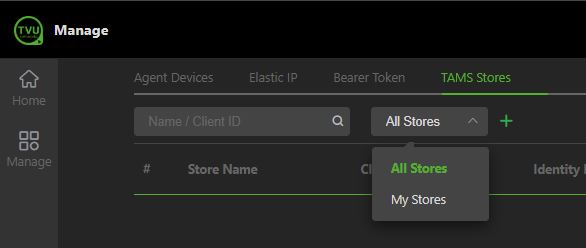
- To view and manage your TAMS Store, you can select My Stores from the drop-down menu to filter and select from your stores in the list.
- To search for a specific Name or Client ID, enter it into the Search field.
TAMS Multi-Store support
Configure and manage multiple TVU Media Storage (TAMS) stores per group.
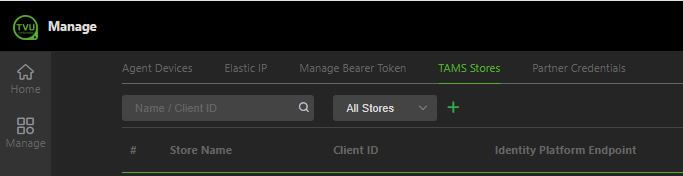
TAMS stores configured in TVU Home Manage > Resources are automatically made available as selectable destinations across downstream services (such as MediaMesh and Workflow Builder).
To create and manage multiple TAMS Stores:
- Click the Manage > Resources tab.
- Click the TAMS Stores tab.
- To Add a new TAMS Store, click the green “+” plus.
- The Create TAMS Store window opens.
- Enter a human-readable label in the Store Name field to identify this store within your group. The name must be unique.
- Enter the remaining required fields. The Client Secret field is optional.
- Enter the Client ID:
- Identity Platform Endpoint (Cognito Domain): The OAuth2 authentication / token endpoint URL.
- Enter the Client Secret:
- The OAuth2 client secret key.
- Identify the platform endpoint:
- The authentication authorization/token URL (Cognito domain).
- Enter the API Endpoint:
- Base URL for the TAMS store API.
- Click Confirm to validate and save the store configuration..
- Verify the Store List Table. Once saved, the store appears in the TAMS Stores table with the following details:
- (Row index)
- Store Name
- Client ID
- Identity Platform Endpoint
- API Endpoint
- Owner
- Created Time
Managing Multiple TAMS Stores
- Filter by Scope: Toggle between All Stores (organization-wide) and My Stores (created by your user account).
- Search: Use the search bar to locate stores by name or endpoint.
- Pagination: Adjust page density (20/page, 50/page, 100/page) at the bottom right.
- Edit Credentials / Endpoints: Under the Operations column, click Edit to update endpoint URLs or regenerate client credentials.
- Delete a Store: Under Operations, click Delete (confirm prompt) to remove an inactive store. Note: Ensure no active workflows are targeting the store before deletion.
Integrating with Workflows (MediaMesh / Workflow Builder)
- Open Workflow Builder or MediaMesh.
- Add a TAMS Record or media ingest component to the canvas.
- In the node inspector panel, locate the Target Store drop down.
- Select the configured store by name from the list. The node will inherit the central OAuth2 credentials and endpoints automatically.
Partner credentials vault
Securely store and manage encrypted third-party license credentials across supported partner platforms, complete with masked display values, role-based access, and search/filtering. Key capabilities are:
Secure Storage & Injection:
- Allows administrators and workflow owners to store licenses and authentication tokens securely. Values are encrypted upon entry and automatically injected when a partner workflow launches. Once saved, raw secret values are masked and never displayed again in the UI.
- Supported Partner Ecosystem: Supports integrations across 12 partner platforms.
Status & Credential Tracking:
- Tracks the health of workflow dependencies by indicating whether a required partner credential is Stored or has a Missing value.
Filtering and Search:
- Includes dedicated filters by partner name and credential status (Stored vs. Missing value), alongside keyword search for finding specific credential configurations.
Audit & Ownership Metadata:
- The credentials list displays key metadata including the Partner name, Credential label, Masked credentials status, Owner, and Created Time.
To Add a new partner credential
To add a new partner credential in TVU Home, follow these steps:
- Open the Partner Credentials Page:
- In TVU Home, navigate to Manage > Resources > Partner Credentials.
- Open the Add Credential Dialog:
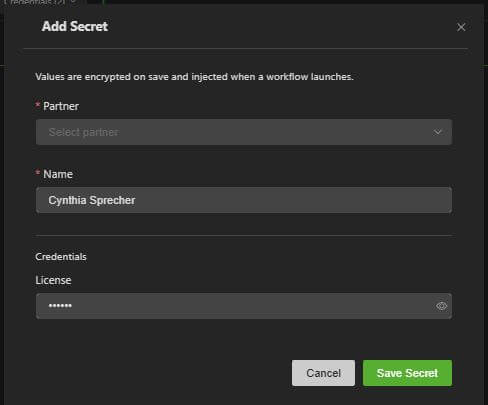
- Click the green +. The Add Secret window opens.
- Configure the Credential:
- Select Partner: Choose the target partner platform from the drop down (e.g., Chyron, Elecard, Emergent, Grass Valley, Jünger, Kinetiq, On-Hertz, PixOp, Redflag, TAG, Vela, Viz).
- Credential Name / Label: Enter a descriptive identifier for this credential to recognize it in your workflow configurations.
- License / Token / Secret Value: Paste the required API token, license key, or authentication secret for the partner service.
- Save the Secret:
- Click Save Secret.
Billing tab
The billing tab allows owner users to:
- Set up a user billing group
- Purchase tokens
- Edit billing information
- Review token purchase history, consumption, and recent TVU Producer, Channel, and MediaHub activity.
- View the total remaining token balance
- Segment their organization’s total token balance into dedicated, named pools with independent access, deduction rules, and alerting thresholds.
- View token transaction history
- View the token expiration date
- View Active commitments
- Purchase and assign Premium tier seats directly through in-platform checkout.
- Filter users by subscription tier with visual Premium badges in the member directory.
User billing group setup
New users will set up their own Billing group when they initially purchase their tokens.
Note: Users must first sucessfully set up a Billing group to purchase tokens. Once the billing group is set up, users can access their Token management page to perform subsequent token related tasks.
To set up your user billing group:
- Click the Manage > Billing tab.
- The Token management page will display.
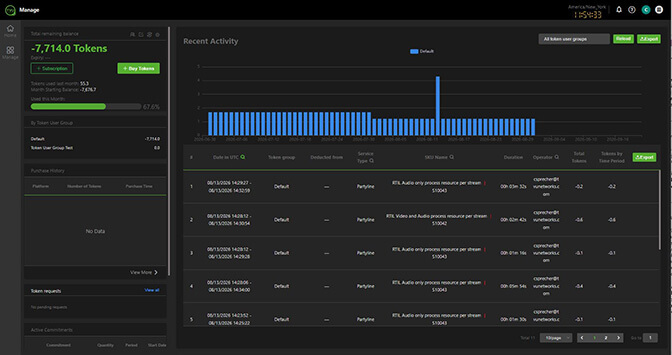
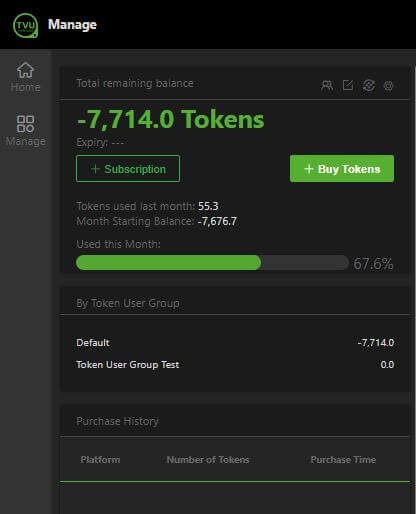
- Click the + Buy Tokens button in the Total Remaining balance panel.
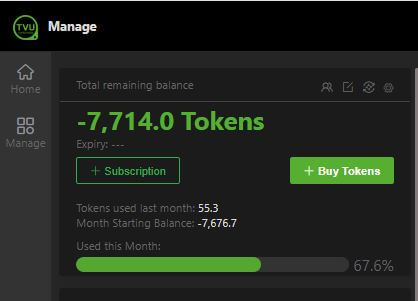
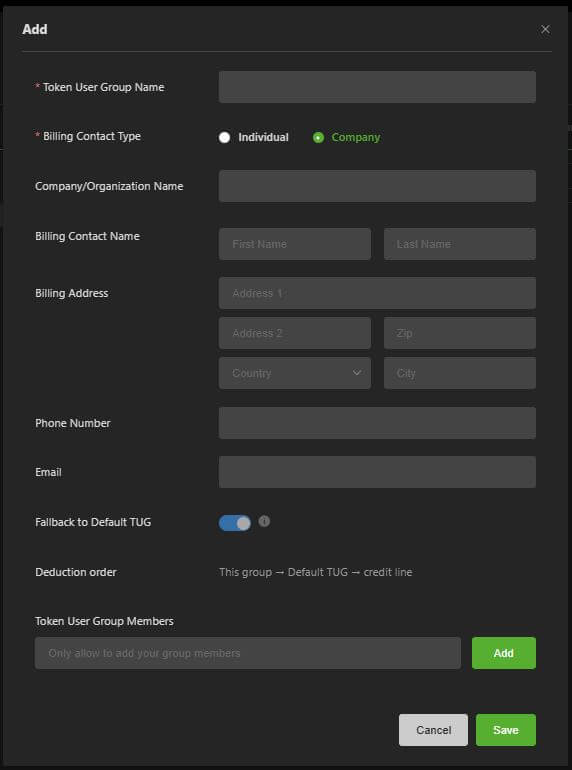
- The Billing info pop-up window will display.
- Enter all required information, click Save, then continue to “Purchasing tokens.”
Editing your billing information
To edit your user billing information:
- Click the Manage > Billing tab.
- The Token management page will display.
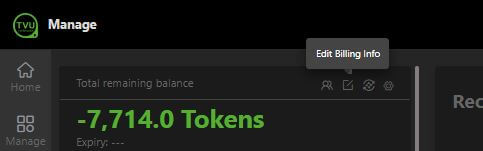
- To edit your billing information before purchasing tokens, click the Edit Billing Info icon.
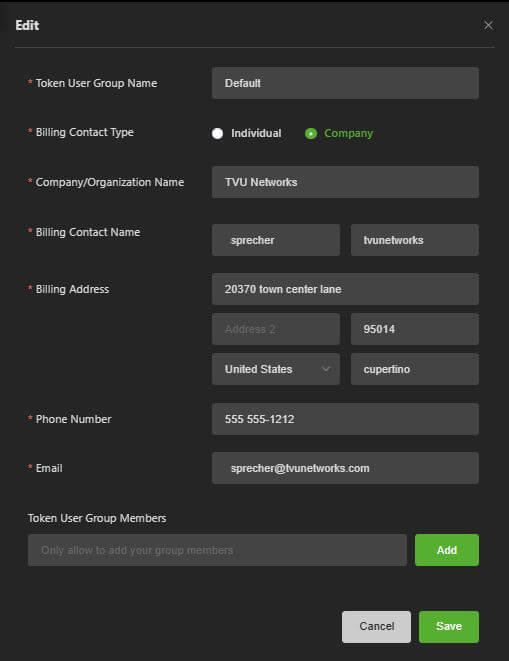
- Make your changes in the Edit Billing Info window, then click Save.
Purchasing TVU Tokens
- After setting up a user billing group, click Buy More in the Purchase History panel.
- The purchase TVU Tokens pop-up window will appear.
- Users can purchase Tokens by credit card or > link.
- Continue to one of the following purchasing methods:
Purchase TVU Tokens using a credit card
- To purchase TVU Tokens by credit card, click the View details menu, select the Qty menu, and choose a quantity.
- Click the Pay button and follow the prompts.
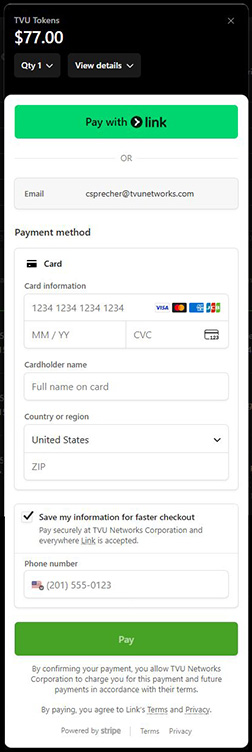
- Your purchase appears in the Purchase History panel.
Purchase TVU Tokens using > link
- To purchase by > link, click the View details menu, select the Qty menu, and choose a quantity.
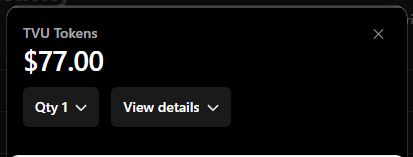
- Click the Pay with > link button.
- The > link window appears. Review your purchase in the gray box.
Note: To create a > link account, click Sign up and follow the prompts.
- Click the Continue to payment button, then follow the prompts.
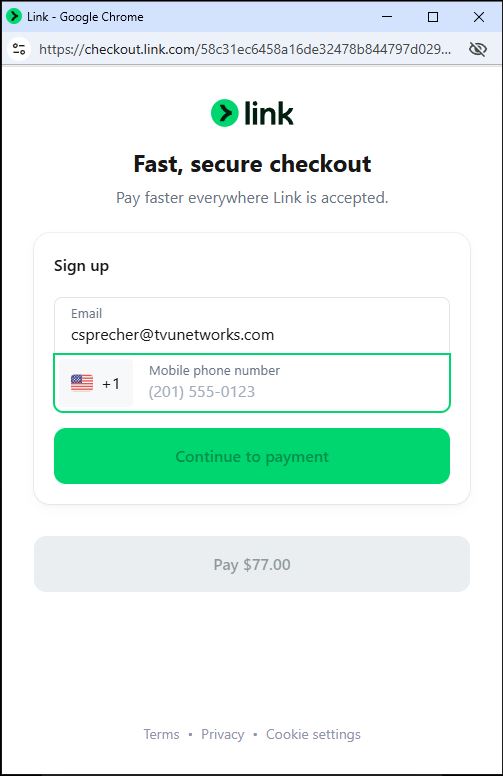
- Your purchase appears in the Purchase History panel.
Seat-based Premium Subscriptions
Owners can purchase and assign Premium tier seats directly through in-platform checkout.
To set up and manage Seat-Based Premium Subscriptions in TVU Home, the system follows a two-part entitlement model:
- Active Subscription: Your organization purchases a pool of Premium seats in Billing.
- Seat Assignment: Admins assign those seats to individual users listed in Manage > Members.
Entitlement Requirement: A user can access Premium features only when both conditions are met:
- The subscription is active
- The seat is assigned
Step 1: Purchase & Manage Seat Inventory (Billing)
Role required: Owner or Finance
- Go to TVU Home and click Manage > Billing in the navigation menu.
- Under the top balance/subscription area, click the + Subscription button.
- Expand your subscription tier/plan and specify the number of seats you want to purchase.
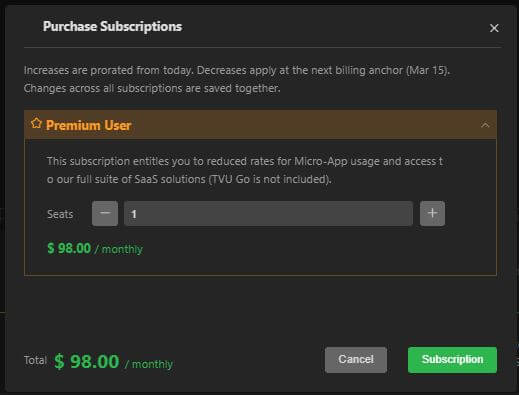
- Click the Subscription button and complete the checkout process.
- Once purchased, the Billing dashboard will display your seat inventory:
- Purchased Seats (Total licenses)
- Assigned Seats (In use)
- Available Seats (Unallocated)
Step 2: Assign Premium Seats to Users (Members)
Role required: Owner or Admin
- In TVU Home, navigate to Manage > Members.
- Locate the team member you want to grant Premium access to.
- Click the Manage Subscription button.
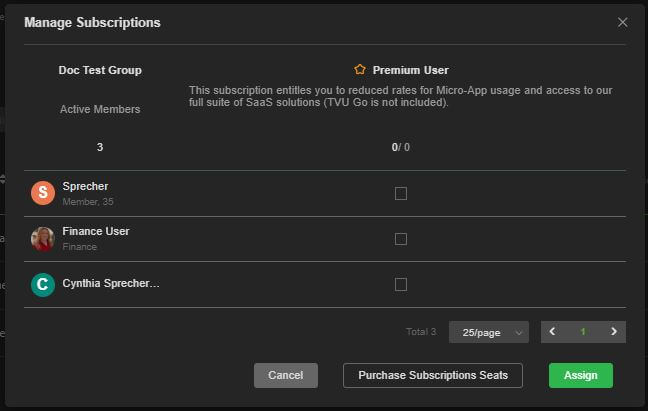
- Toggle the Premium checkbox to Enabled for that user.
- If there are available seats, the seat is immediately allocated, and the user receives a Premium badge in the members directory.
- If all seats are currently assigned (0 available), a prompt will notify you to either reallocate an existing seat or click the Purchase Subscriptions Seats button to open Billing to purchase more seats.
Step 3: Seat Reassignment & Reclaiming
- Reassign a Seat: Toggle off Premium access for a member in the Members list. The seat immediately returns to the unallocated pool and can be assigned to another user at no extra cost.
- Automatic Reclaim: Disabling or deleting a user from the organization automatically reclaims their assigned seat.
- Pending Invites: Users with pending invitations do not consume seats until the invitation is accepted and assigned.
Filter Member list by Profile badging
Filter members by subscription tier with visual Premium badges in the member directory, and view active plan details directly on individual profile pages.
To filter members by their Premium subscription status in TVU Home, follow these steps:
- Navigate to the Members Page:
- In TVU Home, click Manage in the left navigation bar and select Members.
- Locate the Filter Controls:
- Above the members list/table, find the filter bar (next to the user search box).
- Filter by Subscription Status:
- Click the Subscription (or Premium) drop-down menu.
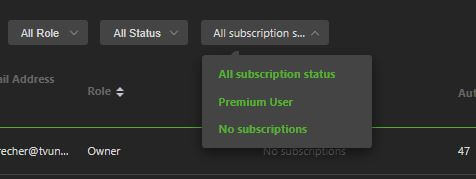
Select your desired view:
- Premium user: Shows only members who have been assigned an active Premium seat (indicated with a Premium badge).
- No subscriptions: Shows all unassigned or standard-tier members.
- All subscription status: Resets the filter to display the entire organization membership.
- Combine with Search (Optional):
- You can combine the subscription filter with the name/email search bar or role filter (Owner, Admin, Member, Finance) to quickly locate specific assigned users or identify unallocated members.
Token User Group creation
In TVU Home, Token User Groups (TUG) allow account Owners and Finance administrators to segment their organization’s total token balance into dedicated, named pools with independent access, deduction rules, and alerting thresholds.
To create a Token User Group (TUG), follow these steps:
- Access the Token User Groups Management Page:
- Log in to TVU Home with an Owner or Finance account.
- In the left navigation sidebar, click Manage > Billing and select the Manage Token User Groups icon (or access the Token User Group management view from the By Token User Group card below your balance overview).
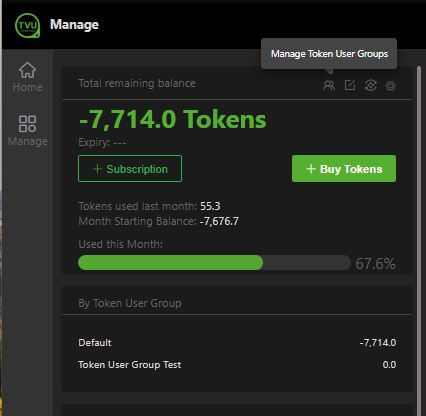
- Create a New Token User Group:
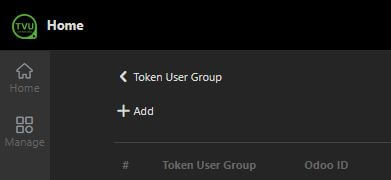
- Click Manage > Billing, On the Token User Groups dashboard, click + Add.
- Configure Group Details:
- Token User Group Name: Enter a clear, descriptive name for the group (e.g., Production Team, Field Operations).
- Billing & Contact Information (if applicable):
- Enter billing contact details or link an Odoo ID if this group requires separate invoicing or finance tracking.
- Deduction & Fallback Settings:
- Configures deduction priority and specifies whether the group should fall back to the default account balance if its group token balance runs out.
- Assign Members to the Group:
- Under the group’s member configuration, select and add users from your root group/organization.
- Any usage (e.g., TVU Producer, MediaHub, Micro-Apps, Transcoding) generated by these members will automatically draw from this group’s allocated token balance.
Note: a user can belong to only one Token User Group at a time.
- Review your settings and click Save to finalize the group.
Token User Group management
Organization Owners and Finance administrators can distribute tokens across dedicated Token User Groups.
Transfer / Allocate Tokens (Optional):
- After creating the group, click Transfer Tokens on the Billing dashboard to allocate tokens from the default account balance to the new group. Refer to “Transferring Tokens between Token User Groups.”
Review Usage:
- Member and Admin roles can view their individual token consumption and group balance under the self-scoped Billing view, while Owners/Finance retain full group-wide management.
Transferring Tokens between Token User Groups
Organization administrators can distribute tokens across dedicated Token User Groups (TUG). The Token Transfer feature allows Owners and Finance administrators to reallocate balances dynamically between different groups (e.g., from the account’s Default pool to a specific project group, or between individual team groups) without interrupting active workflows.
Prerequisites & Permissions:
- Required Roles: Owner or Finance administrator.
- Source Group Balance: The source Token User Group must have sufficient unreserved tokens to cover the transfer amount.
- Navigate to the Transfer Tokens Interface:
- Sign in to TVU Home.
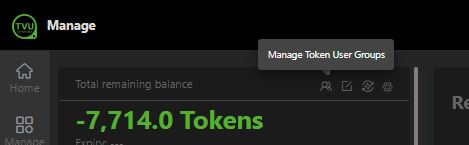
- From the left navigation menu, click Manage > Billing and select the Manage Token User Groups icon.
- On the Token User Groups dashboard, locate the group you want to transfer tokens from/to, then click the Transfer Tokens button.
- In the Transfer Tokens window, click Token User Group.
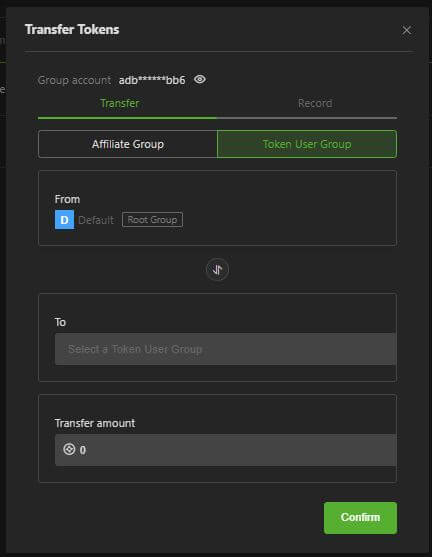
- In the Transfer Tokens window, complete the following fields:
- From (Source Group): Select the Token User Group from which tokens will be deducted. This displays the current available balance for the selected source group.
- To (Destination Group): Select the Token User Group that will receive the tokens. This Cannot be the same as the source group.
- Transfer Amount: Enter the number of tokens to transfer using the up/down symbols. Supports positive numbers, including decimal values (e.g., 150.50).
- Review and confirm:
- Verify that the Source Group, Destination Group, and Transfer Amount are correct.
- Check the calculated post-transfer balances displayed for both groups.
- Click Confirm.
- A success notification will appear, and the updated balances will immediately reflect on the Token User Groups overview table.
Post-Setup Management
- Transferring Tokens: Owners can click Transfer Tokens on any group row or from the Billing overview to transfer tokens between token user groups in either direction.
- Approving Member Requests: Review, approve, or adjust top-up requests submitted by group members when their balance runs low.
- Monitoring Consumption: View per-group remaining balance, active sessions, and detailed usage breakdowns.
Transferring Tokens – Affiliate Group
Users can transfer tokens to pre-defined users. Token owners must contact TVU Support to configure token transfers.
To transfer tokens to an Affiliate group:
To transfer tokens:
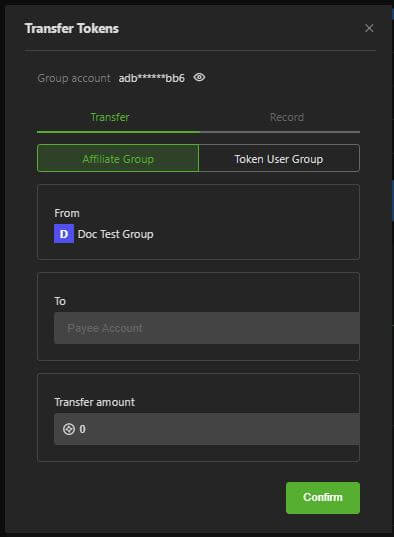
- Click the Transfer Token icon at the top of the Token Management panel.
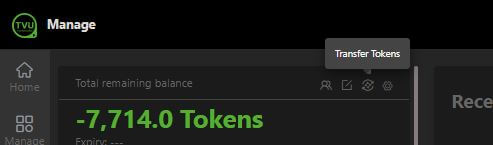
- The Transfer Tokens window will display. Click the Affiliate Group tab.
- Enter the group payee account in the To field.
- In the Transfer amount field, enter a token quantity.
- Click the Confirm button.
Low-balance alerts
Configure customizable notification recipient lists and multi-tier (soft/hard) warning thresholds, including negative-threshold support for credit-enabled groups.
To configure low-balance notification alerts in TVU Home, follow these steps:
- Go to the Billing Page:
- In TVU Home, click Manage in the left navigation bar and select Billing.
- Open Notification Settings:
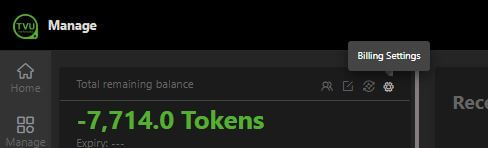
- On the top Total remaining balance card, click the Billing Settings (gear) icon and select Notification Settings.
- Configure Alert Thresholds & Recipients:
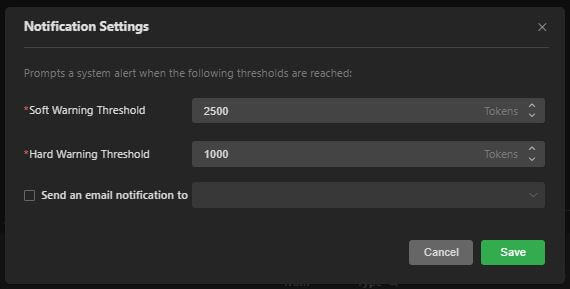
- Alert Thresholds: Define your balance alert trigger points:
- Soft Warning Threshold / Low Balance Warning: Triggers an alert when your token balance drops below a set amount.
- Hard Warning Threshold / Exhausted Balance: Triggers an urgent alert when tokens reach zero or a critical limit (negative thresholds can also be set for credit-enabled accounts/groups).
- Recipients: Click the Send an email notification to checkbox. Specify the email addresses or account roles from the menu (such as Owner, Admin, or Finance) that should receive notification emails when thresholds are crossed.
- Save Settings:
- Click Save to confirm in the dialog to apply your notification settings.
Auto-Recharge
Specify custom Token auto-recharge thresholds and recharge amounts, with one-click workflows to reset negative balances back to positive standing.
- Go to the Billing Dashboard:
- In TVU Home, click Manage in the left navigation bar and select Billing.
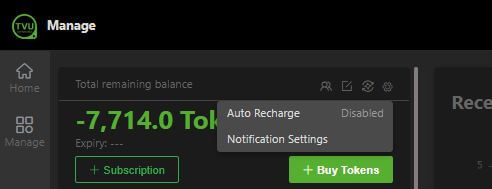
- Open Auto Recharge Settings:
- Locate the top Total remaining balance card.
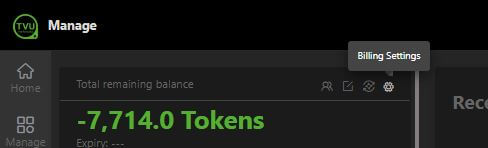
- Click the Billing Settings icon and select Auto Recharge.
- Configure Auto Recharge Parameters:
- Enable Toggle: Switch the Enable Auto Recharge status to Enabled / On.
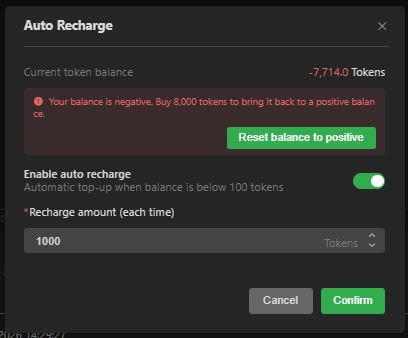
- Recharge Threshold (Trigger): Set the token balance level in Current Token Balance at which auto recharge should trigger (e.g., when remaining balance drops below X tokens).
- Recharge Amount: Specify the number of tokens to automatically purchase/add upon hitting the threshold.
- Payment Method: Click the Reset balance to positive button. Select or enter the designated credit card or payment profile to be charged automatically.
- Confirm & Save:
- Click Confirm to activate Auto Recharge.
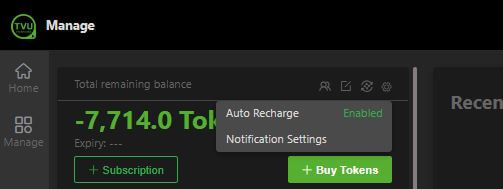
- The status under your balance summary and the Billing Settings icon menu will update to show Enabled.
Access App management
Access App is a dedicated configuration interface for deploying and managing organization access applications. While the Resources section is visible in the sidebar, modifying application access configurations typically requires Owner or Admin permissions.
- Log in to TVU Home.
- Navigate to the TVU Home portal with your credentials.
- In the left navigation sidebar, locate the Manage menu.
- Click on Resources from the sub-menu list.
- Select the Access App tab to view and configure your access-related applications.
TVU Home Quick Start Guide – Member role
Signing in to TVU Home
There are two methods “Members” can use to sign in to TVU Home:
- If you are signed in to a TVU service, click the Services (waffle) icon and select Home in the menu.
- Open a web browser and enter: https://home.tvunetworks.com
The Home login page will display.
Sign in with your account credentials:
- Enter your email and password.
- Click Sign in.
TVU Home – Landing page
The Welcome to TVU Home landing page is displayed when you successfully sign in to TVU Home.
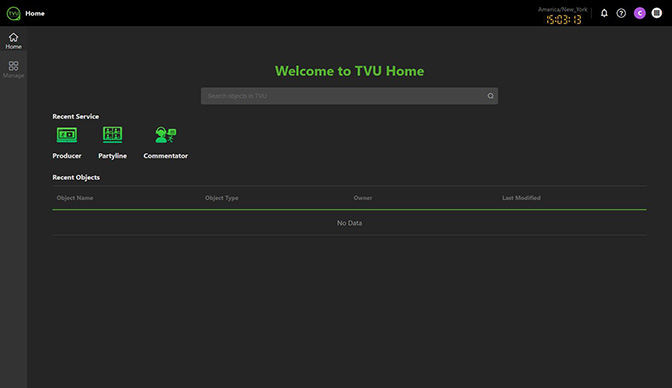
The Home landing page for a Member role includes:
- TVU Home page: The TVU Home landing page provides direct access to recent services, including TVU Producer, Partyline, Commentator, TVU Channel, and TVU Search, without logging in to each service. The Recent Objects panel displays the user’s account activity directly from the Home landing page.
- TVU Services navigation: Users can click the TVU Services navigation (waffle) icon to quickly open a service that is not currently displayed in the Recent Services section on the Home landing page.
- Manage tab: Members and owners can use this tab as their primary tool to perform member-related tasks. Click the Manage tab to access the Members, Resources, and Billing tabs.
- Members tab: The Members tab opens the Group management dashboard and displays controls based on the Members user role type.
- Resources tab: The Resources tab enables Agent device management, box pool folder setup and configuration, and Agent software installation for authorized roles. A box pool folder can store multiple boxes, each of which is a physical device on which you have installed the Agent software.
Members can view Elastic IP assignments, create Bearer Tokens, and TAMS Stores by clicking the appropriate tab in the Resources Management page. - Billing tab: Accessible to owners, members, and finance users. TVU Home enables account owners and finance users to manage their members’ TVU Token purchases. Members can view their Token purchases, usage, and balances. Token purchases are initiated by the Owner and Finance roles.
Dashboard interface – Member controls
Group members have administrative rights to their own accounts.
A Member user can:
- View all users in their group and their status.
- Modify their profile picture (avatar), reset the password, and edit user information.
- View Usage time, storage status, and router usage.
- View authorized basic and optional TVU Services.
- Quit the group.
- View active and inactive Agent devices.
- Add and view active and inactive box pools.
- Create TAMS Stores
- View Elastic IP assignments
- View, add, and manage your Bearer Tokens
- View their Token purchases, usage, and balances.
Members tab controls
The Members tab opens the Group Management page. When you sign in as a member user, you can view your group’s members on the Group workspace page.
Note: A Member’s dashboard will display different controls than the Owner role.
The Members tab allows you to:
- Edit your username
- Add or change your profile picture (avatar)
- Update your Email address
- Reset your Password
- View group member roles and status
- Quit the group
Updating your user information
To update your user information:
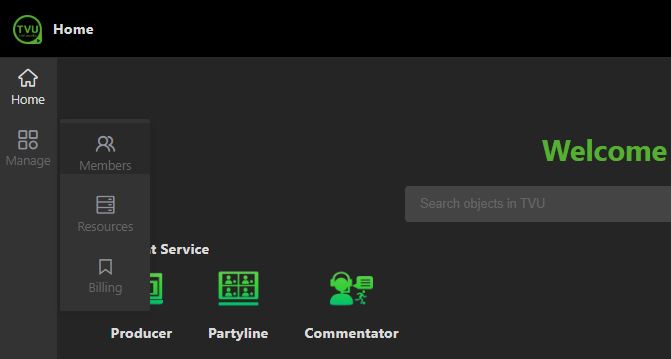
- Click the Manage > Members tab.
- The Group management dashboard will display.
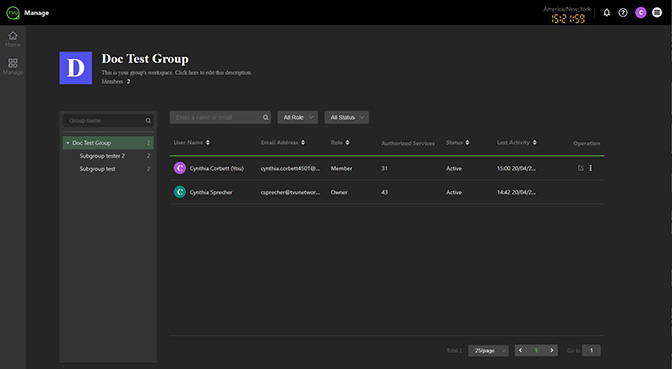
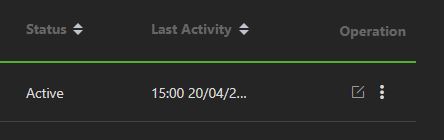
- Click the edit icon in the Operation column.
- The Edit User Information page opens.
- Enter a User Name, update your Email, or reset your Password. You may add additional profile information by clicking More to expand the panel.
- To update your Profile picture, hover your mouse over the picture and click the Edit icon.
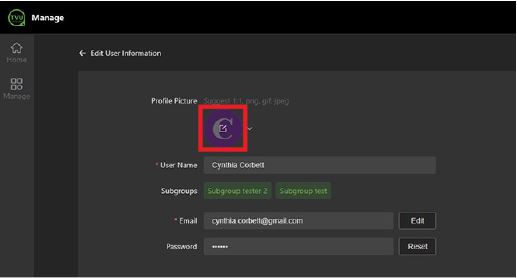
- The Add Profile Picture pop-up will display.
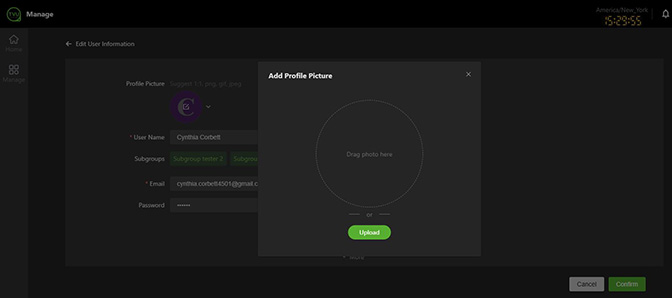
- Drag or Upload a 1:1 image in png, gif, or jpeg format.
- Click the green check mark to save your Avatar picture.
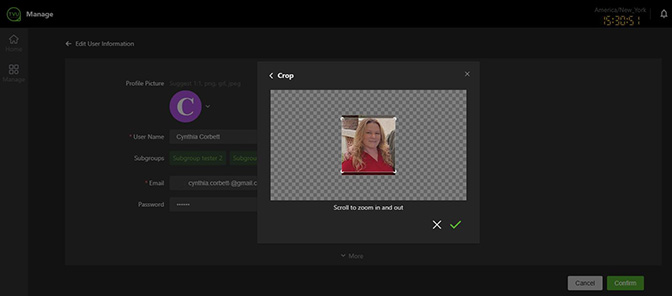
- Click the green Confirm button.
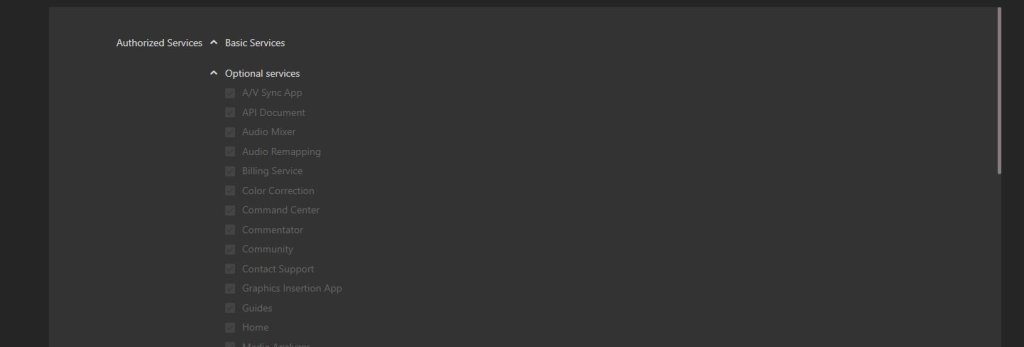
- Scroll down to the Authorized Services panel and select the Optional Services that apply as a member.
Quitting the group
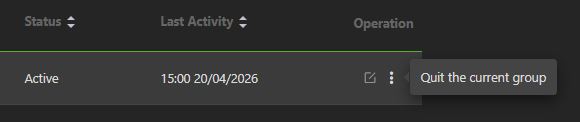
As a Member user, you can quit the group.
To quit the Group:
- Click the Manage > Members tab.
- Your Group management page will display.
- Hover your mouse over the three-dot icon and click Quit the current group.
Search and filter displayed content
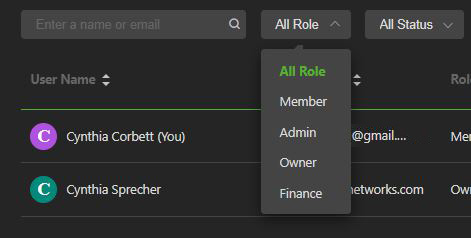
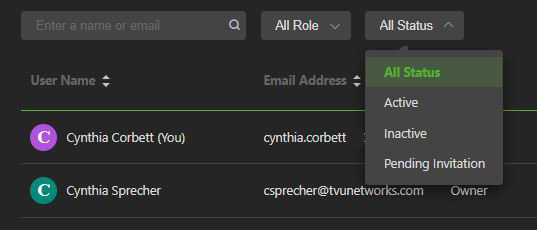
You can search by username and filter what is displayed by selecting a value in the Role and Status drop-down menus.
Resources tab
The Resources > Agent Devices tab allows users to manage an Agent device, set up and configure a Box Pool folder, and install Agent software.
Note: A box pool folder can store multiple boxes, each of which is a physical device where the user has installed the Agent software.
The Resources > Agent Devices tab allows Agent software to be installed on a device. The Agent integrates with MediaHub instead of using cloud-based resources. The agent can be installed on a user’s resource to run programs.
- The Resources > Elastic IP tab allows members to view Elastic IP assignments by region.
- The Resources > Bearer Token tab allows members to create a Bearer Token.
- The Resources > TAMS Stores tab allows members to create TAMS Stores.
Adding resources and services
The Resources tab is where Member users can create Box Pool folders and view, add, and manage Agent devices.
To add resources and services:
- Click the Manage > Resources tab.
- The Manage page opens the Agent Devices tab by default.
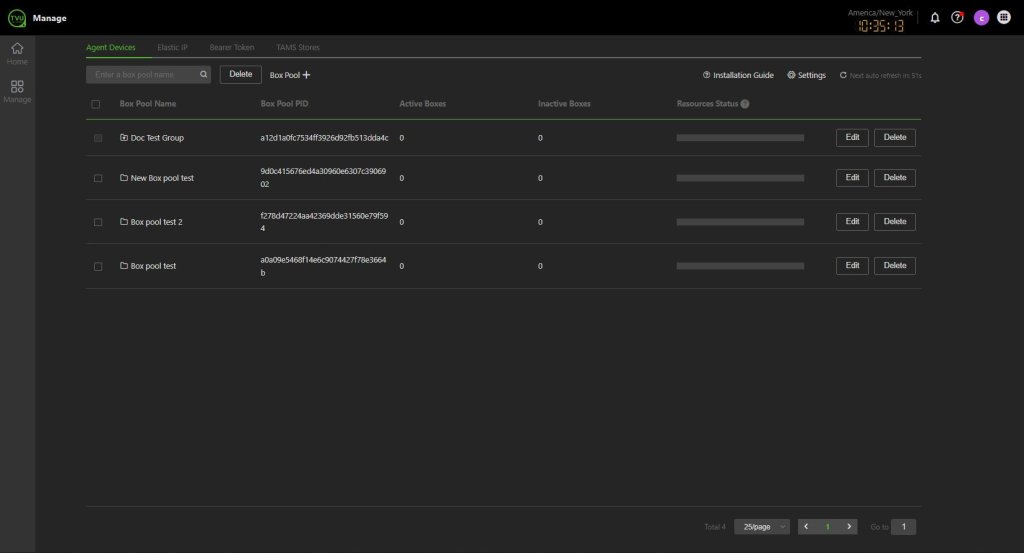
- To add a new Box Pool folder, click the Box Pool +.
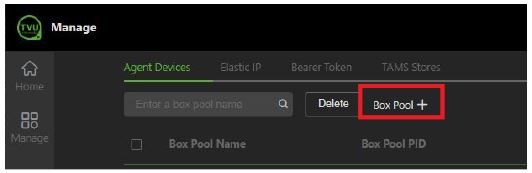
- The Create a new box pool window will display.
- Enter a Box Pool Name and click Confirm.
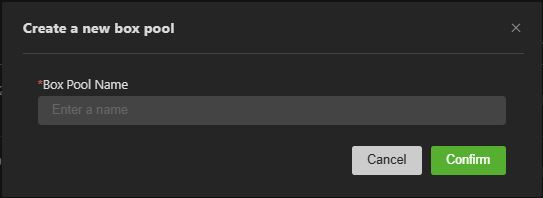
- Your new Box Pool folder has been added to the Agent Devices list.
- To delete a Box Pool, click the Delete button.
- To rename the Box Pool, click the Edit button.
- The Edit box pool window will display.
- Enter a new Box Pool Name and click Confirm.

Adding Agent devices to Cloud services
IMPORTANT: You can only select a device as BYOR in Mediahub after the Agent is successfully installed on it.
After your agent is fully installed, you can configure it by performing the following steps and use it in MediaHub by selecting BYOR under Resources.
To download and install the Agent:
- Click the Manage > Resources tab, then click the Installation Guide link.
- The Agent installation guide pop-up window will display.
- Watch the Installation Quick Guide TVU Agent video tutorial.
- Click the Copy script button and paste the script into your Linux Command line. Run the script to install the Agent on your device.
- To obtain the Installation key, click the Copy key button.
- To Reset the key and script, click the Reset Installation Key & Script button.
- After installation, the Agents will be added to the default Box Pool. To select a default Box Pool, click the Settings icon, select a Box Pool from the menu, and then click the Confirm button.
Port mapping
To map your box pool in TVU Home:
- Click the Manage > Resources tab.
- The Manage page opens and displays Resources.
- Click the Box pool that requires mapping.
- Click the Box pool checkbox that requires mapping in the Box Pool.
- Click the + Add button.
Elastic IP tab
The Elastic IP tab enables members to search for and view assigned Elastic IP addresses.
To assign an Elastic IP:
- Click the Manage > Resources tab.
- Click the Elastic IP tab.
- Click Elastic IP +.
- Click the Search field and enter an IP, User Name, or Email to filter the displayed results.

Bearer Token tab
The Bearer Token tab provides a second contextual entry point for users to create and manage their bearer tokens directly from their profile.
To create and manage a Bearer Token:
- Click the Manage > Resources tab.
- Click the Bearer Token tab.
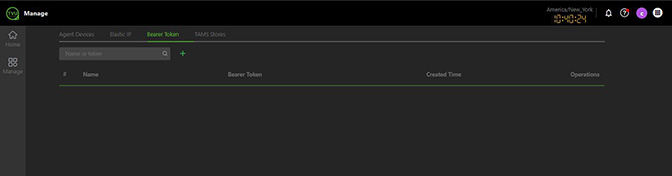
- Click the green “+” plus.
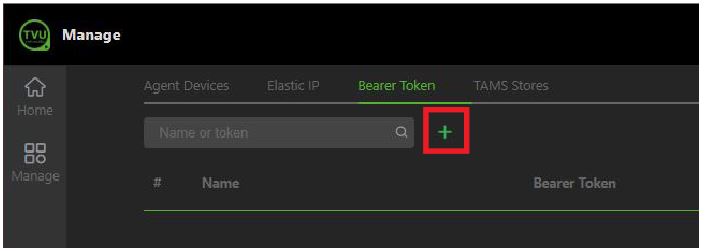
- The Create Bearer Token window opens.
- Enter a Name and click Confirm.
- The new Bearer Token appears in the list.
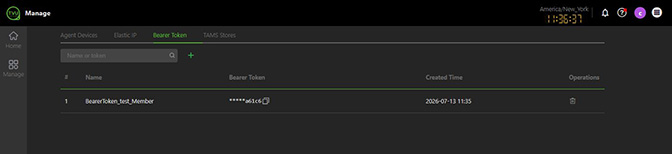
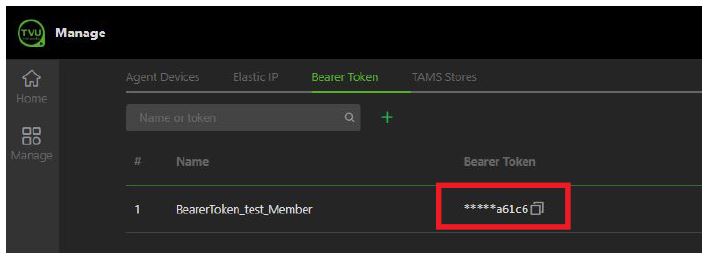
- To copy the Bearer Token, click the Copy icon.
- To delete the Bearer Token from the list, click the Trash icon in the Operations column.
- Click Confirm in the pop-up Warning message.
TAMS Stores tab
The TAMS tab enables users to manage and configure TAMS Store credentials. Use the TAMS-integrated services to reference a centrally managed store rather than requiring per-node authentication setup.
To create and manage a TAMS Store:
- Click the Manage > Resources tab.
- Click the TAMS Stores tab.
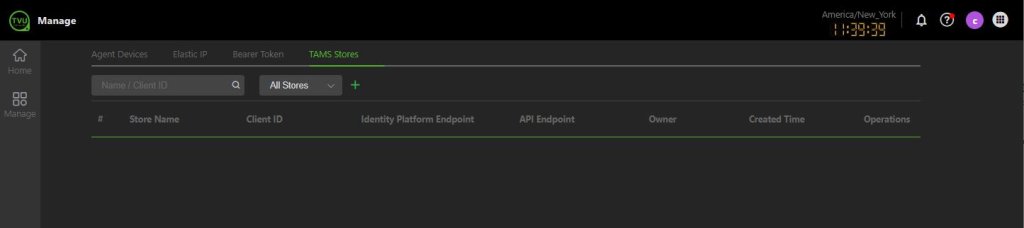
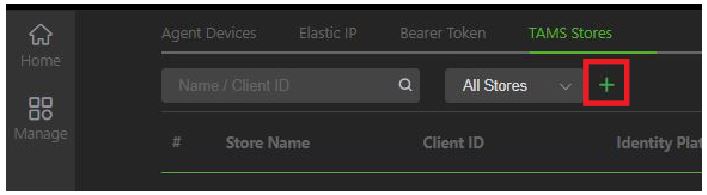
- Click the green “+” plus.
- The Create TAMS Store window opens.
- Enter a human-readable label in the Store Name field to identify this store within your group. The name must be unique.
- Enter the remaining required fields. The Client Secret field is optional.
- Click Confirm.
- The TAMS Store appears in the list.
- To view and manage your TAMS Store, select My Stores from the drop-down menu to filter and select from your stores from the list.
- To search for a specific Name or Client ID, enter it into the Search field.
Billing tab
The billing tab allows member users to:
- Edit their own billing information
- Review token purchase history, consumption, and recent TVU Producer and MediaHub activity
- View the total remaining token balance
- View token transaction history
- View the token expiration date
- View Active commitments
User billing group setup
New users must contact their owner or finance member to set up their user Billing group and to purchase TVU Tokens.
Note: Once the billing group is set up, users can access their Token management page to edit their billing information, view Token related activity, and balances.
Editing your billing information
To edit your user billing information:
- Click the Manage > Billing tab.
- The Token management page will display.
- To edit your billing information before purchasing tokens, click the Edit Billing Info icon.
- Make your changes in the Billing group window and click Save.
TVU Home Quick Start Guide – Admin role
Signing in to TVU Home
There are two methods an “Admin” can use to sign in to TVU Home:
- If you are signed in to a TVU service, click the Services (waffle) icon and select Home in the menu.
- Open a web browser and enter: https://home.tvunetworks.com
The Home login page will display.
Sign in with your account credentials:
- Enter your email and password.
- Click Sign in.
TVU Home – Landing page
The Welcome to TVU Home landing page is displayed when you successfully sign in to TVU Home.
The Home landing page for the admin role includes:
- TVU Home page: The TVU Home landing page provides direct access to recent services, including TVU Producer, Partyline, Commentator, TVU Channel, and TVU Search, without logging in to each service. The Recent Objects panel displays the user’s account activity directly from the Home landing page.
- TVU Services navigation: Users can click the TVU Services navigation (waffle) icon to quickly open a service that is not currently displayed in the Recent Services section on the Home landing page.
- Manage tab: Admins can use this tab as their primary tool to perform member and owner Admin-related tasks. Click the Manage tab to access the Members, Usage, Resources and Billing tabs.
- Members tab: Opens the Group management dashboard and displays controls based on the Admin user role type.
- Usage tab: Users can view their hourly usage history by date, product, and service name.
- Resources tab: The Resources tab enables Agent device management, box pool folder setup and configuration, and Agent software installation for authorized roles. A box pool folder can store multiple boxes, each of which is a physical device on which you have installed the Agent software. An Admin can assign Elastic IP, create and manage Bearer Tokens, and TAMS Stores by clicking the appropriate tab in the Resources Management page.
- Billing tab: Accessible to owners. members, Admins, and finance users. TVU Home enables account owners, Admins, and finance users to manage their TVU Token purchases, usage, and balances. Members can view their Token purchases, usage, and balances. Token purchases are initiated by Owner and Finance roles.
Dashboard interface – Admin controls
The Admin role has administrative rights to members’ accounts, similar to owners. However, admins can’t edit an Owner role.
An Admin can:
- Manage a group and a subgroup workspace
- View Usage time, storage status, and router usage.
- Add users and sub-users
- Add resources and services
- Invite new members
- Assign roles to each member
- Add members to other subgroups
- Designate a new group owner
- Delete or disable a member’s access
- Authorize, manage, and monitor a member’s TVU services
- Purchase tokens, view usage, and balances
- Add Agent devices to the Cloud service
- Assign Elastic IP addresses to a specific region.
- Create and manage Bearer Tokens
- Create TAMS Stores.
Members tab controls
The Members tab opens the Group management page. When you sign in as an account Admin, you can manage your members on the Group page by clicking the Manage > Members tab.
Note: Admin’s cannot edit Owner users.
The Members tab allows you to:
- Edit your Group Name and add group information
- Add a profile picture (avatar)
- Add subgroup workspaces
- Add a new subgroup user
- Add an email domain name to your group
- Assign roles to sub-users
- Manage all aspects of your group
- View TVU Token purchases, usage, and balances
- View Elastic IP addresses by a specific region.
- Create and manage Bearer Tokens.
- Create TAMS Stores.
Updating your Group information
To update your Group information:
- Click the Manage > Members tab.
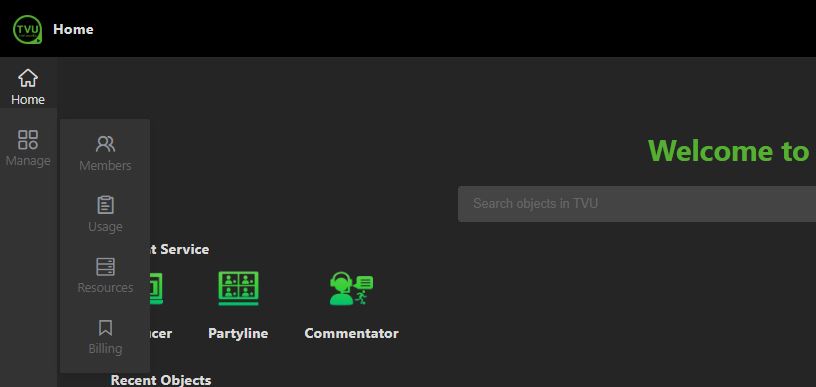
- The Group Management dashboard will display.
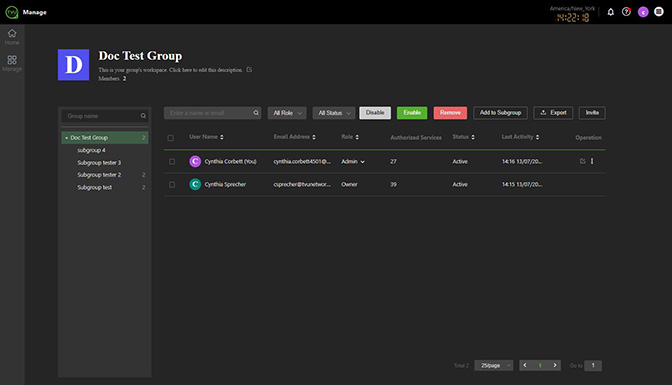
- Click the edit icon below the Group name.
- The Edit Group Information page opens.
- Enter a Group Name and page Description.
- To update your Profile picture, hover your mouse over the picture and click the Edit icon.
- The Add Profile Picture pop-up will display.
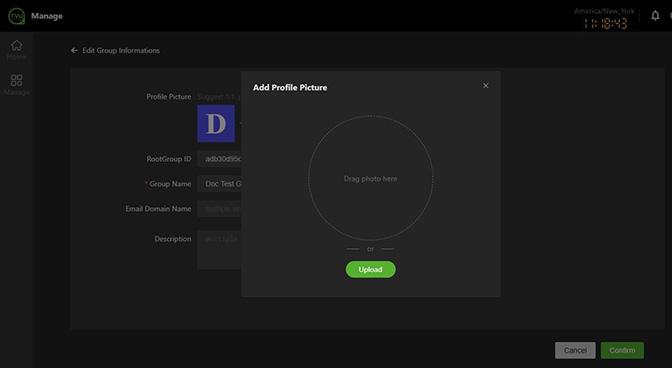
- Drag or Upload a 1:1 image in png, gif, or jpeg format.
- Click the green check mark to save your Avatar picture.
- Click the green Confirm button.
- Scroll down to the Authorized Services panel and select the Optional Services that apply or disable services.
- Click the green Confirm button.
Editing a user’s information
To edit a user’s information:
- Select your Group Name in the left panel.
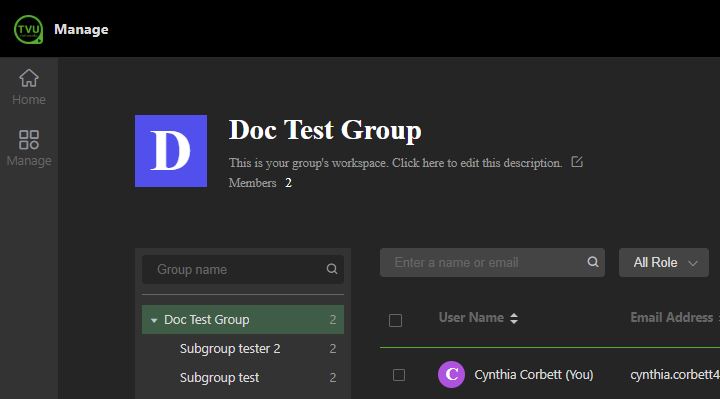
- Highlight (a user) in the user list.
- Click the edit icon in the Operation column.
- The Edit User Information window opens.
- Enter any required edits.
- If you want to add the new user to an existing subgroup, click the Subgroup edit icon and select a subgroup.
- Scroll down to the Authorized Services panel and select the Optional Services you want to assign to the user.
- Click the green Confirm button.
Creating a subgroup
When you create a subgroup, it becomes part of your group workspace. You can invite group members as sub-users into this workspace and assign roles to each user.
To create a subgroup:
- Click the Manage > Members tab.
- Hover your mouse over Group name, then click the Plus.
- The Create a subgroup window will display.
- Enter a subgroup name, your Email Domain Name (if you want to assign a domain to the subgroup), and a description of your subgroup (optional).
- Click Confirm.
- The new subgroup is displayed under your Group name.
- To configure and manage Subgroups, click a Subgroup name in the left panel to open the Subgroup management page.
- All Subgroups will display.
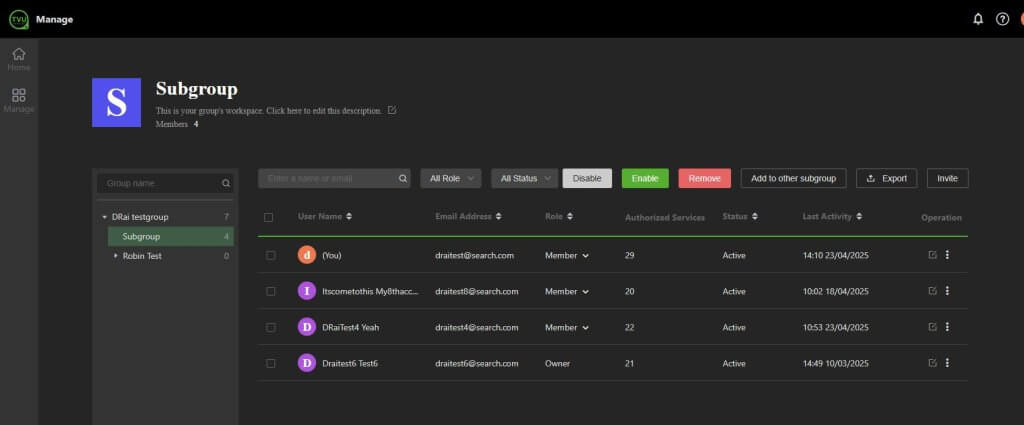
- Click the Edit icon in the Operation column to edit and manage a Subgroup.
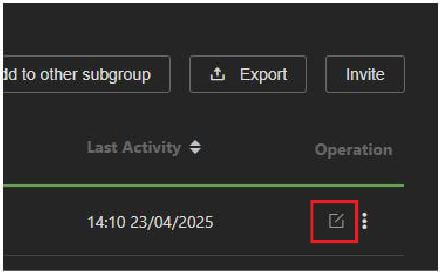
- The Edit User Information window will display.
- Configure the Subuser’s information, then click Confirm.
- When finished, click ‹— Edit User Information at the top of the page to return to the Subgroup page.
Inviting users to your group
After you have created your subgroups, you can invite users to your group and subgroups.
Note: The invitation procedure only accepts users with or without an active TVU account.
To invite a user to your group:
- Click to highlight your Group name.
- Click the Invite button.
- The Invite window will display.
- Enter the Email address of the user you want to invite to your group, then click Send Invitation.
- The dashboard will display the invited user and a “Pending Invitation” notification in the dashboard status column until the invitation is accepted.
- The owner can cancel the invitation by clicking the green Cancel Invitation in the Operation column.
- The invited user receives an email to accept the invitation. After accepting the invitation, the TVU Home page will open. The new user clicks the Bell icon at the top-right of the page, then clicks the Join or Ignore button to complete the process.
After joining the group, the user’s name is displayed in the user list. Users can click the edit icon on the Groups page to edit their user information.
Note: The group admin receives a Bell icon notification when the user has joined the group.
Adding a role to the new user
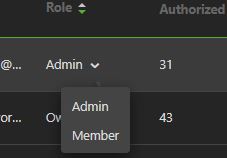
Owners can assign a new user a Member or Admin role. The Admin role allows co-admin rights, whereas the Member role does not.
To add a role to the new user, click the user’s Role drop-down menu and select Admin or Member.
Note: Choosing Admin allows the user administrative rights.
Adding members to other subgroups
To add a user to a subgroup:
- Click the three-dot icon and select Add to other subgroup.
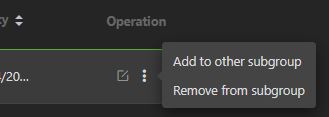
- Select the Subgroup checkbox in the Add to Subgroup window, then click Confirm.
Removing a member from a subgroup
To remove a member from a subgroup:
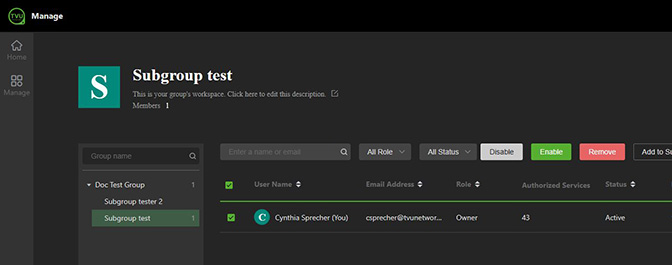
- Locate the Member’s name, click the three-dots in the Operation column, then click Remove from subgroup.
- To remove a member from a Subgroup, select the subgroup, click the checkbox next to the member’s name, and then click the red Remove button.
Deleting or disabling a member’s access
To delete or disable a member’s access:
- Click the three-dot icon and select Disable or Delete member from the menu.
- If you need to batch Enable or Disable a group of users, select each user’s checkbox and click the Disable or Enable button.
Authorizing, managing, and monitoring a member’s services
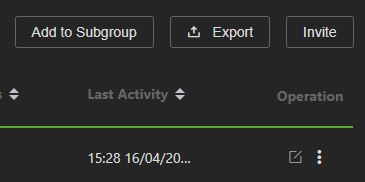
As a group Admin, you can authorize access to services and manage group and subgroup users from the Manage > Members tab. Users and their activity are easily monitored and sorted, and can be exported to Excel by clicking the Export button.
Usage tab
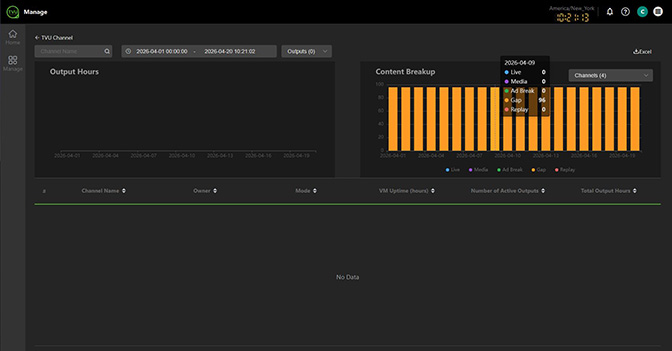
The Usage tab displays the TVU MediaHub, Producer, and TVU Channel Usage time overview. Users can select a specific date range to display by clicking the calendar icon at the top left of the screen.
- Click the Manage > Usage tab. The Manage screen will display Usage options.
- Click View More to display usage information.
- Hover over the charts for more information.
Resources tab
The Resources tab allows users to manage an Agent device, set up and configure a Box Pool folder, and install Agent software.
Note: A Box Pool folder can store multiple boxes, each of which is a physical device where the user has installed the Agent software.
The Resources tab opens the Manage page. This page enables owners to access the Agent Devices, Elastic IP, Manage Bearer Token, and TAMS Stores pages.
The Resources > Agent Devices tab allows users to manage an Agent device, set up and configure a Box Pool folder, and install Agent software.
The Resources > Agent Devices tab allows Agent software to be installed on a device. The Agent integrates with MediaHub instead of using cloud-based resources. The agent can be installed on a user’s resource to run programs.
The Resources > Elastic IP tab alows owners to create and view Elastic IP assignments by region.
The Resources > Manage Bearer Token tab allows owners to create and manage Bearer Token.
The Resources > TAMS Stores tab allows owners to create TAMS Stores.
Adding resources and services
The Resources tab is where Admins can create Box Pool folders and view, add, configure, and manage Agent devices.
To add resources and services:
- Click the Manage > Resources tab.
- The Manage page opens and displays Resources.
- To add a new Box Pool folder, click Box Pool +.
- The Create a new box pool window will display.
- Enter a Box Pool Name and click Confirm.
- Your new Box Pool folder has been added to the Agent Devices list.
- To delete a Box Pool, click the Delete button.
- To rename the Box Pool, click the Edit button.
- The Edit box pool window will display.
- Enter a new box pool name and click Confirm.
Adding Agent devices to Cloud services
IMPORTANT: You can only select a device as BYOR in MediaHub after the Agent is successfully installed on it.
After your agent is fully installed, configure it by following these steps, then use it in MediaHub by selecting BYOR under Resources.
To download and install the Agent:
- Click the Manage > Resources tab, then click the Installation Guide link.
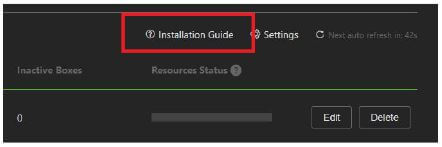
- The Agent installation guide pop-up window will display.
- Review the Installation Quick Guide TVU Agent video tutorial.
- Click the Copy script button and paste the script into your Linux Command line. Run the script to install the Agent on your device.
- To obtain the Installation key, click the Copy key button.
- To reset the key and script, click the Reset Installation Key & Script button.
- After installation, the Agents will be added to the default Box Pool. To select a default Box Pool, click the Settings icon, select a Box Pool from the menu, and then the Confirm button.
Port mapping
To map your box pool in TVU Home:
- Click the Manage > Resources tab.
- The Resources page opens.
- Click the Box Pool that requires mapping.
- Click the Box Pool checkbox that requires mapping in the Box Pool.
- Click the + Add button.
Elastic IP tab
The Elastic IP tab enables users to assign an Elastic IP to a specific region.
To assign an Elastic IP:
- Click the Manage > Resources tab.
- Click the Elastic IP tab.
- Click Elastic IP +.
- The Assign Elastic IP window opens.
- Select a Region from the drop-down menu.
- Click Confirm.
Manage Bearer Token tab
The Manage Bearer Token tab provides a second contextual entry point for users to create and manage their bearer tokens directly from their profile.
To create and manage a Bearer Token:
- Click the Manage > Resources tab.
- Click the Manage Bearer Token tab.
- Click the green “+” plus.
- The Create Bearer Token window opens.
- Enter a Name and click Confirm.
- The new Bearer Token appears in the list.
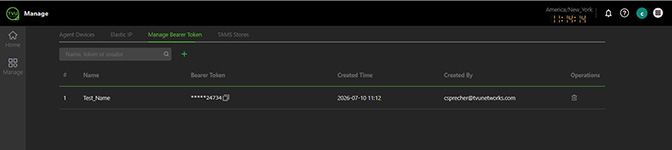
- To copy the Bearer Token, click the Copy icon.
- To delete the Bearer Token from the list, click the Trash icon in the Operations column.
- Click Confirm in the pop-up Warning message.
TAMS Stores tab
The TAMS tab enables users to manage and configure TAMS Store credentials. Use the TAMS-integrated services to reference a centrally managed store rather than requiring per-node authentication setup.
To create and manage a TAMS Store:
- Click the Manage > Resources tab.
- Click the TAMS Stores tab.
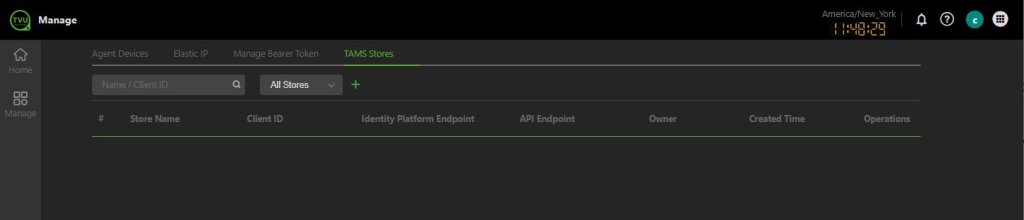
- Click the green “+” plus.
- The Create TAMS Store window opens.
- Enter a human-readable label in the Store Name field to identify this store within your group. The name must be unique.
- Enter the remaining required fields. The Client Secret field is optional.
- Click Confirm.
- The TAMS Store appears in the list.
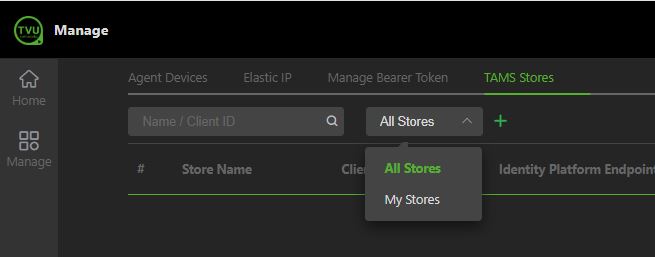
- To view and manage your TAMS Store, you can select My Stores from the drop-down menu to filter and select from your stores in the list.
- To search for a specific Name or Client ID, enter it into the Search field.
Billing tab
The billing tab allows Admin users to:
- Set up a user billing group
- Purchase tokens
- Edit billing information
- Review token purchase history, consumption, and recent TVU Producer and MediaHub activity
- View the total remaining token balance
- View token transaction history
- View the token expiration date
- View Active commitments
User billing group set up
New users will set up their own Billing group when they initially purchase their tokens.
Note: Users must first successfully set up a Billing group to purchase tokens. Once the billing group is set up, users can access their Token management page to perform subsequent token related tasks.
To set up your user billing group:
- Click the Manage > Billing tab.
- The Token management page will display.
- Click + Buy Tokens button in the Total Remaining balance panel.
- The Billing info pop-up window will display.
- Enter all required information, click Save, then continue to “Purchasing TVU Tokens.”
Editing your billing information
To edit your user billing information:
- Click the Manage > Billing tab.
- The Token management page will display.
- To edit your billing information before purchasing tokens, click the Edit Billing Info icon.
- Make your changes in the Billing Edit window and click Save.
Purchasing TVU Tokens
- After setting up a user billing group, click Buy More in the Purchase History panel.
- The purchase TVU Tokens pop-up window will appear.
- Users can purchase Tokens by credit card or > link.
- Continue to one of the following purchasing methods:
Purchase TVU Tokens using a credit card
- To purchase TVU Tokens by credit card, click the View details menu, select the Qty menu, and choose a quantity.
- Click the Pay button and follow the prompts.
- Your purchase appears in the Purchase History panel.
Purchase TVU Tokens using > link
- To purchase by > link, click the View details menu, select the Qty menu, and choose a quantity.
- Click the Pay with > link button.
- The > link window appears. Review your purchase in the gray box.
Note: To create a > link account, click Sign up and follow the prompts.
- Click the Continue to payment button, then follow the prompts.
- Your purchase appears in the Purchase History panel.
Transferring tokens – Affiliate Group
Users can transfer tokens to pre-defined users. Token owners must contact TVU Support to configure token transfers.
To transfer tokens:
- Click the Transfer Token icon at the top of the Token Management panel.
- The Transfer Tokens window will display.
- Enter the group payee account in the To field.
- In the Transfer amount field, enter a token quantity.
- Click the Confirm button.

TVU Home Quick Start Guide – Finance role
Signing in to TVU Home
There are two methods “Finance” can use to sign in to TVU Home:
- If you are signed in to a TVU service, click the Services (waffle) icon and select Home in the menu.
- Open a web browser and enter: https://home.tvunetworks.com
The Home login page will display.
Sign in with your account credentials:
- Enter your email and password.
- Click Sign in.
TVU Home – Landing page
The Welcome to TVU Home landing page is displayed when you successfully sign in to TVU Home.
The Home landing page for the admin role includes:
- TVU Home tab: The TVU Home landing page provides direct access to recent services, including TVU Producer, Partyline, Commentator, TVU Channel, and TVU Search without logging in to each service. The Recent Objects panel displays the user’s account activity directly from the Home landing page.
- TVU Services navigation: Users can click the TVU Services navigation (waffle) icon to quickly open a service that is not currently displayed in the Recent Services section on the Home landing page.
- Manage tab: Finance users can use this tab as their primary tool for finance – and owner-related tasks. Click the Manage tab to access the Members, Resources, and Billing tabs.
- Members tab: Opens the Group management dashboard and displays controls based on the Finance user role type.
- Resources tab: Enables Agent device management, box pool folder setup and configuration, and Agent software installation for authorized roles. A box pool folder can store multiple boxes, each of which is a physical device on which you have installed the Agent software.
A Finance user can view an assigned Elastic IP, create and manage Bearer Tokens, and TAMS Stores by clicking the appropriate tab in the Resources Management page. - Billing tab: Accessible to owners. members, Admins, and finance users. TVU Home enables account owners, Admins, and Finance users to manage their TVU Token purchases, usage, and balances. Members can view their Token purchases, usage, and balances. Token purchases are initiated by Owner and Finance roles.
Dashboard interface – Finance controls
Finance users only have administrative rights to their own account. They are not part of any other group.
Finance account users can:
- Manage your User information and subgroup workspace
- Add users and sub-users
- Add resources and services
- Invite new members
- Assign roles to each member
- Add members to other subgroups
- Change a subgroup member’s role
- Delete or disable a member’s access
- View a member’s TVU Authorized Services
- Purchase tokens, view usage, and balances
- Create Token user groups
- Purchase and assign seat-based Premium subscriptions
- Securely store and manage encrypted third-party license credentials across supported partner platforms
- Segment their organization’s total token balance into dedicated, named pools with independent access, deduction rules, and alerting thresholds
- Add Agent devices to the Cloud service.
- Reserve and monitor Agent SDI input/output slots
- View assigned Elastic IP addresses by region.
- Create and manage Bearer Tokens.
- Create and manage multiple TAMS Stores.
Members tab controls
The Members tab opens the Group management page. When you sign in as an account Finance user, you can manage your members on the Group page by clicking the Manage > Members tab.
Note: Finance users cannot edit Owner users.
The Members tab allows you to:
- Edit your Subgroup Name and add group information.
- Add a new subgroup user
- Add a profile picture (avatar)
- Add subgroup workspaces
- Add an email domain name to your group
- Assign roles to sub-users
- Manage all aspects of your group
- View TVU Token purchases, usage, and balances
- View Elastic IP addresses by a specific region.
- Create and manage Bearer Tokens.
- Create TAMS Stores.
Updating your user information
To update your user information:
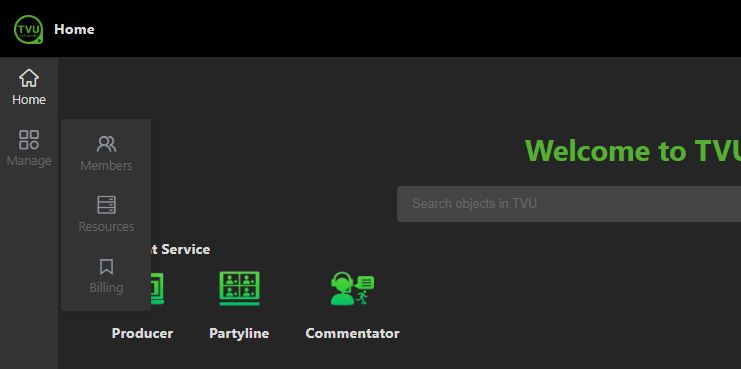
- Click the Manage > Members tab.
- The Group Management dashboard will display.
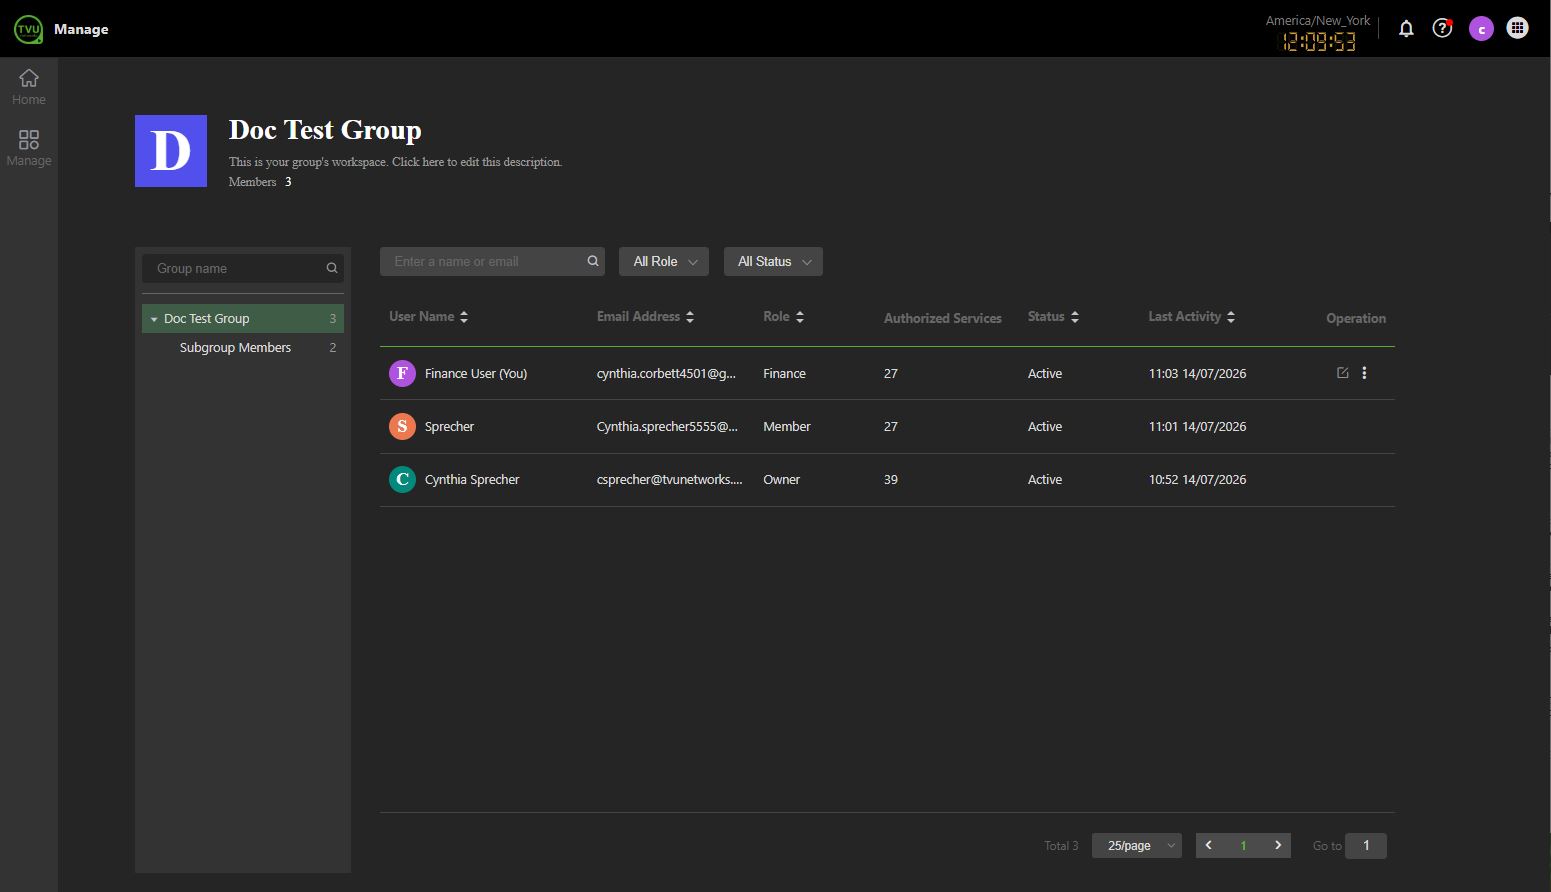
- Click the Group name.
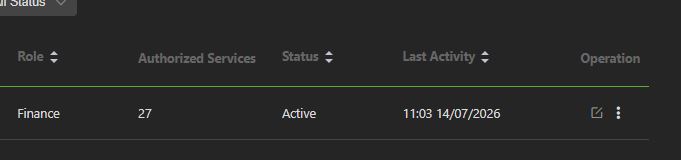
- Locate your role and click the edit icon in the Operations column.
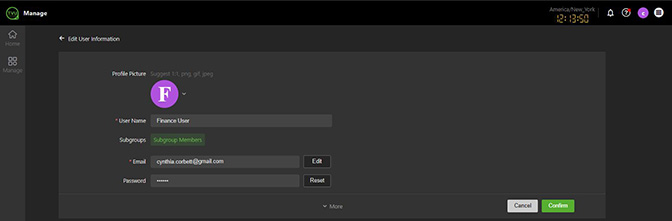
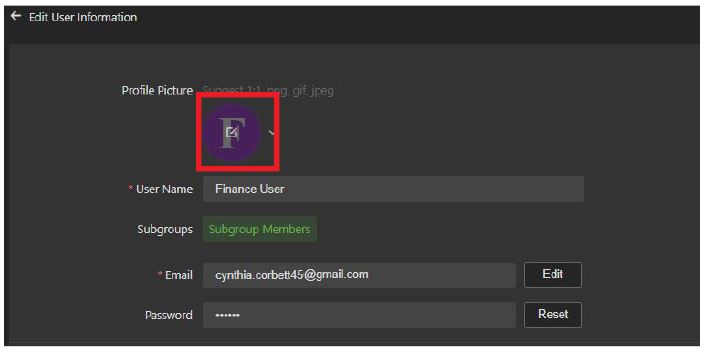
- The Edit User Information window opens.
- Enter a User Name, update your Email, or reset your Password, and add yourself to Subgroups. You may add your additional profile information by clicking More to expand the panel.
- To update your Profile picture, hover your mouse over the picture and click the Edit icon.
- The Add Profile Picture pop-up will display.
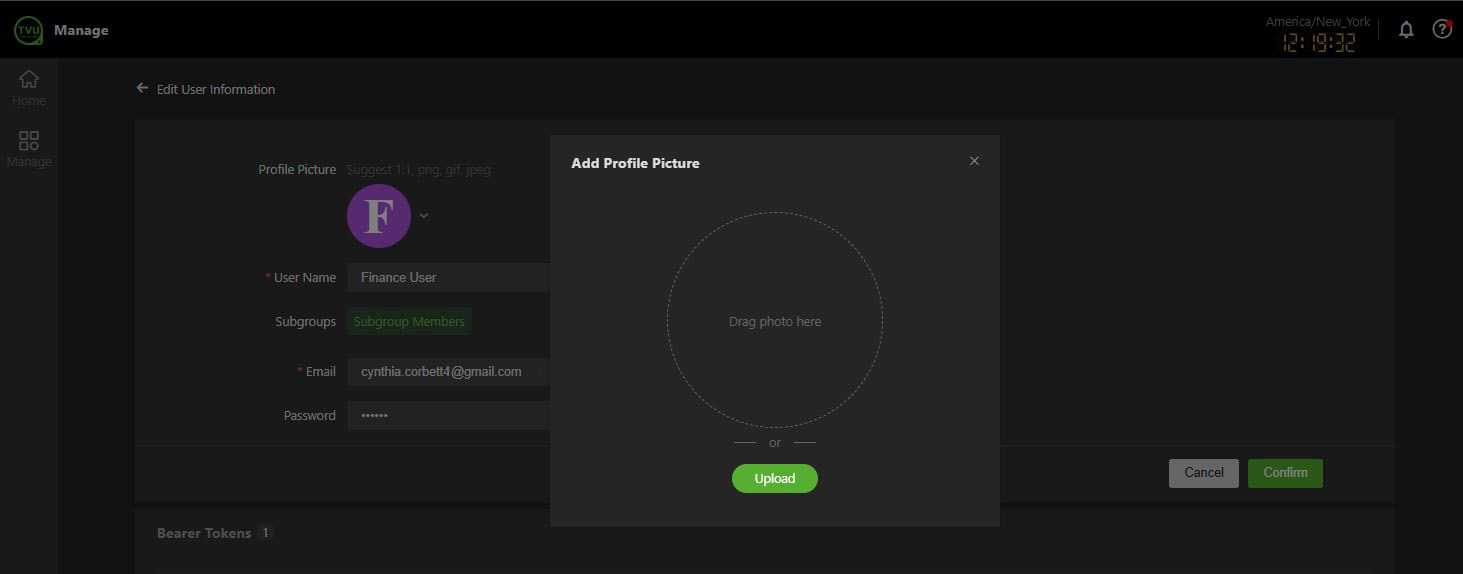
- Drag or Upload a 1:1 image in png, gif, or jpeg format.
- Click the green check mark to save your Avatar picture.
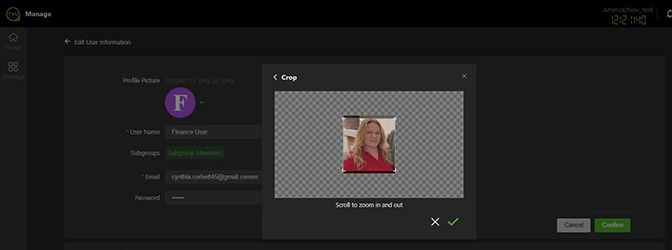
- Click the green Confirm button.
- Scroll down to the Authorized Services panel and select the Optional Services that apply to your role.
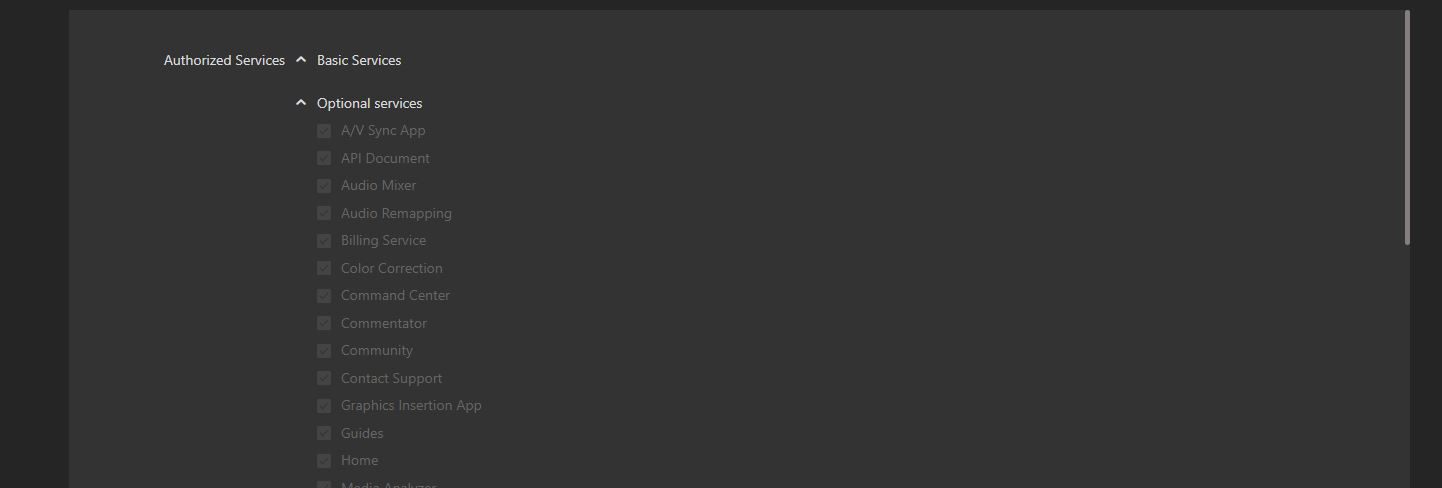
- Click the green Confirm button.
Updating your Subgroup workspace
To update your Subgroup workspace information:
- Click the Manage > Members tab.
- The Group Management dashboard will display.
- Click the Subgroup name in the Groups panel.
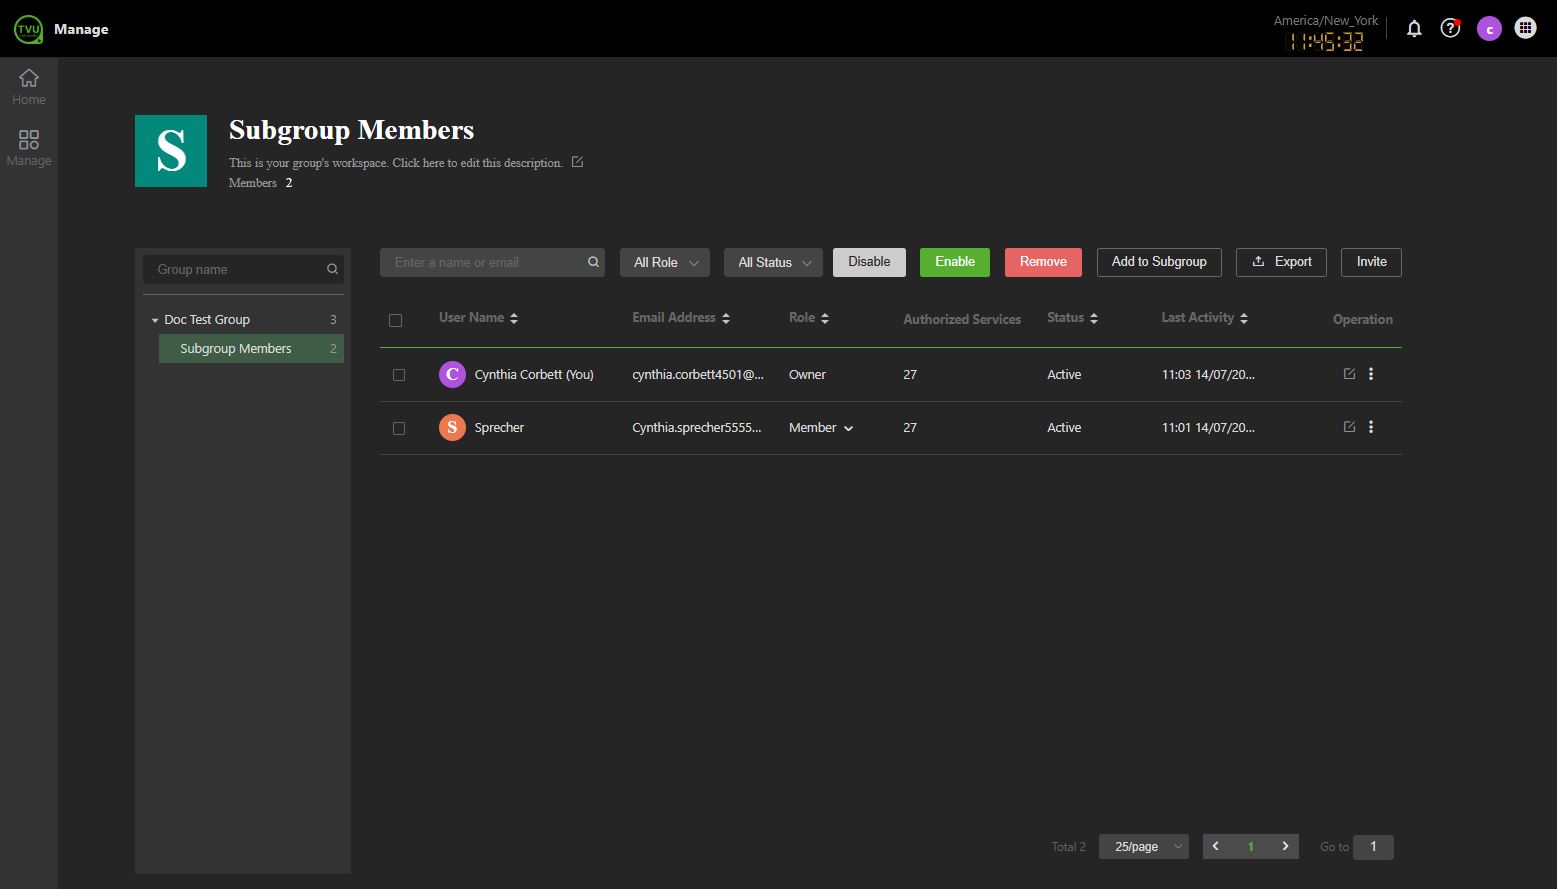
- Click the Subgroup edit icon below the Subgroup Name.
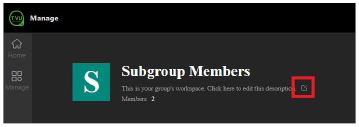
- The Edit Subgroup Information page opens.
- Finance users can update the Subgroup Name, choose an email domain, and enter multiple email domains in the Description field.
- Click the Confirm button to save your changes.
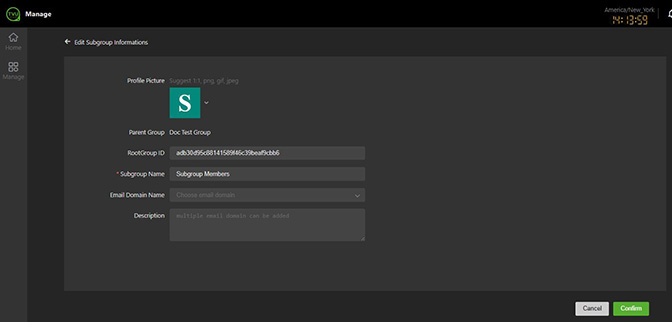
Updating Subgroup User information
The Finance user can perform the following procedures.
To update a Subgroup member’s profile information:
- Click the Manage > Members tab.
- The Group Management dashboard will display.
- Click the Subgroup name in the Groups panel.
- Locate the applicable user name and click the edit icon in the Operation column.
- The Edit User information page opens.
- Enter or update the User Name, email, reset the Password, and assign a Subgroup to the member.
Note: Finance users can add members to Subgroups by clicking the Subgroups edit icon. Subgroup members cannot add subgroups.
- You may add additional profile information by clicking More to expand the panel.
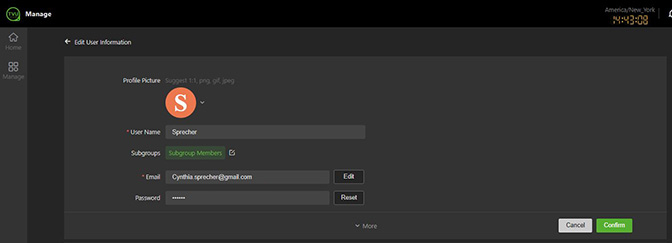
- To update a Profile picture, hover your mouse over the picture and click the Edit icon.
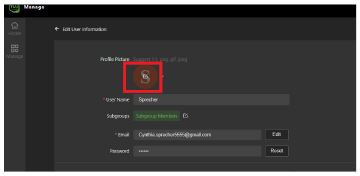
- The Add Profile Picture pop-up will display.
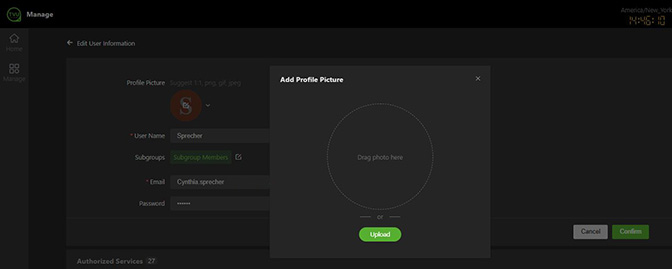
- Drag or Upload a 1:1 image in png, gif, or jpeg format.
- Click the green check mark to save your Avatar picture.
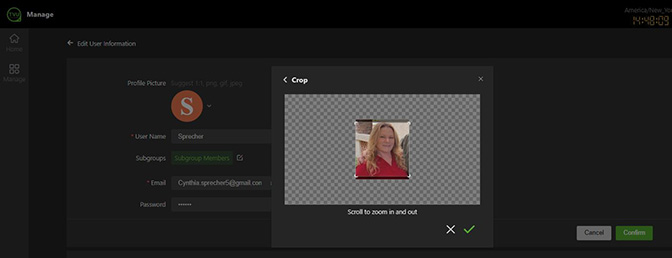
- Click the green Confirm button.
- Scroll down to the Authorized Services panel to view the Optional Services that apply to the role.
- Click the green Confirm button.
Resources tab
The Resources tab opens the Manage page. This page enables Finance users and Subgroup members to access the Agent Devices, Elastic IP, Bearer Token, and TAMS Stores pages.
The Resources > Agent Devices tab allows users to manage an Agent device, set up and configure a Box Pool folder, and install Agent software.
Note: A box pool folder can store multiple boxes, each of which is a physical device where the user has installed the Agent software.
The Resources > Agent Devices tab allows Agent software to be installed on a device. The Agent integrates with MediaHub instead of using cloud-based resources. The agent can be installed on a user’s resource to run programs.
The Resources > Elastic IP tab allows Finance users and Subgroup members to view Elastic IP assignments by region.
The Resources > Bearer Token tab allows Finance users and subgroup members to create a Bearer Token.
The Resources > TAMS Stores tab allows Finance users and subgroup members to create TAMS Stores.
The Resources > Partner Credentials tab allows users to assign licenses and tokens for partner applications. They are stored encrypted and injected when a workflow launches.
Adding resources and services
The Resources tab is where Finance and subgroup Member users can create Box Pool folders and view, add, and manage Agent devices.
To add resources and services:
- Click the Manage > Resources tab.
- The Manage page opens and displays the Agent Devices tab by default.
- To add a new Box Pool folder, click the Box Pool +.
- The Create a new box pool window will display.
- Enter a Box Pool Name and click Confirm.
- Your new Box Pool folder has been added to the Agent Devices list.
- To delete a Box Pool, click the Delete button.
- To rename the Box Pool, click the Edit button.
- The Edit box pool window will display.
- Enter a new Box Pool Name and click Confirm.
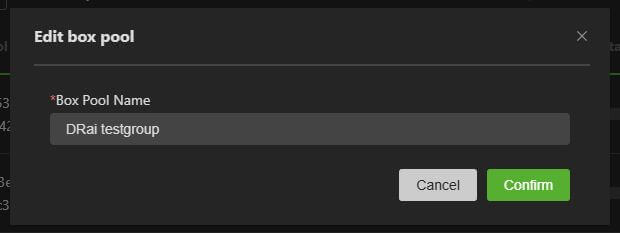
Adding Agent devices to Cloud services
IMPORTANT: You can only select a device as BYOR in Mediahub after the Agent is successfully installed on it.
After your agent is fully installed, you can configure it by performing the following steps and use it in MediaHub by selecting BYOR under Resources.
To download and install the Agent:
- Click the Manage > Resources tab. Click Installation Guide.
- The Agent installation guide pop-up window will display.
- Review the Installation Quick Guide TVU Agent video tutorial.
- Click the Copy script button and paste the script into your Linux Command line. Run the script to install the Agent on your device.
- To obtain the Installation key, click the Copy key button.
- To Reset the key and script, click the Reset Installation Key & Script button.
- After installation, the Agents will be added to the default Box Pool. To select a default Box Pool, click the Settings icon, select a Box Pool from the menu, and then click the Confirm button.
Port mapping
To map your box pool in TVU Home:
- Click the Manage > Resources tab.
- The Manage page opens and displays Resources.
- Click the Box Pool that requires mapping.
- Click the Box Pool checkbox that requires mapping in the Box Pool.
- Click the + Add button.
SDI Slot reservation
SDI Slot Reservation allows administrators and operators to configure, allocate, and manage dedicated SDI input and output slots on on-premise TVU Agent hardware directly from TVU Home.
This feature ensures predictable hardware resource management, prevents SDI port collisions across downstream services (such as TVU MediaHub and Workflow Studio), and provides real-time visibility into physical and virtual slot occupancy.
Key Features & UI Behaviors
- Dedicated SDI Port Mapping & Reservation: Assign specific SDI input/output channels on TVU Agent nodes to designated workflows or sources.
- Auto-Refreshing Occupancy Status: The interface automatically monitors and updates the live operational status of each SDI slot in real time without requiring manual page refreshes.
- Edit-Lock Protection During Active Use: When an SDI slot is actively processing or ingesting video in a running graph/production session, editing and reconfiguration options are automatically disabled to prevent accidental signal interruption.
- Contextual Status Tooltips: Hovering over disabled or locked slot controls displays informative tooltips indicating the current usage state (e.g., explaining why a slot cannot be modified while actively routed).
Slot Status Indicators
| Status | Visual indicator | Description | Allowed actions |
| Available | Green / Unlocked | Slot is idle and available for routing or reassignment. | Configure, Edit, Reserve |
| In Use / Occupied | Blue / Active | Slot is currently allocated and actively carrying a live SDI signal. | View Details (Edit Locked) |
| Disabled / System Reserved | Grey / Locked | Slot is unavailable due to system-level reservation or unsupported mode. | View Tooltip |
Step-by-Step Configuration Guide
To Access Agent Hardware Resources:
- Log in to TVU Home with an Owner or Admin role.
- Navigate to Manage in the left navigation sidebar and select Resources.
- Locate the target agent machine in the Agents / Edge Devices list and click to view its configuration panel.
Configuring and Reserving an SDI Slot:
- In the Agent details view, locate the SDI Slot Configuration section.
- Review the list of available SDI hardware channels (e.g., Slot 1 through Slot 4/8).
- Select an Available slot and specify its operating parameters (e.g., Signal Format, Direction/Input/Output mode, and Target Service).
- Click Save / Apply to commit the reservation.
Modifying or Reallocating an SDI Slot:
- Verify the slot status
- If the slot is Available, click the Edit icon to adjust port configurations.
- If the slot is In Use, the edit option will be greyed out. To modify it, first stop or unroute the active task/source in MediaHub or Workflow Studio.
- Once the active stream terminates, the slot occupancy status automatically updates to Available, unlocking the edit controls.
Elastic IP tab
The Elastic IP tab enables Finance users and subgroup members to search for and view assigned Elastic IP addresses.
To assign an Elastic IP:
- Click the Manage > Resources tab.
- Click the Elastic IP tab.
- Click the Search field and enter an IP, User Name, or Email to filter the displayed results.
Bearer Token tab
The Bearer Token tab provides a second contextual entry point for Finance users and subgroup members to create and manage their bearer tokens directly from their profile.
To create and manage a Bearer Token:
- Click the Manage > Resources tab.
- Click the Bearer Token tab.
- Click the green “+” plus.
- The Create Bearer Token window opens.
- Enter a Name and click Confirm.
- The new Bearer Token appears in the list.
- To copy the Bearer Token, click the Copy icon.
- To delete the Bearer Token from the list, click the Trash icon in the Operations column.
- Click Confirm in the pop-up Warning message.
Managing API Bearer Tokens
This guide outlines the complete workflow for generating, scoping, managing, and revoking API Bearer Tokens within the TVU Home portal—either via the dedicated Resources management page or through the User Profile quick-access menu.
Overview and Access Paths: API Bearer Tokens allow secure, programmatic authentication to TVU APIs and services (e.g., Command Center, MediaHub, RPS, and Device Management).
You can manage tokens via two navigation methods:
- Dedicated Management Page: Click Manage > Resources > Manage Bearer Token tab. Best for Full administration, auditing all workspace tokens, and bulk operations
- User Profile shortcut: Via Profile Avatar (top-right) > API Tokens / Developer Settings. Best for Quick generation and personal token management.
TAMS Stores tab
The TAMS tab enables Finance users and subgroup members to manage and configure TAMS Store credentials. Use the TAMS-integrated services to reference a centrally managed store rather than requiring per-node authentication setup.
To create and manage a TAMS Store:
- Click the Manage > Resources tab.
- Click the TAMS Stores tab.
- Click the green “+” plus.
- The Create TAMS Store window opens.
- Enter a human-readable label in the Store Name field to identify this store within your group. The name must be unique.
- Enter the remaining required fields. The Client Secret field is optional.
- Click Confirm.
- The TAMS Store appears in the list.
- To view and manage your TAMS Store, you can select My Stores from the drop-down menu to filter and select from your stores in the list.
- To search for a specific Name or Client ID, enter it into the Search field.
TAMS Multi-Store support
Configure and manage multiple TVU Media Storage (TAMS) stores per group.
TAMS stores configured in TVU Home Manage > Resources are automatically made available as selectable destinations across downstream services (such as MediaMesh and Workflow Builder).
To create and manage multiple TAMS Stores:
- Click the Manage > Resources tab.
- Click the TAMS Stores tab.
- To Add a new TAMS Store, click the green “+” plus.
- The Create TAMS Store window opens.
- Enter a human-readable label in the Store Name field to identify this store within your group. The name must be unique.
- Enter the remaining required fields. The Client Secret field is optional.
- Enter the Client ID:
- Identity Platform Endpoint (Cognito Domain): The OAuth2 authentication / token endpoint URL.
- Enter the Client Secret:
- The OAuth2 client secret key.
- Identify the platform endpoint:
- The authentication authorization/token URL (Cognito domain).
- Enter the API Endpoint:
- Base URL for the TAMS store API.
- Click Confirm to validate and save the store configuration..
- Verify the Store List Table. Once saved, the store appears in the TAMS Stores table with the following details:
- (Row index)
- Store Name
- Client ID
- Identity Platform Endpoint
- API Endpoint
- Owner
- Created Time
Managing Multiple TAMS Stores
- Filter by Scope: Toggle between All Stores (organization-wide) and My Stores (created by your user account).
- Search: Use the search bar to locate stores by name or endpoint.
- Pagination: Adjust page density (20/page, 50/page, 100/page) at the bottom right.
- Edit Credentials / Endpoints: Under the Operations column, click Edit to update endpoint URLs or regenerate client credentials.
- Delete a Store: Under Operations, click Delete (confirm prompt) to remove an inactive store. Note: Ensure no active workflows are targeting the store before deletion.
Integrating with Workflows (MediaMesh / Workflow Builder)
- Open Workflow Builder or MediaMesh.
- Add a TAMS Record or media ingest component to the canvas.
- In the node inspector panel, locate the Target Store drop down.
- Select the configured store by name from the list. The node will inherit the central OAuth2 credentials and endpoints automatically.
Partner credentials vault
Securely store and manage encrypted third-party license credentials across supported partner platforms, complete with masked display values, role-based access, and search/filtering. Key capabilities are:
Secure Storage & Injection:
- Allows administrators and workflow owners to store licenses and authentication tokens securely. Values are encrypted upon entry and automatically injected when a partner workflow launches. Once saved, raw secret values are masked and never displayed again in the UI.
- Supported Partner Ecosystem: Supports integrations across 12 partner platforms.
Status & Credential Tracking:
- Tracks the health of workflow dependencies by indicating whether a required partner credential is Stored or has a Missing value.
Filtering and Search:
- Includes dedicated filters by partner name and credential status (Stored vs. Missing value), alongside keyword search for finding specific credential configurations.
Audit & Ownership Metadata:
- The credentials list displays key metadata including the Partner name, Credential label, Masked credentials status, Owner, and Created Time.
To Add a new partner credential
To add a new partner credential in TVU Home, follow these steps:
- Open the Partner Credentials Page:
- In TVU Home, navigate to Manage > Resources > Partner Credentials.
- Open the Add Credential Dialog:
- Click the green +. The Add Secret window opens.
- Configure the Credential:
- Select Partner: Choose the target partner platform from the drop down (e.g., Chyron, Elecard, Emergent, Grass Valley, Jünger, Kinetiq, On-Hertz, PixOp, Redflag, TAG, Vela, Viz).
- Credential Name / Label: Enter a descriptive identifier for this credential to recognize it in your workflow configurations.
- License / Token / Secret Value: Paste the required API token, license key, or authentication secret for the partner service.
- Save the Secret:
- Click Save Secret.
Billing tab
The billing tab allows finance users to:
- Set up a user billing group
- Purchase tokens
- Edit billing information
- Review token purchase history, consumption, and recent TVU Producer, Channel, and MediaHub activity.
- View the total remaining token balance
- Segment their organization’s total token balance into dedicated, named pools with independent access, deduction rules, and alerting thresholds.
- View token transaction history
- View the token expiration date
- View Active commitments
- Purchase and assign Premium tier seats directly through in-platform checkout.
- Filter users by subscription tier with visual Premium badges in the member directory.
User billing group setup
New users will set up their own Billing group when they initially purchase their tokens.
Note: Users must first sucessfully set up a Billing group to purchase tokens. Once the billing group is set up, users can access their Token management page to perform subsequent token related tasks.
To set up your user billing group:
- Click the Manage > Billing tab.
- The Token management page will display.
- Click the + Buy Tokens button in the Total Remaining balance panel.
- The Billing info pop-up window will display.
- Enter all required information, click Save, then continue to “Purchasing tokens.”
Editing your billing information
To edit your user billing information:
- Click the Manage > Billing tab.
- The Token management page will display.
- To edit your billing information before purchasing tokens, click the Edit Billing Info icon.
- Make your changes in the Billing Edit window and click Save.
Purchasing tokens
- After setting up a user billing group, click the + Buy Tokens button in the Total Remaining balance panel.
- The purchase TVU Tokens pop-up window will appear.
- Users can purchase Tokens by credit card or > link.
- Continue to one of the following purchasing methods:
Purchase by credit card
- To purchase by credit card, click the View details menu, and then select the Qty menu and choose a quantity.
- Click the Pay button and follow the prompts.
- Your purchase appears in the Purchase History panel.
Purchase by > link
- To purchase via the> link, click the View details menu, then select the quantity menu and make a selection.
- Click the Pay with > link button.
- The > link window appears. Review your purchase in the gray box.
Note: To create a > link account click Sign up and follow the prompts.
- Click the Continue to payment button, then follow the prompts.
- Your purchase appears in the Purchase History panel.
Seat-based Premium Subscriptions
Owners can purchase and assign Premium tier seats directly through in-platform checkout.
To set up and manage Seat-Based Premium Subscriptions in TVU Home, the system follows a two-part entitlement model:
- Active Subscription: Your organization purchases a pool of Premium seats in Billing.
- Seat Assignment: Admins assign those seats to individual users listed in Manage > Members.
Entitlement Requirement: A user can access Premium features only when both conditions are met:
- The subscription is active
- The seat is assigned
Step 1: Purchase & Manage Seat Inventory (Billing)
Role required: Owner or Finance
- Go to TVU Home and click Manage > Billing in the navigation menu.
- Under the top balance/subscription area, click the + Subscription button.
- Expand your subscription tier/plan and specify the number of seats you want to purchase.
- Click the Subscription button and complete the checkout process.
- Once purchased, the Billing dashboard will display your seat inventory:
- Purchased Seats (Total licenses)
- Assigned Seats (In use)
- Available Seats (Unallocated)
Step 2: Assign Premium Seats to Users (Members)
Role required: Owner or Admin
- In TVU Home, navigate to Manage > Members.
- Locate the team member you want to grant Premium access to.
- Click the Manage Subscription button.
- Toggle the Premium checkbox to Enabled for that user.
- If there are available seats, the seat is immediately allocated, and the user receives a Premium badge in the members directory.
- If all seats are currently assigned (0 available), a prompt will notify you to either reallocate an existing seat or click the Purchase Subscriptions Seats button to open Billing to purchase more seats.
Step 3: Seat Reassignment & Reclaiming
- Reassign a Seat: Toggle off Premium access for a member in the Members list. The seat immediately returns to the unallocated pool and can be assigned to another user at no extra cost.
- Automatic Reclaim: Disabling or deleting a user from the organization automatically reclaims their assigned seat.
- Pending Invites: Users with pending invitations do not consume seats until the invitation is accepted and assigned.
Filter Member list by Profile badging
Filter members by subscription tier with visual Premium badges in the member directory, and view active plan details directly on individual profile pages.
To filter members by their Premium subscription status in TVU Home, follow these steps:
- Navigate to the Members Page:
- In TVU Home, click Manage in the left navigation bar and select Members.
- Locate the Filter Controls:
- Above the members list/table, find the filter bar (next to the user search box).
- Filter by Subscription Status:
- Click the Subscription (or Premium) drop-down menu.
Select your desired view:
- Premium user: Shows only members who have been assigned an active Premium seat (indicated with a Premium badge).
- No subscriptions: Shows all unassigned or standard-tier members.
- All subscription status: Resets the filter to display the entire organization membership.
- Combine with Search (Optional):
- You can combine the subscription filter with the name/email search bar or role filter (Owner, Admin, Member, Finance) to quickly locate specific assigned users or identify unallocated members.
Token User Group creation
In TVU Home, Token User Groups (TUG) allow account Owners and Finance administrators to segment their organization’s total token balance into dedicated, named pools with independent access, deduction rules, and alerting thresholds.
To create a Token User Group (TUG), follow these steps:
- Access the Token User Groups Management Page:
- Log in to TVU Home with an Owner or Finance account.
- In the left navigation sidebar, click Manage > Billing and select the Manage Token User Groups icon (or access the Token User Group management view from the By Token User Group card below your balance overview).
- Create a New Token User Group:
- Click Manage > Billing, On the Token User Groups dashboard, click + Add.
- Configure Group Details:
- Token User Group Name: Enter a clear, descriptive name for the group (e.g., Production Team, Field Operations).
- Billing & Contact Information (if applicable):
- Enter billing contact details or link an Odoo ID if this group requires separate invoicing or finance tracking.
- Deduction & Fallback Settings:
- Configures deduction priority and specifies whether the group should fall back to the default account balance if its group token balance runs out.
- Assign Members to the Group:
- Under the group’s member configuration, select and add users from your root group/organization.
- Any usage (e.g., TVU Producer, MediaHub, Micro-Apps, Transcoding) generated by these members will automatically draw from this group’s allocated token balance.
Note: a user can belong to only one Token User Group at a time.
- Review your settings and click Save to finalize the group.
Token User Group management
Organization Owners and Finance administrators can distribute tokens across dedicated Token User Groups.
Transfer / Allocate Tokens (Optional):
- After creating the group, click Transfer Tokens on the Billing dashboard to allocate tokens from the default account balance to the new group. Refer to “Transferring Tokens between Token User Groups.”
Review Usage:
- Member and Admin roles can view their individual token consumption and group balance under the self-scoped Billing view, while Owners/Finance retain full group-wide management.
Transferring Tokens between Token User Groups
Organization administrators can distribute tokens across dedicated Token User Groups (TUG). The Token Transfer feature allows Owners and Finance administrators to reallocate balances dynamically between different groups (e.g., from the account’s Default pool to a specific project group, or between individual team groups) without interrupting active workflows.
Prerequisites & Permissions:
- Required Roles: Owner or Finance administrator.
- Source Group Balance: The source Token User Group must have sufficient unreserved tokens to cover the transfer amount.
- Navigate to the Transfer Tokens Interface:
- Sign in to TVU Home.
- From the left navigation menu, click Manage > Billing and select the Manage Token User Groups icon.
- On the Token User Groups dashboard, locate the group you want to transfer tokens from/to, then click the Transfer Tokens button.
- In the Transfer Tokens window, click Token User Group.
- In the Transfer Tokens window, complete the following fields:
- From (Source Group): Select the Token User Group from which tokens will be deducted. This displays the current available balance for the selected source group.
- To (Destination Group): Select the Token User Group that will receive the tokens. This Cannot be the same as the source group.
- Transfer Amount: Enter the number of tokens to transfer using the up/down symbols. Supports positive numbers, including decimal values (e.g., 150.50).
- Review and confirm:
- Verify that the Source Group, Destination Group, and Transfer Amount are correct.
- Check the calculated post-transfer balances displayed for both groups.
- Click Confirm.
- A success notification will appear, and the updated balances will immediately reflect on the Token User Groups overview table.
Post-Setup Management
- Transferring Tokens: Owners can click Transfer Tokens on any group row or from the Billing overview to transfer tokens between token user groups in either direction.
- Approving Member Requests: Review, approve, or adjust top-up requests submitted by group members when their balance runs low.
- Monitoring Consumption: View per-group remaining balance, active sessions, and detailed usage breakdowns.
Transferring Tokens – Affiliate Group
Users can transfer tokens to pre-defined users. Token owners must contact TVU Support to configure token transfers.
To transfer tokens to an Affiliate group:
To transfer tokens:
- Click the Transfer Token icon at the top of the Token Management panel.
- The Transfer Tokens window will display. Click the Affiliate Group tab.
- Enter the group payee account in the To field.
- In the Transfer amount field, enter a token quantity.
- Click the Confirm button.
Low-balance alerts
Configure customizable notification recipient lists and multi-tier (soft/hard) warning thresholds, including negative-threshold support for credit-enabled groups.
To configure low-balance notification alerts in TVU Home, follow these steps:
- Go to the Billing Page:
- In TVU Home, click Manage in the left navigation bar and select Billing.
- Open Notification Settings:
- On the top Total remaining balance card, click the Billing Settings (gear) icon and select Notification Settings.
- Configure Alert Thresholds & Recipients:
- Alert Thresholds: Define your balance alert trigger points:
- Soft Warning Threshold / Low Balance Warning: Triggers an alert when your token balance drops below a set amount.
- Hard Warning Threshold / Exhausted Balance: Triggers an urgent alert when tokens reach zero or a critical limit (negative thresholds can also be set for credit-enabled accounts/groups).
- Recipients: Click the Send an email notification to checkbox. Specify the email addresses or account roles from the menu (such as Owner, Admin, or Finance) that should receive notification emails when thresholds are crossed.
- Save Settings:
- Click Save to confirm in the dialog to apply your notification settings.
Auto-Recharge
Specify custom Token auto-recharge thresholds and recharge amounts, with one-click workflows to reset negative balances back to positive standing.
- Go to the Billing Dashboard:
- In TVU Home, click Manage in the left navigation bar and select Billing.
- Open Auto Recharge Settings:
- Locate the top Total remaining balance card.
- Click the Billing Settings icon and select Auto Recharge.
- Configure Auto Recharge Parameters:
- Enable Toggle: Switch the Enable Auto Recharge status to Enabled / On.
- Recharge Threshold (Trigger): Set the token balance level in Current Token Balance at which auto recharge should trigger (e.g., when remaining balance drops below X tokens).
- Recharge Amount: Specify the number of tokens to automatically purchase/add upon hitting the threshold.
- Payment Method: Click the Reset balance to positive button. Select or enter the designated credit card or payment profile to be charged automatically.
- Confirm & Save:
- Click Confirm to activate Auto Recharge.
- The status under your balance summary and the Billing Settings icon menu will update to show Enabled.
Access App management
Access App is a dedicated configuration interface for deploying and managing organization access applications. While the Resources section is visible in the sidebar, modifying application access configurations typically requires Owner or Admin permissions.
- Log in to TVU Home.
- Navigate to the TVU Home portal with your credentials.
- In the left navigation sidebar, locate the Manage menu.
- Click on Resources from the sub-menu list.
- Select the Access App tab to view and configure your access-related applications.
© Copyright 2026 TVU Networks Corporation. All rights reserved in all media.
Document Part Number: TVU Home Quick Start User Guide Rev F EN 10-2026
Related tips
