Contents
- TVU Search overview, operations, and features
- Interface overview operations and features
- Schedule mode overview
- Timeline and Calendar schedule overviews
- Basic Timeline overview
- Basic Timeline functions
- Source panel functions
- Calendar page functions
- Browser mode overview
- Browser mode functions
- Content discovery using the Search bar
- Event inspector panel overview
- Event inspector panel functions
- Speech recognition panel functions
- Facial detection panel functions
- Clipping player features
- Upload and download clip tools
- Export profiles overview
- Publish a clip to Social Media
- Routing live sources
- IP Output
- Share link functions
- Event management
- Event management in the Timeline page
- Event management in the Calendar page
- Import source event schedule
- Live Monitor Page and Sidebar
TVU Search Quick Start User Guide

TVU Search is a powerful Cloud-based solution that enables users to monitor, route, search, clip, and export live and recorded video content which is indexed in real-time with TVU’s MediaMind AI service with rich metadata, including timecode, speech transcription, and facial detection.
Chapter 1 – TVU Search overview, operations, and features
This quick start guide provides an in-depth interface overview and explains how to use the latest operations and features in TVU Search.
Product overview
TVU Search dramatically improves the accuracy and speed of content discovery by intelligently searching keywords, phrases, images, and more to surface a comprehensive list of related content.
Easily sort and review all media content matching the search criteria. Refine your search as needed based on relevancy and air date. Then, clip and export the exact seconds of desired content in real-time from any location using simple and robust clipping tools.
Interface overview operation and features
When users Log in to TVU Search, they enter the Schedule mode in the Timeline view, the initial landing page.
TVU Search modes
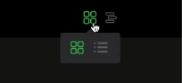
At the top of the Timeline view are two mode icons: Schedule mode (three bars) and Browser mode (four squares). These two modes allow users to access primary operations.
- The Schedule mode allows users to access and manage events using a Timeline or Calendar view.
- The Browser mode allows users to search for assets using a Grid or List view.
Schedule mode
Hover your mouse over the Schedule mode (three bar) icon to select the Timeline and Calendar views (Calendar icons).
Timeline view:
Calendar view:
Timeline and Calendar schedule page overviews
Hover your mouse over the selected schedule page icon in the top bar to select the Timeline and Calendar pages.
Timeline view:
Calendar view:
Timeline overview
Interface operation and features overview
TVU Search has four operational tabs in the left panel:
- Filter: Filter the sources and events that appear to the left
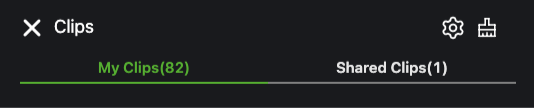
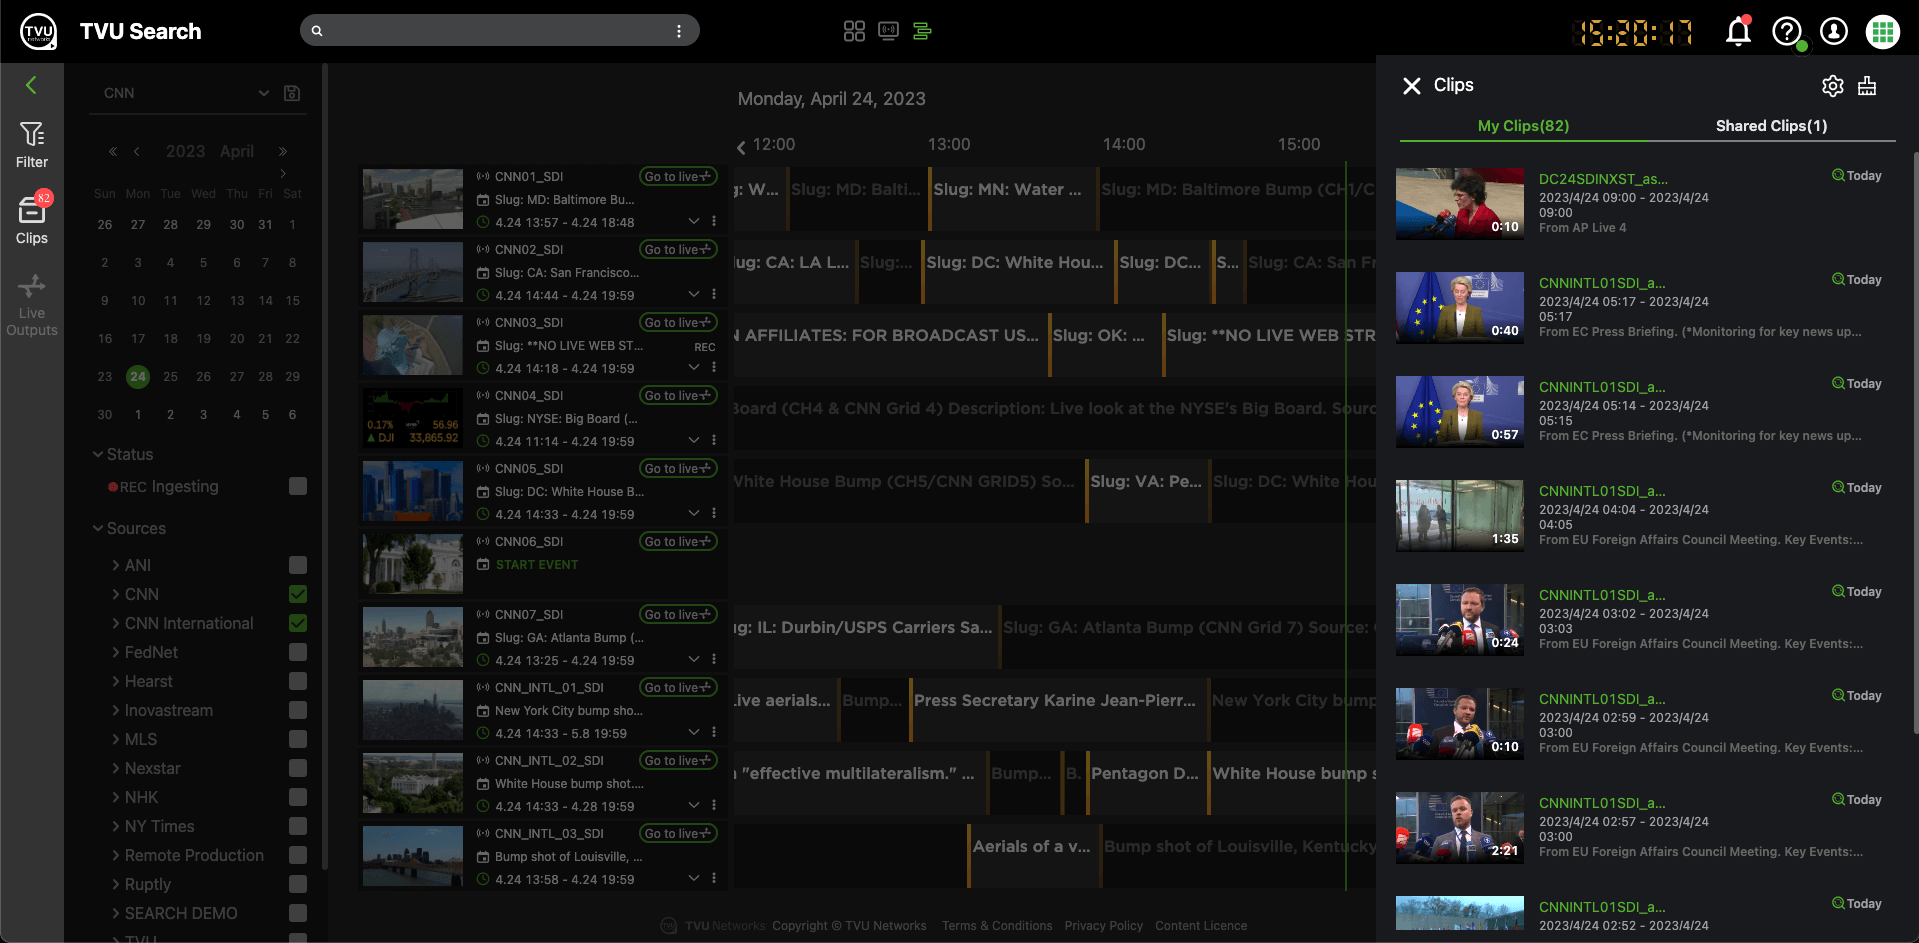
- Clips: Open the right side panel, which includes saved and exported clips
- Live outputs: Open the live outputs right-side panel, with includes any sources currently being sent to a live output.
- Monitor: Open the live monitor right side panel, which includes live previews of the sources enabled in the filter menu
Basic Timeline view functions
The Timeline user interface has two main panels. From left to right: Source panel and Timeline.
Timeline panel functions:
- The date in the top panel is the current date.
- The yellow digital timer in the top navigation corresponds to the current local time.
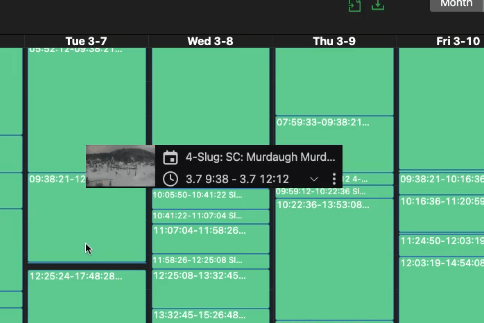
- The Timeline panel shows scheduled events by date and time in chronological order from left to right.
- The vertical green bar refers to the current local time.
- Use the top right > and left < arrows to go back or forward in the Timeline.
- A “Go to now” button displays next to the date to quickly return to the current time.
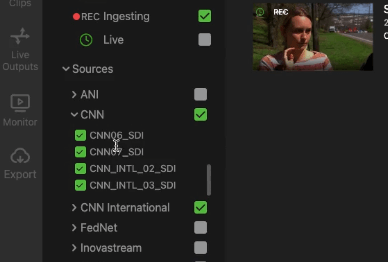
Source panel functions
The source panel includes a source tile for each source available in the ‘Sources’ filter (explained in the ‘Filter menu’ section).
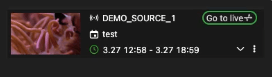
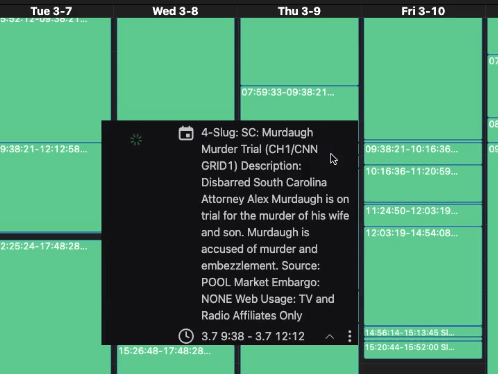
Each Source tile allows users to see the source’s current event status, regardless of where they are in the Timeline. The source tile includes a thumbnail of the source’s active video input, source name, current event description, and its start and stop time.
Source tile icons:
- (1) Routing icon: the source name
- (2) Calendar icon: the event name
- (3) Clock icon: the Event’s start and stop time
- (4) Go to Live button: Opens the Routing inspector
- (5) V: Expand the source tile to include the full event description
- (6) Three-dot icon: Open the Event Inspector and Manage the Event
- (7) REC: The Event is currently being recorded
Note: When an event has not been recorded, hovering over the event in the Timeline displays the following icon. In this case, a user cannot open the event.
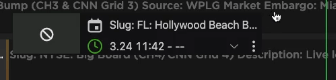
- Click the three-dot icon and select Open to view the event’s status.
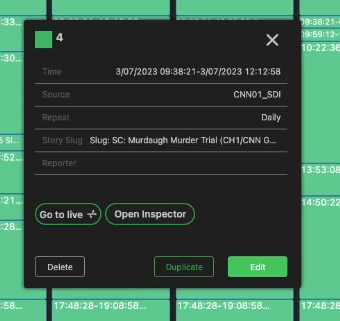
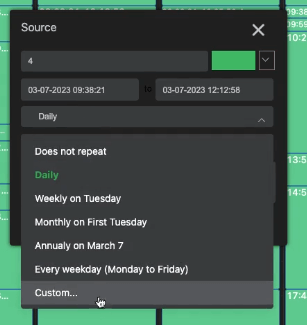
- Select Manage to view the event details. A source owner can change the event in the Event pop-up or choose an action from the bottom buttons. A user can make changes and click Save. To save your changes as a new event, click the Start button.
- The Go to live button opens Routing mode (see Routing mode), and clicking the Open Event button opens the Event Inspector panel (see Inspector panel.)

Calendar page functions
- Click the three-dot icon to manage the event.
- Click the Duplicate button to duplicate the event.
- Click the Delete button to delete the event.
- You can edit the event by clicking the Edit button and expanding the fields.
- Click the color caret icon to change the color of the event.
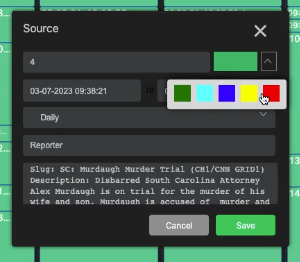
- Click the three-dot icon to open the Inspector panel.
Browser mode overview
The Browser mode (four-square icon) displays the Grid view and list view icons. Hover your mouse over the four-square icon to access the Grid and List view icons.
List view:

Grid view:
Note: Users can click one of the top icons to return to the Browser or Schedule mode from any page.
Browser mode functions
- Click the Browser mode > Grid view icon in the top navigation bar.
- Open the slide-out menu “<” and select the Filter icon.
- Use the checkboxes to select, filter, and view Ingesting or Live events.
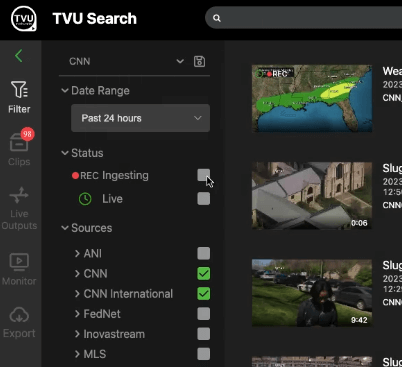
- Click the caret to expand the group to view sources within each group. Use the checkboxes to select the desired sources to use in a group.
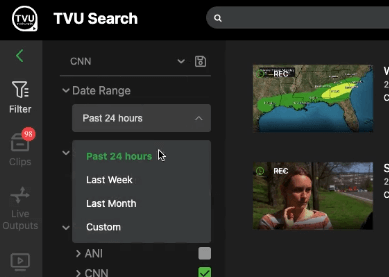
All events for the selected source groups display according to the chosen date range from the drop-down menu.
Note: Only selectable source groups the user is entitled to display.
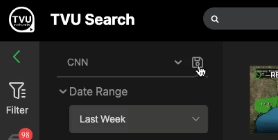
- The user can change filter settings by making a date range selection.
- To save filtered settings, click the disk icon and enter a profile name in the Save custom filter settings pop-up. When finished, click confirm to save your custom filter settings.
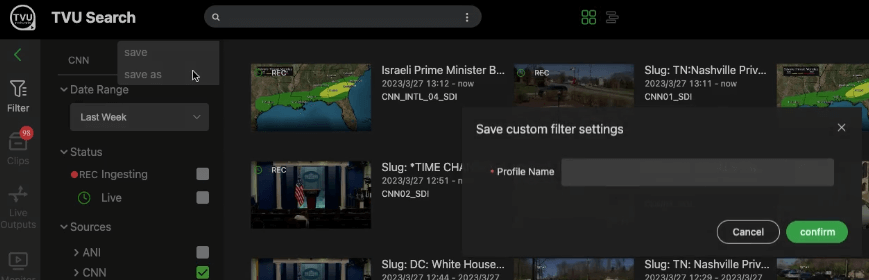
Your saved filter becomes a selectable option in the Date Range drop-down menu.
- Users can view events in a grid or list format. First, click the Browser mode icon and then the List view icon.
Events display in list format.
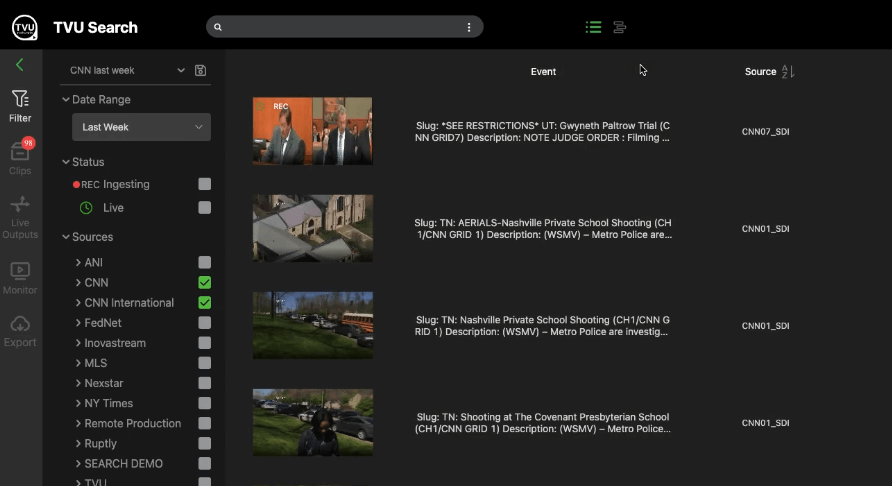
- Users can sort the list view information using the sort options at the top of each column.

Note: In the browser interface, users have the same ability to open an asset in the same manner used in the Timeline view by opening the Inspector panel.
- Click a thumbnail in the list view to open the Inspector panel.
- The Inspector panel opens in a collapsed view. Click the Expanded view icon at the top of the panel to the left of the three-dot icon to open the expanded view.
The expanded view window opens.
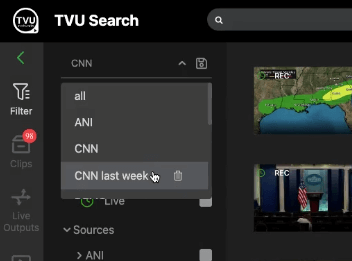
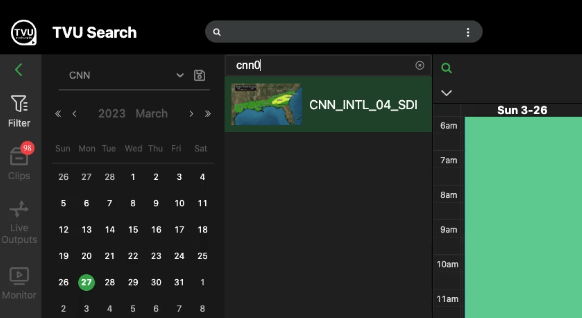
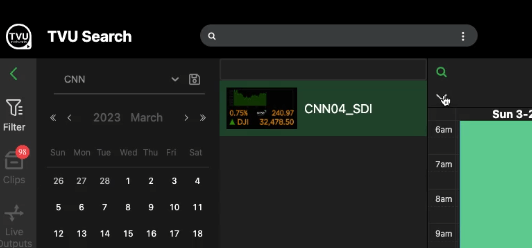
Content discovery using the search bar
Keyword/Phrase search feature
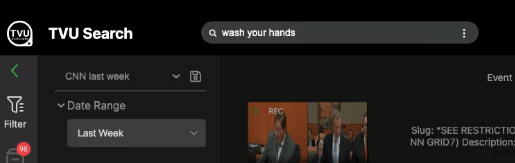
To locate content in a long list of events, use the top search bar to enter source names, keywords, phrases, etc.
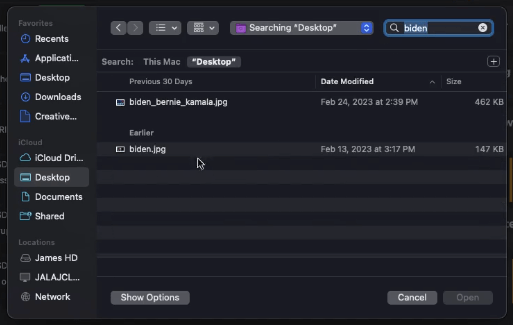
Search by face feature
- The search by face (image) feature is accessible by clicking the three-dots in the search bar and selecting the camera icon.
- Enter a name in the Search field to filter results. Next, select an image you uploaded in the file browser window, and click Open.
TVU Search displays all results based on your custom filter settings.
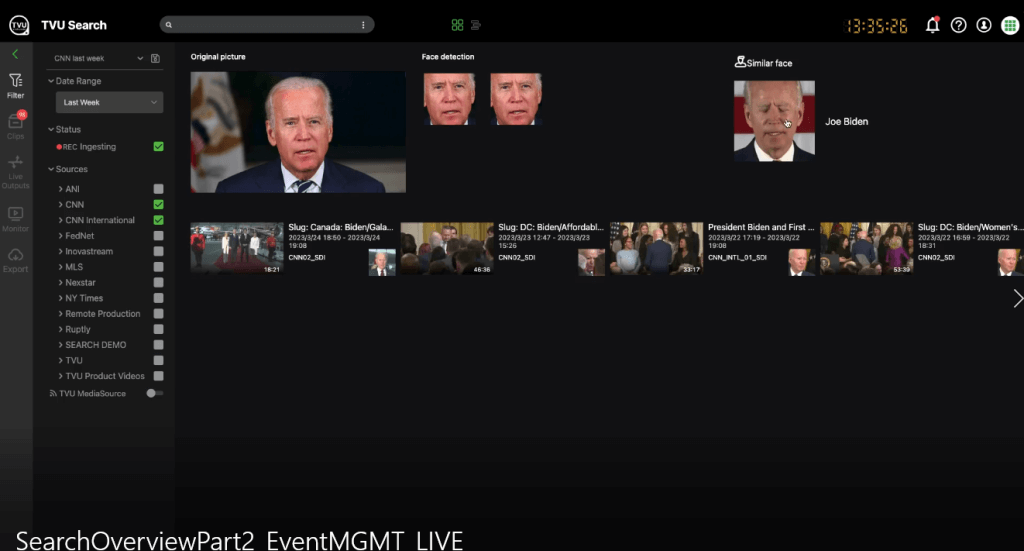
- Click on an asset to view precisely when the “image” appears in the recorded clip.
Active Search
Active Search allows you to add search criteria to profiles. When the criteria are detected by TVU MediaMind AI-service in any of your source events, various actions will be automatically triggered including creating a clip, emailing users in your group, or notifying users in your group.
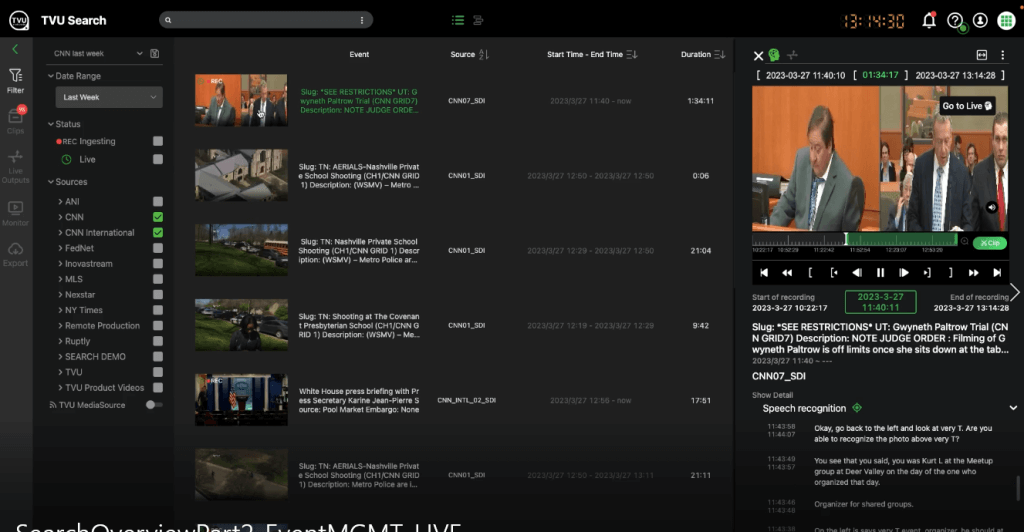
Event inspector panel overview
When a user clicks on an event, the Event inspector panel opens. If there is any metadata associated with the event that was generated by TVU MediaMind’s AI engine, it will be displayed in the MediaMind AI panel.
Event inspector panel functions
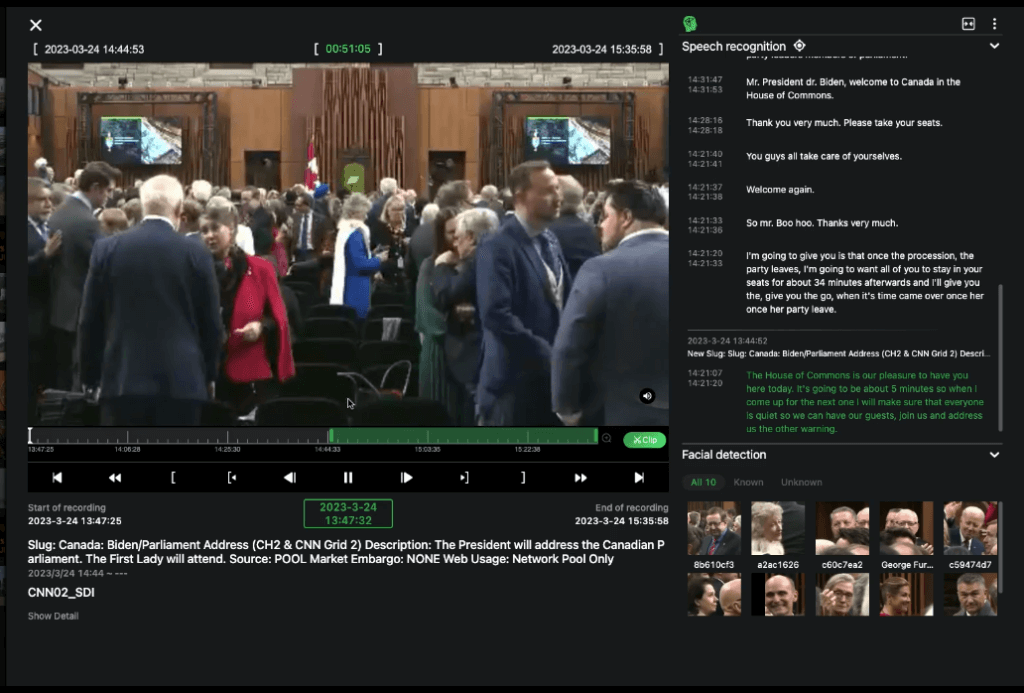
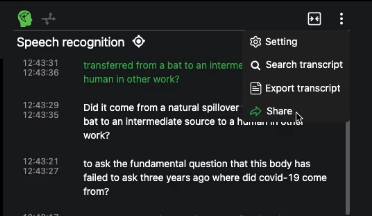
Speech recognition panel: The Speech Recognition panel shows the speech recognition transcript generated by TVU’s MediaMind AI service for the event you are previewing and has the following features and functions:
- The three-dot icon opens a menu that allows users to:
- Configure Asset inspector and speech recognition panel settings
- Choose a language
- Search the transcript within the selected event for keywords or phrases. Enter the search criteria in the search field.
- Export the entire transcript or a marked area of an event.
- Upload (when upload permission is enabled)
- Download
- Please note that the transcript file format will match the setting in the selected export profile (see export profiles)
- Share event. Share temporary preview access to the event via a URL link
- The Speech Recognition panel can expand or collapse using the top-right icons.
- Users can click the time caption segment to move the play head to that specific recording time in the video.
- Users can highlight an area in the speech recognition transcript to set the marked area (i.e. timecode of mark-in will be set to just before the highlighted portion begins, and the timecode of the mark-out will be set to just after the highlighted portion ends)
- To copy a transcript segment, highlight the text, right-click, and select Copy (or CTRL-C)
- The recentering icon at the top of the Speech Recognition panel turns green when users scroll away from the segment corresponding to the playhead’s timecode. Clicking the green icon allows users to return to the selected segment in the transcript list.
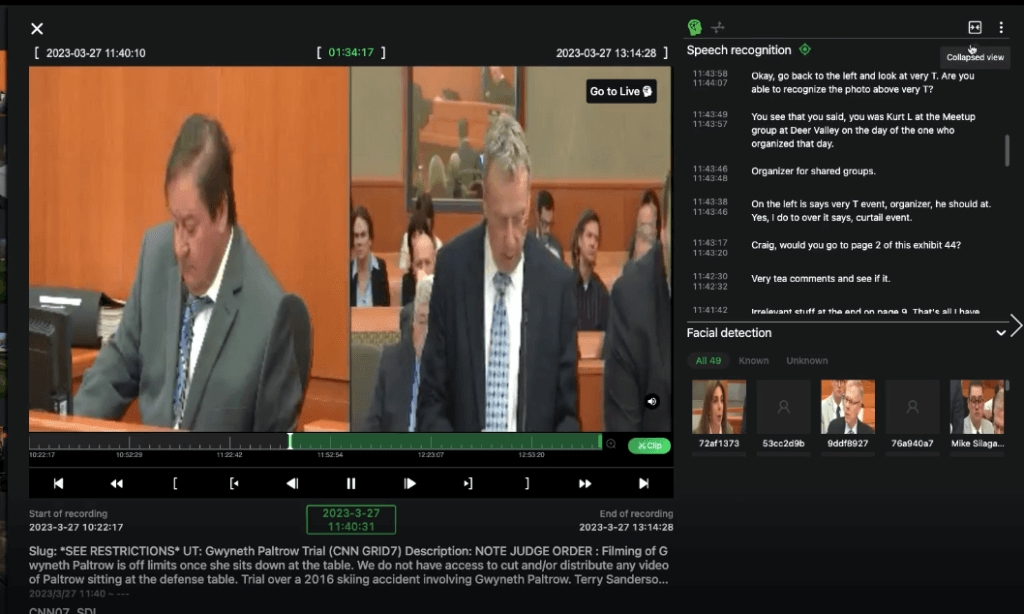
Facial detection panel
The Facial detection feature uses TVU MediaMind’s AI service to detect all faces that appear in the marked area and displays thumbnail images of all detected faces in the video.

Selecting any facial thumbnail will move the play head to the first appearance of the face and display how many times the face appears in the selected event. In addition, any text portions of the speech recognition transcript corresponding with the timecodes of the selected face’s appearances will become yellow.
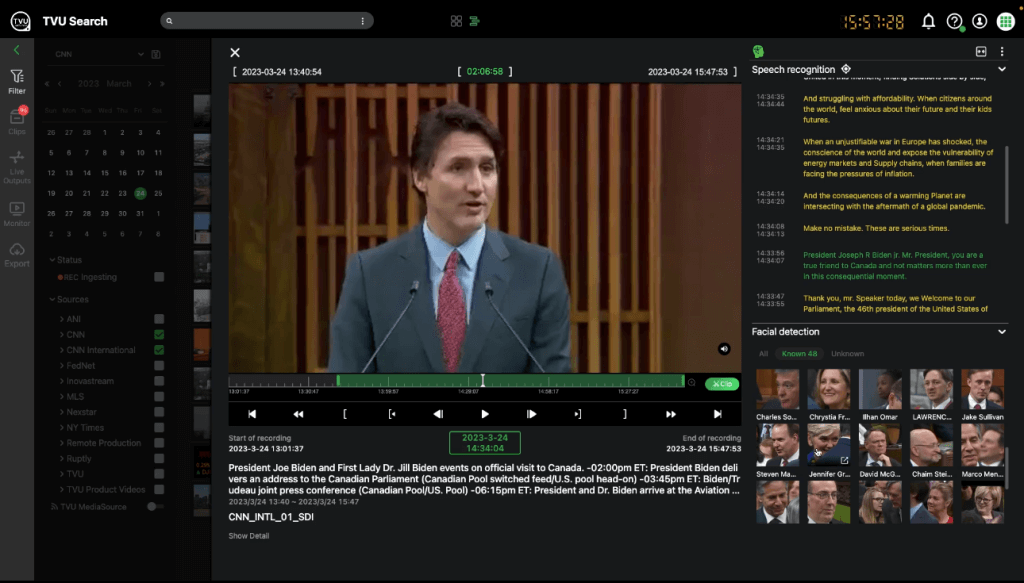
If a person is known, their name appears above their thumbnail. Unknown persons are cataloged and assigned by code.
An image name can be edited and cataloged by hovering over the image and clicking the edit icon.
The detected faces can be sorted between known (i.e. face matches a known person entity) and unknown faces (face does not match any known person entity).
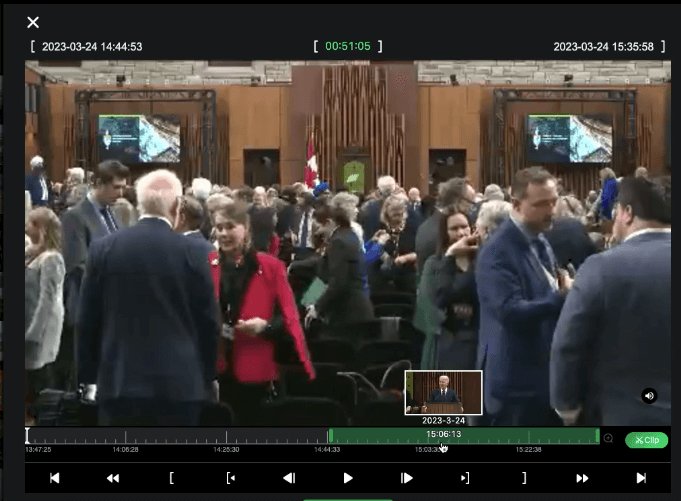
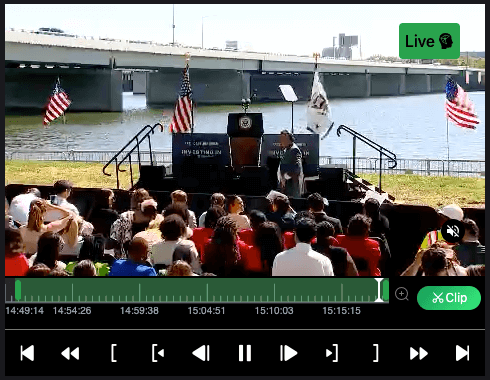
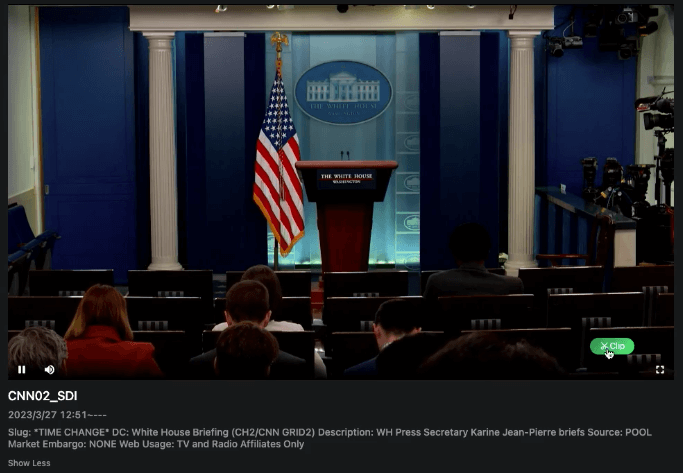
Clipping player features
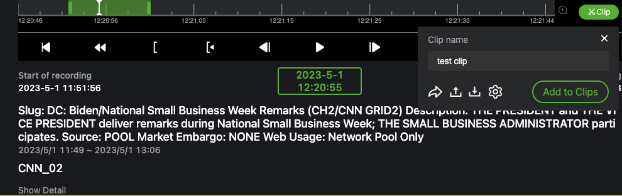
Player Timeline: The player timeline shows the marked area in green. Hover your mouse over the timeline to view a thumbnail from the corresponding timecode and click to set the playhead timecode.
Player Toolbar: The Player toolbar features clip navigation tools to play, rewind, fast forward, start, and end the video. The Mark in and Mark out tools are also available in the toolbar.
Mark In and Mark Out function: The Mark in and out function allows users to change the timecode of the mark-in and mark-out by clicking the ‘[‘ or ‘]’ icons or by using the ‘I’ or ‘O’ shortcut keys, respectively.
- While using your mouse to scroll through the Playhead timeline, a visual thumbnail displays each frame and timecode.
- To play the Marked clip, click the ‘>’ icon or use the spacebar shortcut key.
- The user can edit the timecode of the Mark-in and Mark-out by clicking the Mark-in and Mark-out timecode entries on the top left and right of the player.
RWD and FWD: Rewind or play the video at 2x speed by clicking the ‘<<’ or ‘>>’ icons OR by using the ‘J’ or ‘K’ shortcut keys, respectively
Clip function: The clip button allows users to save and export the marked area as a clip. (see creating clips).
Zoom in and out feature: Click the magnifying glass icon OR use your mouse scroll wheel while hovering over the timeline area to adjust the zoom view level.
Mute feature: Use the mute button to mute and unmute the audio in the player.
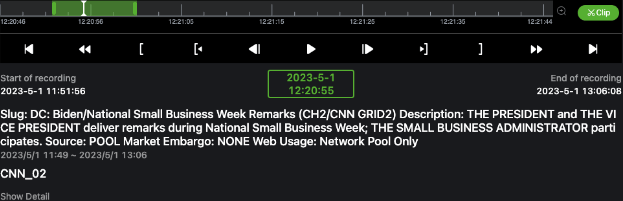
Start/End of recording: The Start and End of recording fields represent the entire duration of a recording. The end of recording time will continue to increase until the recording stops.
Event details: The event description is followed by the event start and stop times. Click Show Detail to view more than two lines of the event’s description.
Event source name: For example, CNN02_SDI
Live clipping mode overview
If the user selects an ingesting event whose end time has not been reached, the inspector will open in ‘live’ clipping mode. Live clipping mode means that the playhead will be set to near the most recent time available for the event’s the growing recorded file. This allows the user to keep up with the most recent time in the live event. If they move the playhead away from this point, the ‘live’ mode will be disabled until they click the ‘Go to Live’ button in the top right of the clipping player which will bring the playhead back to the near-live point. In any case, the growing recording will continue to become available in the player until the event recording is done.
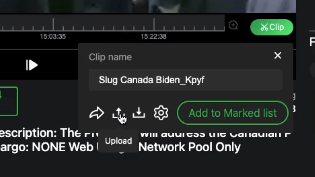
Upload and Download clip tools
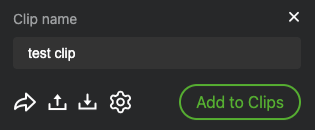
The Upload feature allows users to send the clip to their TVU Drive or their own Amazon S3 bucket.
Click the Clip button and select the Upload icon.
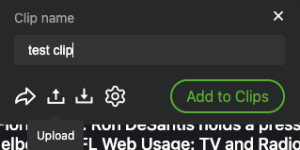
The Download feature allows users to download a full-quality video file and transcript file of the clip. The video file format and transcript file format can be configured in an ‘Export Profile’ (see below).
Click the Clip button and select the Download icon.
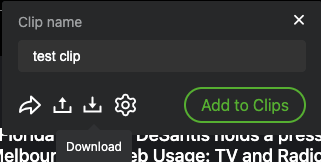
Add to Clips: The Add to Clips button adds the clip to the user’s “Clips” list.
Export Profiles overview
- Click the Clip button in the Event inspector or open the Clips side panel and click the settings “Gear” icon to open the Export Profile menu.
- Select the Export profile that should be used for any subsequent Download or Upload export actions by clicking the corresponding checkbox next to the Export Profile’s name.
- Use the checkbox to select an Export Profile from the list or +Add one to select.
- To edit a profile, click the edit icon to open the Profile Settings window. Next, edit and save the upload settings.
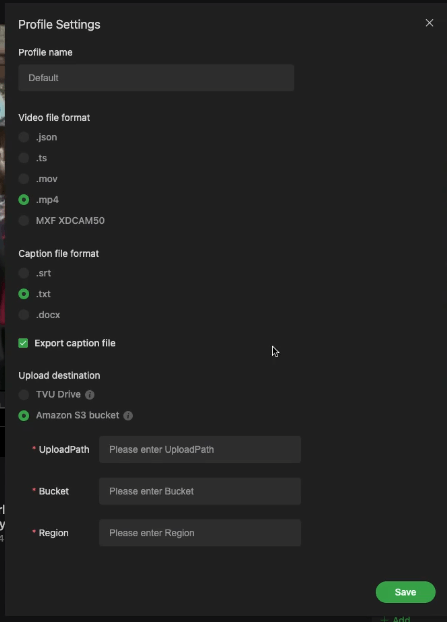
- Click the Save button when finished.
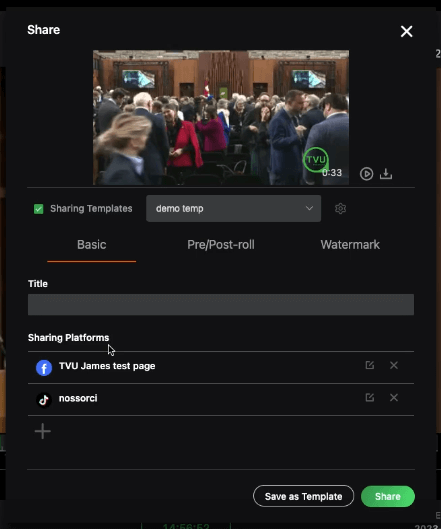
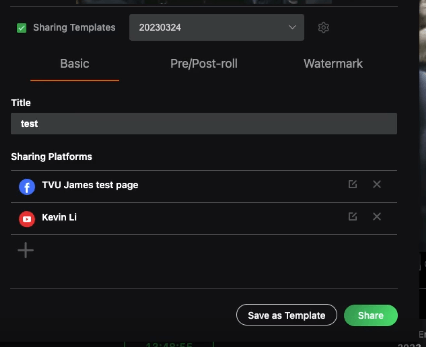
Publish a clip to Social Media
The clip button allows users to save and export the marked area as a clip.
- After clicking the Clip button, enter a Clip name in the pop-up window.
The Clip feature includes the following options:
- Share to Social media: Publish the clip to multiple social media sites with decoration (ie. pre/post-roll video, watermark.)
- Share with my group: This option adds the clip to selected group’s/user’s “Shared Clips” list.

- Clicking the Share to Social Media option opens the Share pop-up window.
- Users can publish the clip to Facebook, Twitter, Instagram, YouTube, and TikTok. In addition, users can add Pre/Post-roll branding and a Watermark to the clip when it is published.
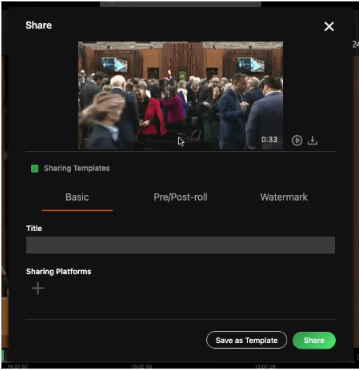
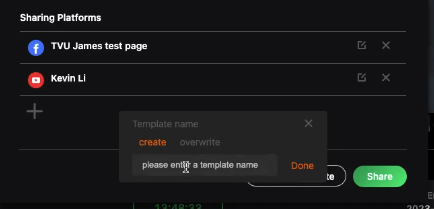
- Click Save as Template to save the Sharing Platforms you’ve added along with any decoration settings enabled to a template that can be applied to any subsequent clips you want to share to social media. Next, enter a Template name, click Create, Overwrite, and Done.
Saved templates are accessible in the Template drop-down menu.

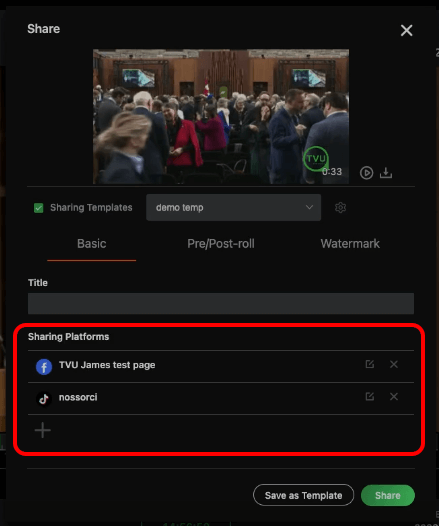
- Click the Sharing Platform “+” to add the Social Media platform account you want to publish to. The Sharing Platform pop-up opens.
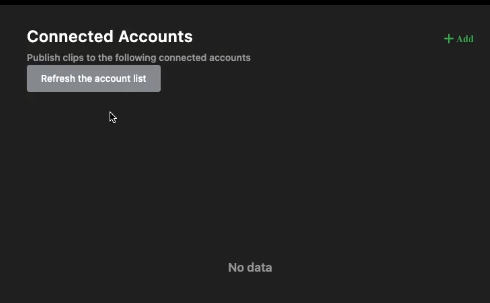
- Click Manage connected accounts.
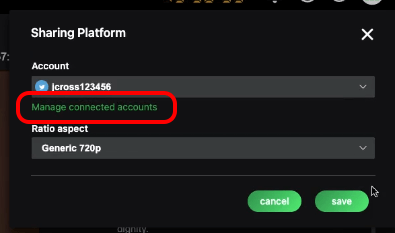
- In the Connected Accounts window, click +Add to add a new account.
- Select your clip’s account name and ratio aspect, then click Save.
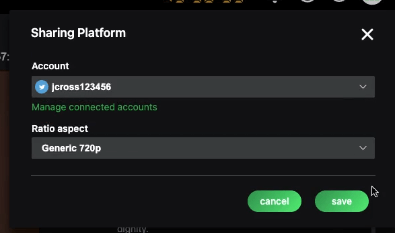
The new account is added to the Sharing Platform menu.
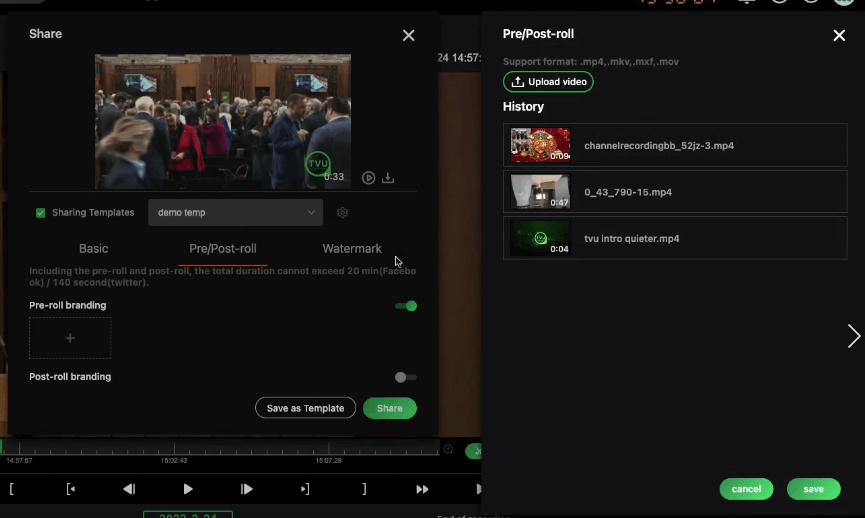
Pre/Post roll tab functions
The Pre/Post-roll tab allows users to customize a clip by adding an introductory video and ending video.

- Enable the Pre-roll or Post-roll branding slider to open the Pre/Post-roll window.
- Choose an uploaded video from the list, or click the Upload video button to upload a pre or post-roll branding video, then click save.
Watermark tab functions
- Open the Watermark tab and enable the slider to add a watermark to your clip.
- Click the Watermark positioning container and thumbnail to upload or select an image.
Users can preview the watermark’s position in the preview window.

- Finally, open the Basic tab, and select a Sharing platform account.
Once the Sharing Platforms, Pre/Post-roll, and Watermark settings have been configured, it’s ready to share to a configured Social media account.
- Enter a video Title, confirm your sharing platform selections, and click Share.
- Click Save as Template to save the Sharing Platforms you’ve added along with any decoration settings enabled to a template that can be applied to any subsequent clips you want to share to social media. Next, enter a Template name, click Create, Overwrite, and Done.
- Click the Sharing Templates checkbox and select a template from the drop-down menu.
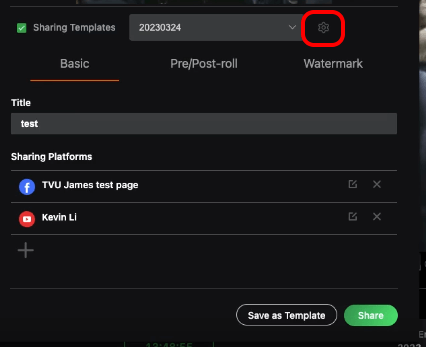
To edit a saved template click the gear icon to open the Sharing templates window. Click the edit icon for the template you want to change.
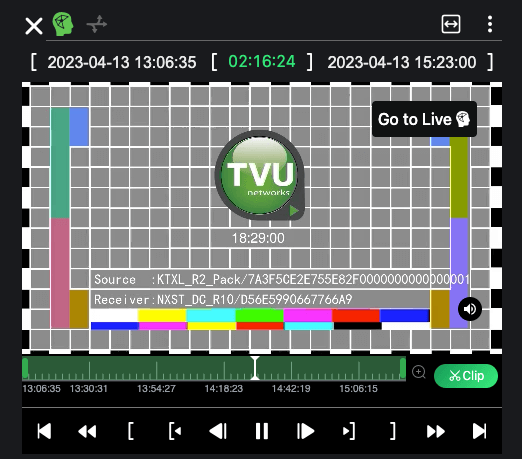
Go to Live panel (Routing mode inspector) functions
- Click the Schedule mode icon and select the Timeline view icon to open the live routing view.
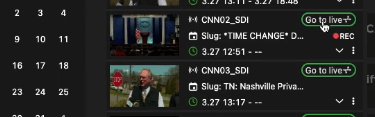
- Click the go to live button in the source box to select a live event.
The Routing inspector opens.
- Click the Routing icon (three arrow icon) to open the Routing mode within the Inspector.
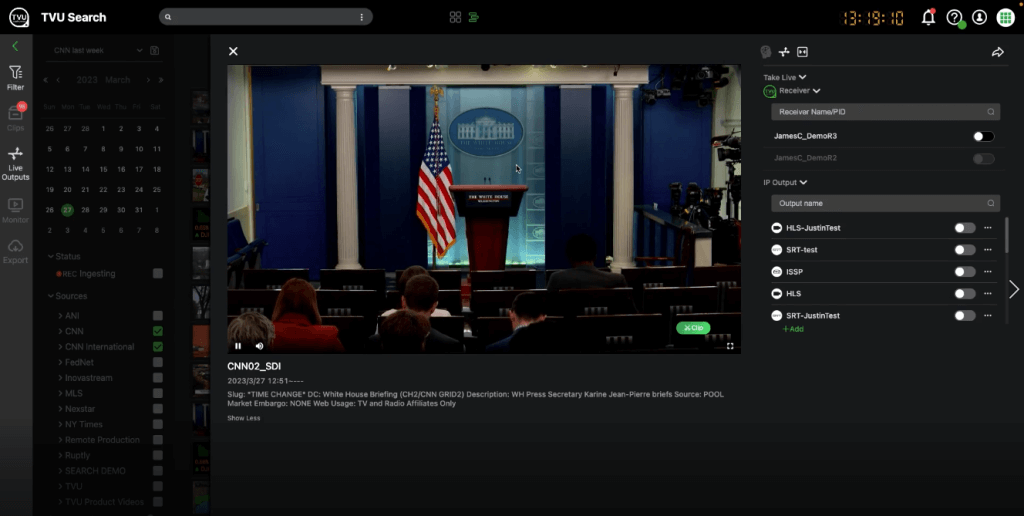
The Routing mode allows a user to watch the full frame preview of the live event.
- To access the Event inspector mode from within Routing mode, click the Clip button.
Take Live function in Routing mode
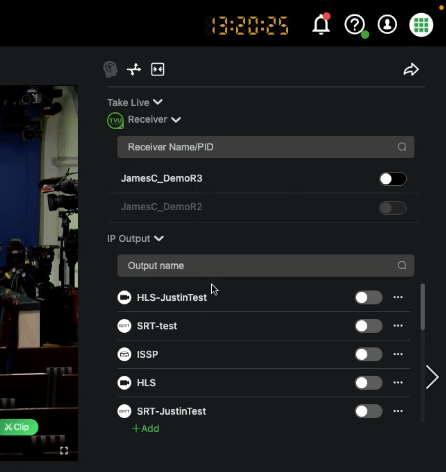
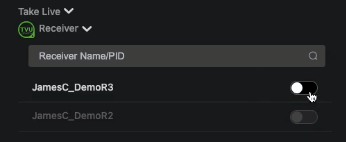
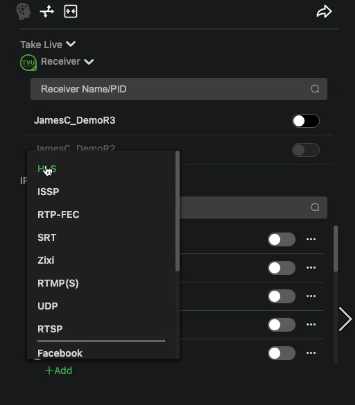
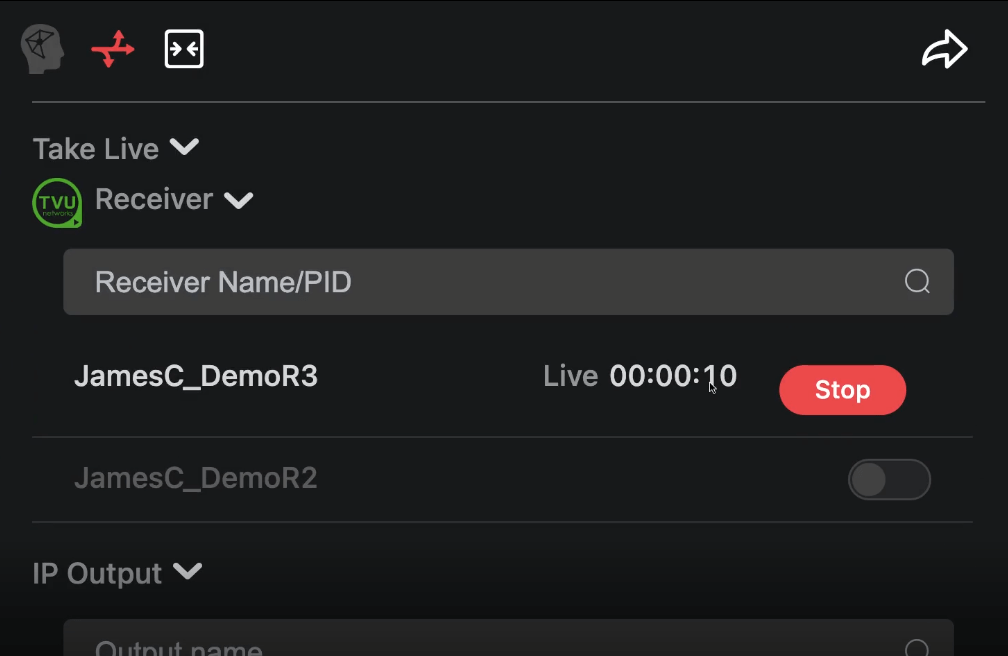
TVU Receiver Routing option
The TVU Receiver subpanel allows users to route the live source to the receivers that are authorized to their TVU Command Center account.
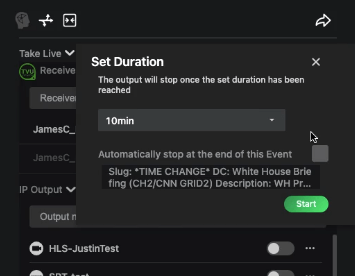
- To take the source live to a TVU receiver, enable the slider to the right.
- Choose how long you would like the source to go live with the receiver in the Set Duration pop-up window.
- Click the Automatic stop checkbox if you want the live source to stop live with the TVU receiver at the end of the event, then click Start.
IP Output
The IP Output feature allows users to send the live source to any IP destination in the list via TVU Producer.
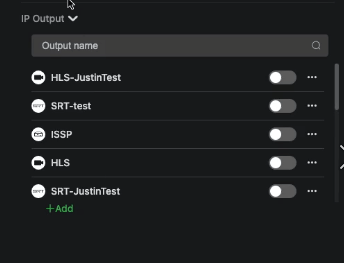
- To add a destination to the list, click +Add, select from the drop-down list, and follow the prompts.
Note: The output profiles appear in Command Center and Producer accounts.
- To start an IP output, enable the slider. The Start IP Output pop-up opens.
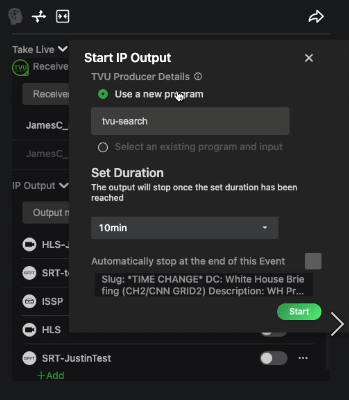
Note: Click the TVU Producer information icon to learn more about using TVU Search with TVU Producer.
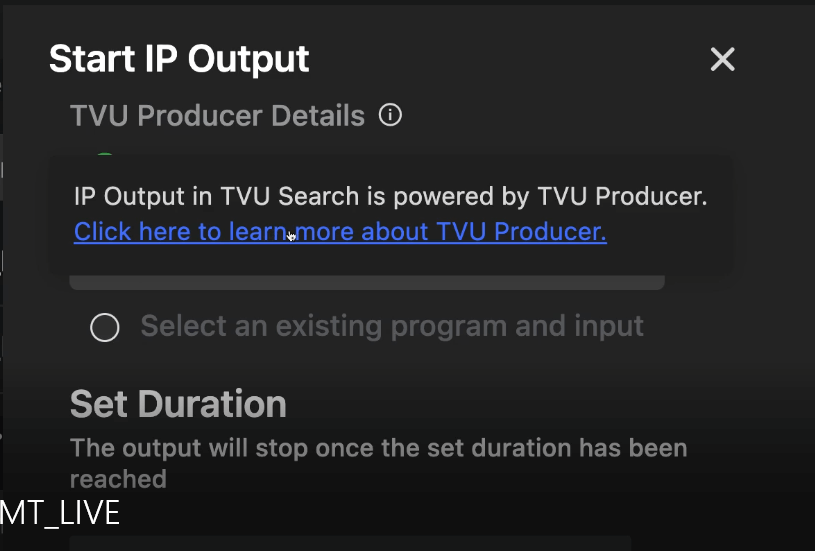
- Users can choose to use a new program or select an existing program in your Producer Workbench to facilitate sending the live source to the specified IP output.

- Users can choose an Input from the drop-down menu if the program is running.
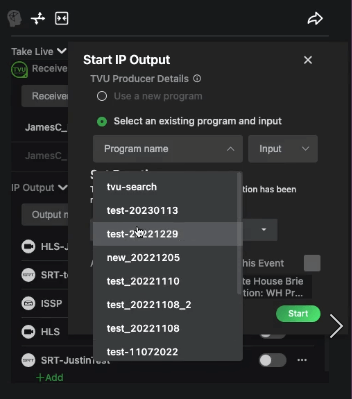
- Set the output duration and if you would like the output to stop at the end of the event.
- When finished, click the Start button. A message that the TVU Producer module (if applicable) is starting in the background.
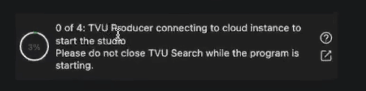
The source is automatically sent to the Producer program using the configured input. Then, the producer program starts the output configured in TVU Search.
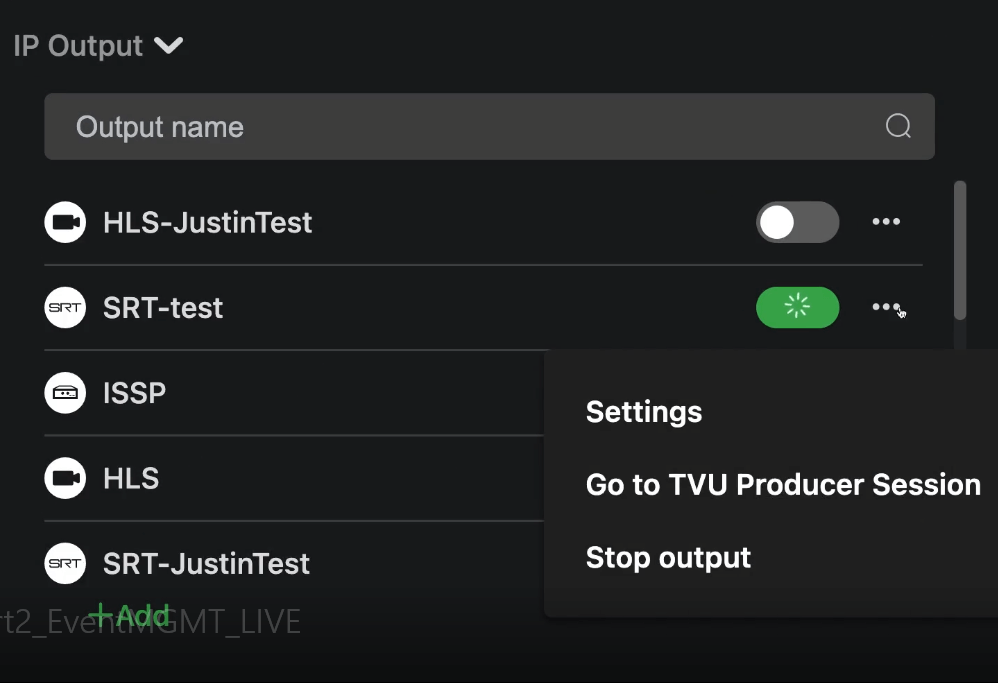
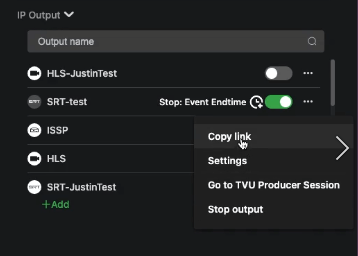
- Output management: Click the three-dot icon next to the enabled output slider to access output Settings, Stop output, or Go to the TVU Producer Session (this selection opens the Producer session).
Once the output starts and is live, a countdown timer displays how long the video has been live. In a live session, the Live outputs tab (which includes the number of sources routed) and the routing icon turn red.
Note: If you are outputting a pull stream, select Copy Link to copy the output stream URL.
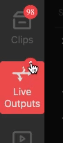
Live Outputs tab:
Red Routing icon:
- To stop the output, click the Stop button.
- To view Active feeds, open the Live Outputs tab to open the panel.
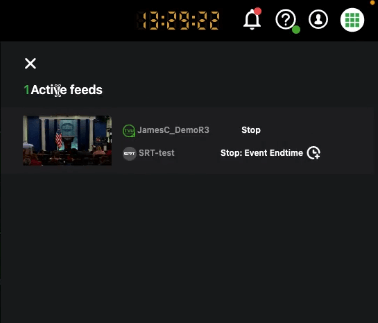
- The slide-out live outputs panel allows you to Stop active feeds from the source box.
- You can also stop the live feed by disabling the slider in the IP output panel.
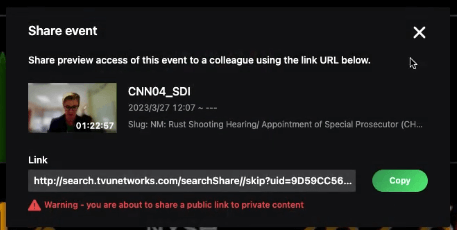
Share link functions
The Event inspector panel includes a Share feature that allows users to share a link to an event.
- Click the three-dot icon to select the Share feature.
- In the Share event pop-up window, click the Copy button and send the link to the recipient.
Note: The visitor can view the feed for a 10-minute duration without logging in or indefinitely using a logged-in session.
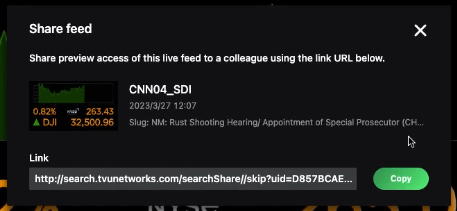
Share link to a live source
The routing mode allows users to share a link to a live source preview. You can also share a feed while in Router mode by clicking the forward arrow icon in the top panel. The visitor can view the feed for a 10-minute duration without logging in or indefinitely using a logged-in session.
Event Management
The Timeline and Calendar schedule pages allow users to access and manage events for the sources they are entitled to.
Event management in the Timeline page
Note: Users must have owner permissions of a source in order to manage its events.
- Start an Event by clicking ‘Start Event’ in the source tile.
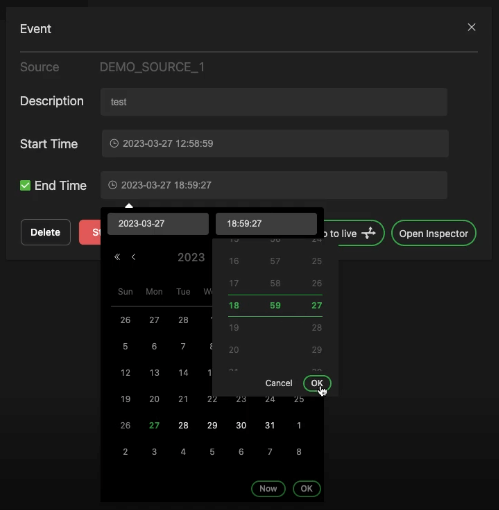
- In the Event management window, enter a Description, set a Start Time and Date, then click OK (default is the current time).
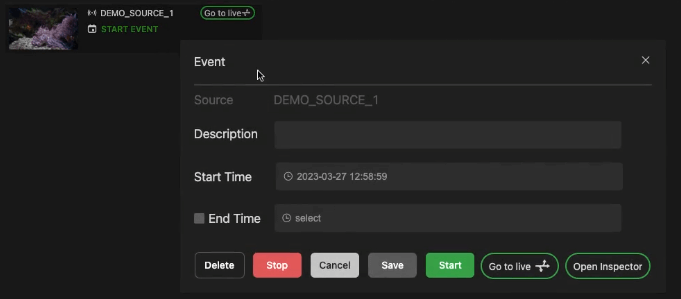
- If desired, click the end time check box to add a date and an end time, then Click OK.
- Click the Start button to create the event.
- To manage the event, click the three-dot icon and select Manage.

- Make your changes in the Event management window and click Save.
Additional Event management window functions
Using the Stop and Delete buttons:
The Stop button automatically changes the stop time to the current time and date.
Click the Delete button to delete the event from the Timeline.

To create an event within the Timeline:
- Hover the mouse over the Timeline. A green time bar displays where an event can be scheduled.
- Click Start Event to schedule an event.

To manage events in the timeline:
- Hover the mouse over the event in the timeline.
- Click the three-dot icon and select Manage in the pop-up window.
Users can:
- Make a change in the Event management window.
- Open the Routing inspector by clicking the Go to live button.
- Open the event Inspector by clicking the Open Inspector button.

Event management in the Calendar page
Users can also manage events from the Calendar page.
- Click the Schedule mode icon and select the Calendar icon to open the calendar page.
The Calendar page displays.
- To view scheduled events by Month, Week, or Day, click the desired button in the top-right navigation.
Note: You can’t edit and manage another grid owner’s source event schedule.
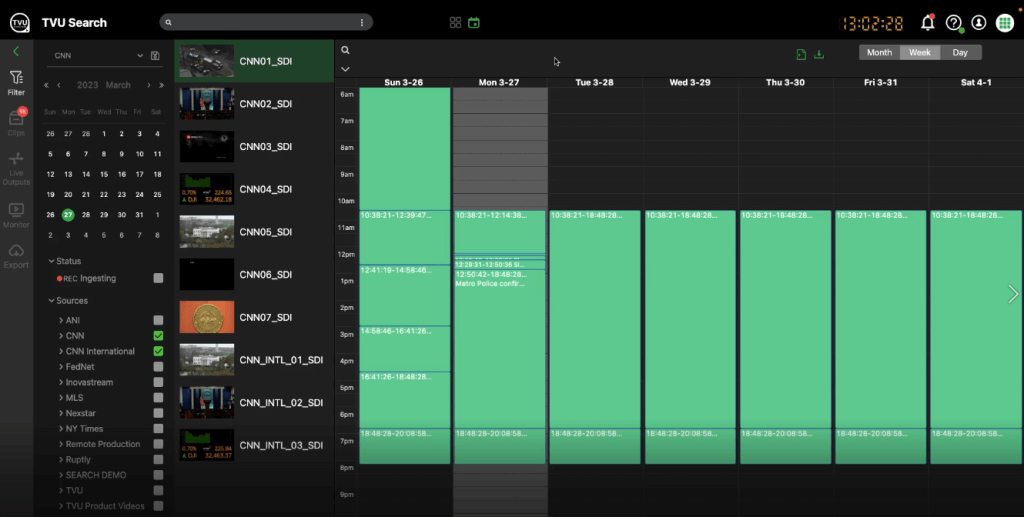
- Select a source in the left panel to view the Month, Week, or Day schedule.
- You can also use the top search bar to search for a specific source quickly.
- To view the schedule for a specific source, select the source, then click the caret icon below the search icon to display your selection’s schedule. For example, use the calendar to view a specific date.
- To view an event name in the calendar, hover the mouse over the event to display the source box. The event thumbnail, description, and scheduled start/stop times display.
- Click the caret icon to expand the source box for more detail.
Import source event schedule
- Click the Import source icon to import events from a schedule file into your calendar.
Note: Event schedule uploads support in .xls or CSV (MS Outlook) formats
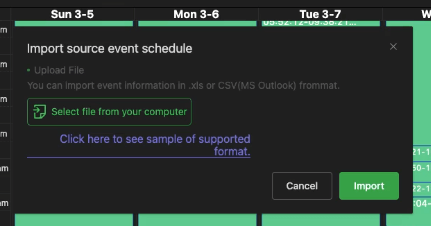
- Click Select a file from your computer and click Open.

- Select a file and click Import.

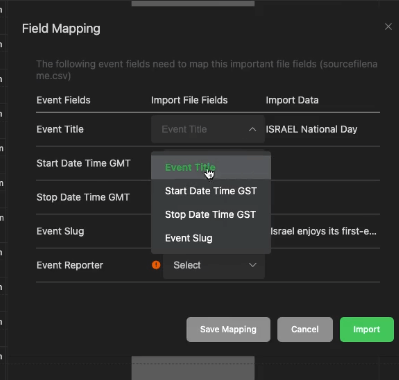
The Field Mapping window displays.
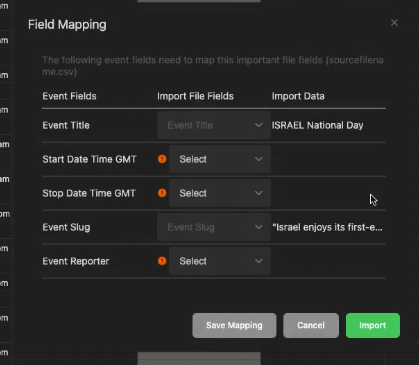
- To Map the fields, use the drop-down menus to edit the Event title, start date, stop date, event slug, and reporter. When finished, click Import.
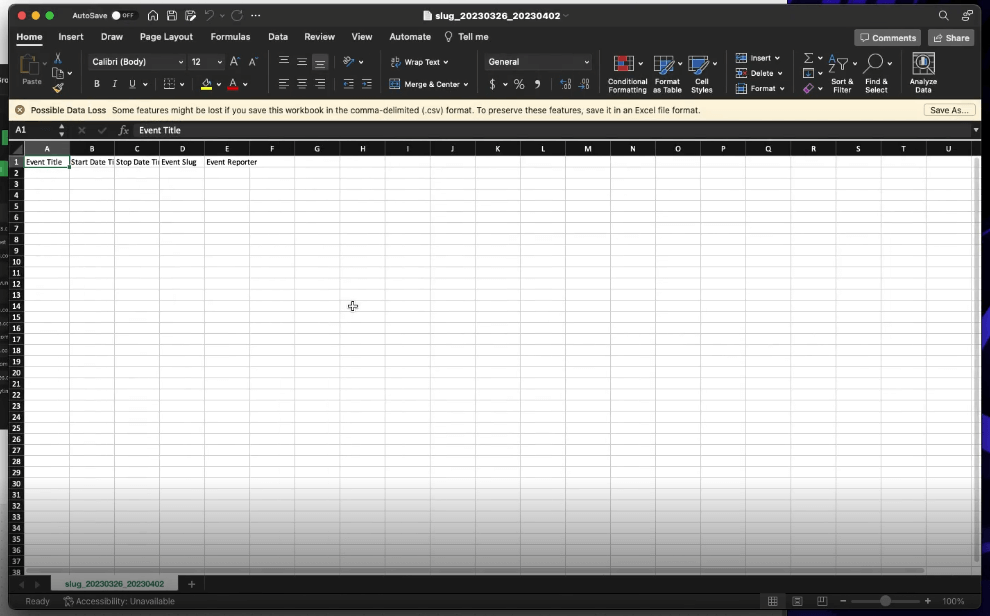
- The download icon allows users to download a CSV file of the selected source.
The downloaded file displays in the pop-up window.
Live Monitor Page and Sidebar
The Live Monitor page and sidebar in TVU Search allows you to create multiviewers of live sources. You can customize the display type, search and filter sources, and adjust the preview position. You can also choose which sources to display in the sidebar, and manage source events and live outputs in the live monitor page and sidebar.
© Copyright 2023 TVU Networks Corporation. All rights reserved in all media.
Document Part Number: TVU Search Quick Start Guide Rev A EN 04-2023