Contents
TVU G-Link Software feature User Guide

TVU G-Link software feature is an Internet-based, licensed solution for point-to-point live transmission that provides an affordable way of sharing live video between two locations. The G-Link software feature allows a receiver to transmit video to and from another G-Link receiver (point-to-point) for bidirectional transmission. The TVU G-Link software feature is added to the existing VS3100, VS3200, VS3500, and VS3600 server Web interface and is accessed and enabled in the Feature Control menu.
The TVU Server is the primary hardware component of TVU G-Link. With the G-Link software license, two servers can simultaneously send and receive a broadcast-quality video feed to/from each other. A TVU Server with the TVU G-Link software license takes a variety of incoming video types and formats, including incoming TVU One and TVU Anywhere transmissions, SDI input, and external IP sources. A TVU Server with a TVU G-Link software license also outputs in SDI and various IP formats in high resolution and can send feeds directly to social media platforms such as YouTube and Facebook via an optional IP streaming software.
Note: Prior authorization for the G-Link feature is required by the TVU Support team at support@tvunetworks.com.
Features
The TVU G-Link software feature enables TVU Servers to send and receive video with another dedicated G-Link software-enabled TVU Server.
TVU G-Link works with other TVU Products, including AP ENPS Integration, TVU Analytics, TVU Booking Service, TVU MediaMind, and TVU Producer. Also, A TVU Server with the TVU G-Link software license can be easily upgraded with a TVU Grid service license and subscription.
- TVU G-Link software is reliable, easy to use, and affordable.
- TVU G-Link is designed to work with commodity internet.
- SDI delivery with a wide variety of IP-based inputs and outputs.
- It supports up to two bidirectional links (between two locations) or four unidirectional links (between two locations).
- Controllable via an intuitive and web-based management platform.
Enabling the G-Link feature for LinuxR allows users to:
- Set bitrate, codec, and port of the G-Link encoder
- Add a G-Link source to the receiver
- Remove a G-Link source from the receiver
Quick Start guide
This Quick Start user guide provides the steps necessary to complete the following objectives:
- Setting up the G-Link encoder
- Adding the G-Link source to the receiver
- Editing G-Link source information
- Removing a G-Link source
- Monitoring the G-Link transmission
- G-Link configuration
- Link aggregation feature
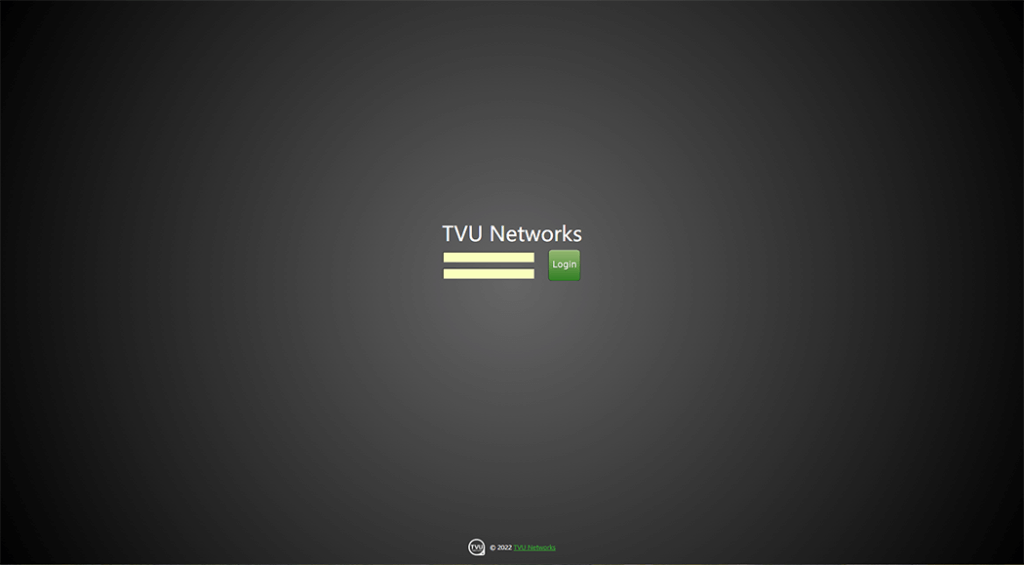
Sign in to the TVU Web interface
Tip: Bookmark the login page for future access.
Logging in to the TVU Server Web UI
To log in to the TVU receiver Web UI, have your server static IP address available and complete the following steps:
- Open a Web browser window and enter:
http://external_IP_Address:8288
(Where External_IP_Address is your server’s static IP address)
- Click Enter. The Login pop-up displays.
- To Log in to the TVU Receiver UI, Enter the following:
User ID: tvu
Password: Enter the last 8-digits of the PID using all caps
The Receiver Web landing page displays.
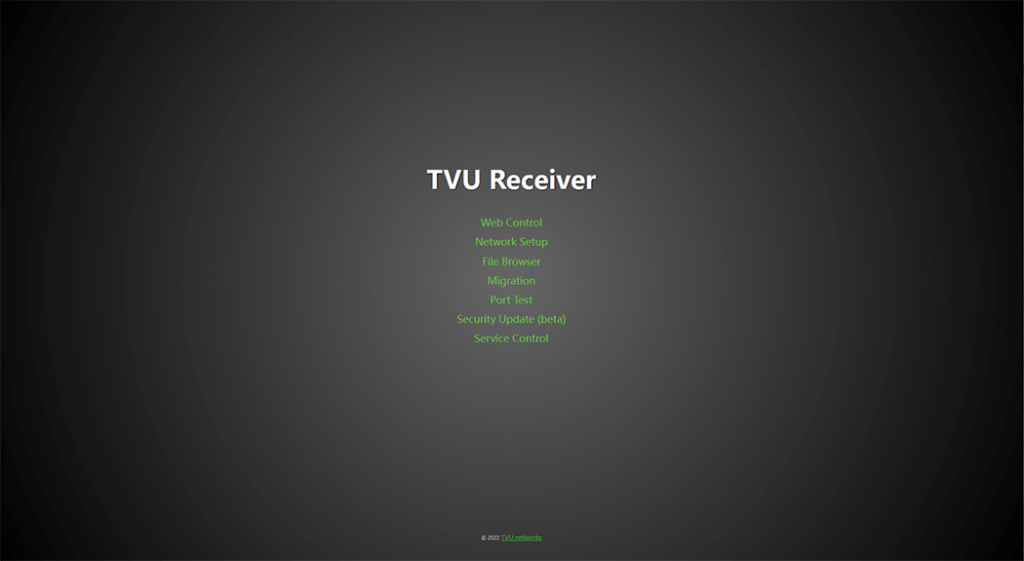
- Click Web Control.
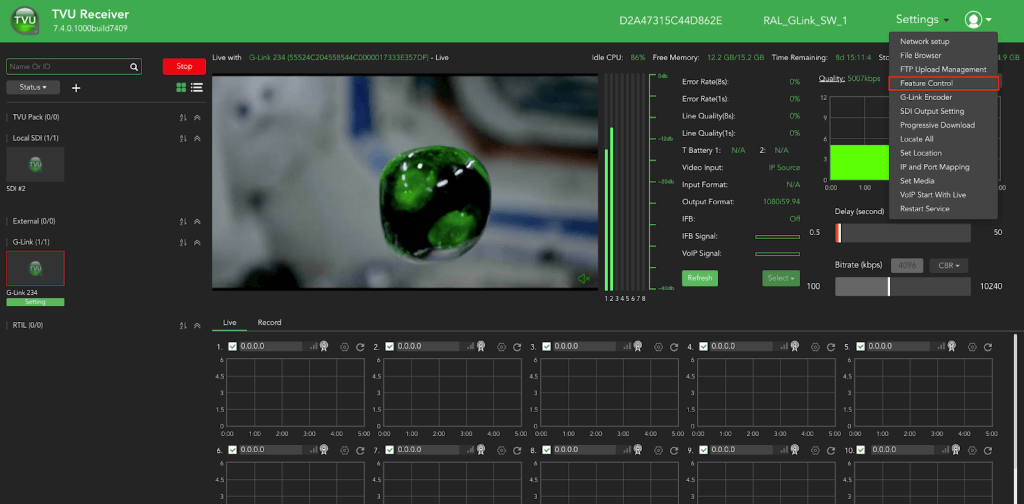
Setting up the G-Link encoder
To set up the G-Link encoder, complete the following steps:
- Click Settings in the top right main navigation bar. Then click Feature Control from the drop-down menu.

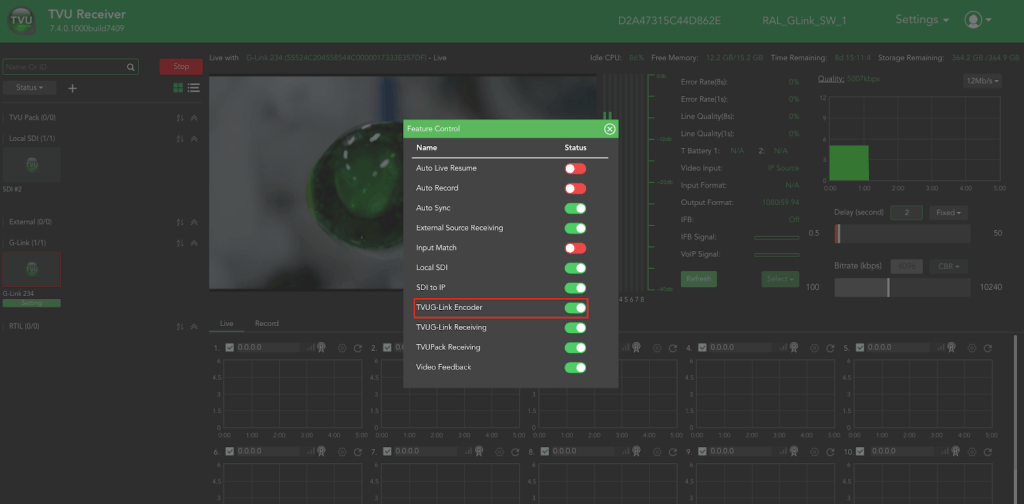
The Feature Control dialog displays.
- Click and slide the TVU G-Link Encoder switch to the right until it turns green to enable the feature. Then, close the window.
Setting the bitrate for the G-Link encoder
To set the bitrate for the G-Link encoder, complete the following steps:
- Click Settings in the top right main navigation bar. Then click G-Link Encoder from the drop-down menu.
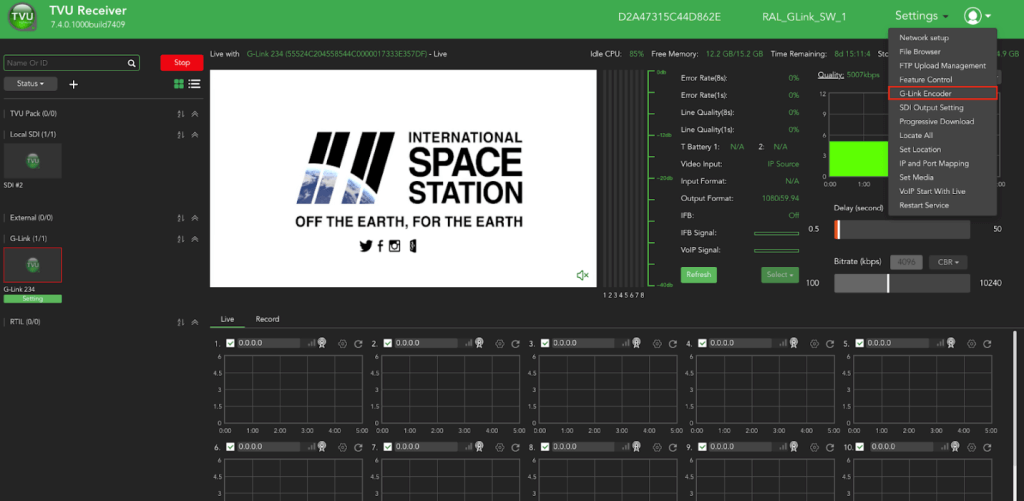
The G-Link Encoder dialog displays.
- Use the Bitrate sliders to set the bitrate. The default bitrate setting is 5 Mbps.
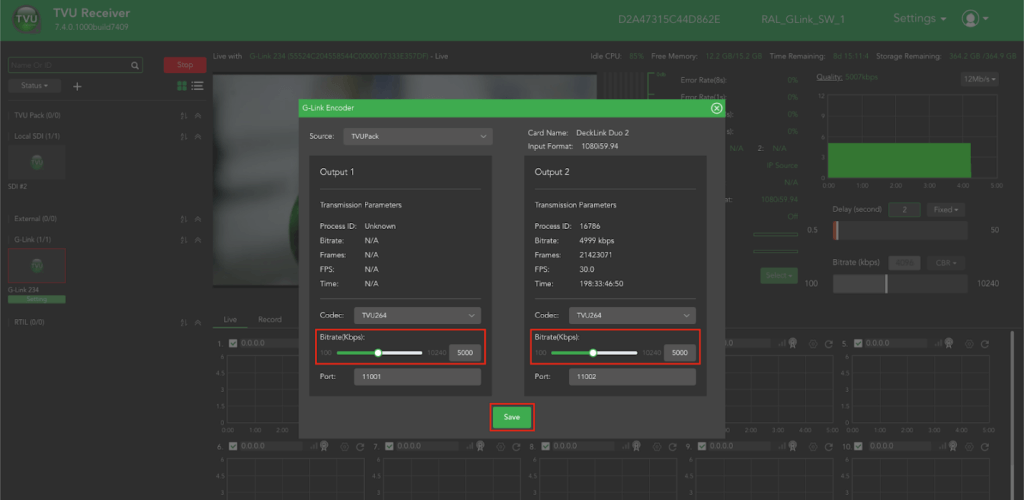
Note: The receiver will restart after saving any changes to the G-Link bitrate.
- When you are finished, click Save.
Setting the G-Link encoder codec
To set the encoder codec for G-Link encoder, complete the following steps:
- Click Settings in the top right main navigation bar. Then click G-Link Encoder from the drop-down menu.
The G-Link Encoder dialog displays.
- In the right pane, click the Codec drop-down menu and select the appropriate setting. Contact TVU Support to enable TVU265.
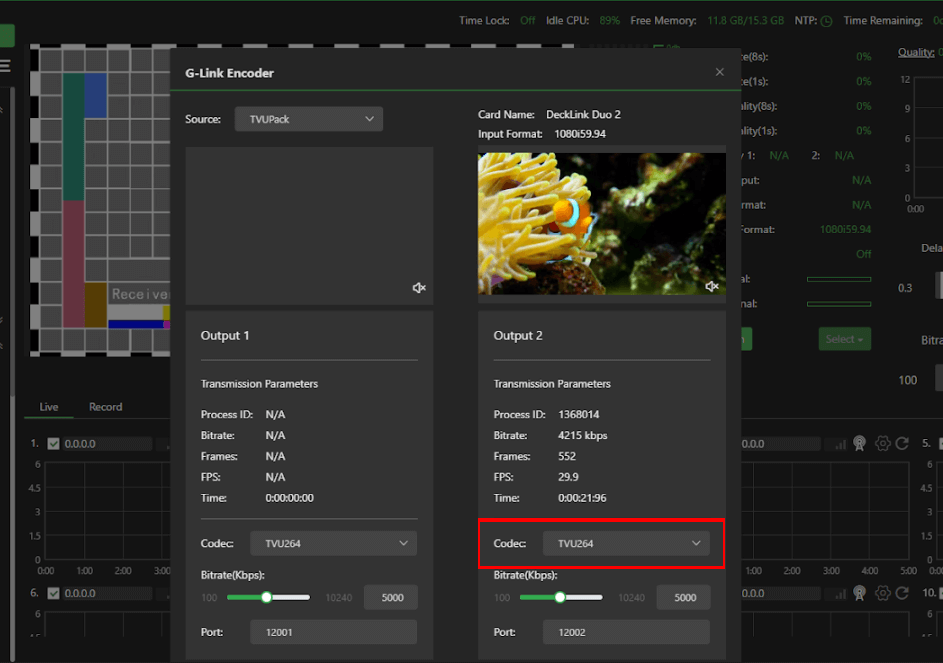
- When you are finished, click Save.
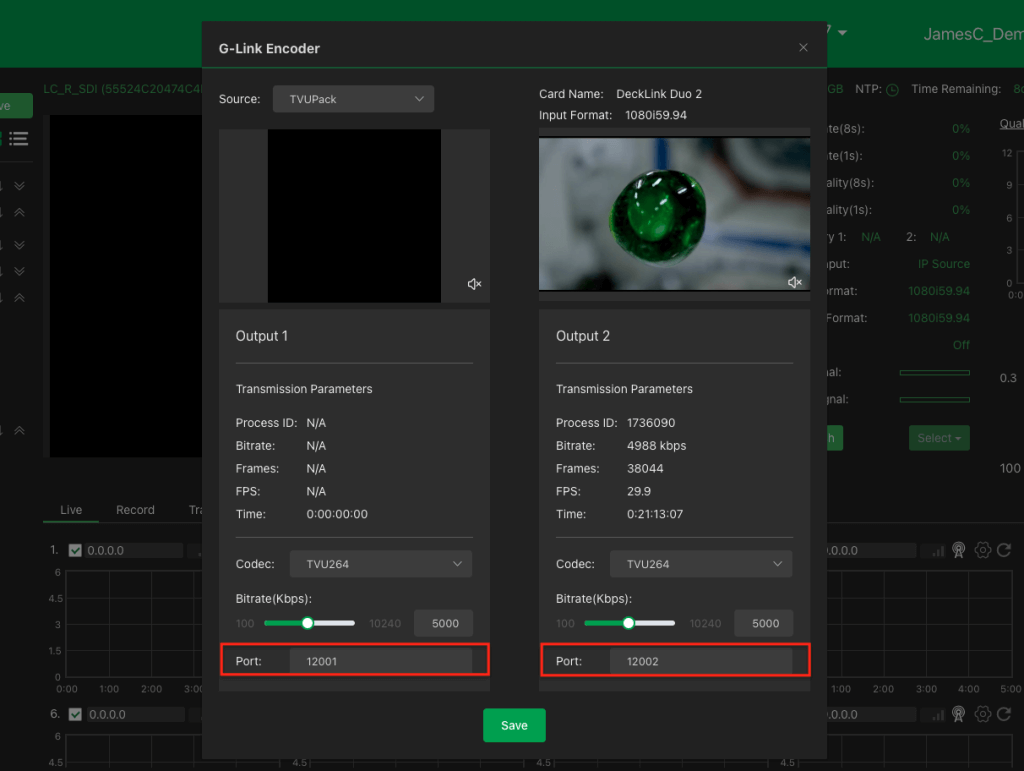
Setting the G-Link encoder source destination port
To set the destination port for the G-Link encoder source, complete the following steps:
- Click Settings in the top right main navigation bar. Then click G-Link Encoder from the drop-down menu.
The G-Link Encoder dialog displays.
- Enter the Source destination port numbers in the right and left Port fields.
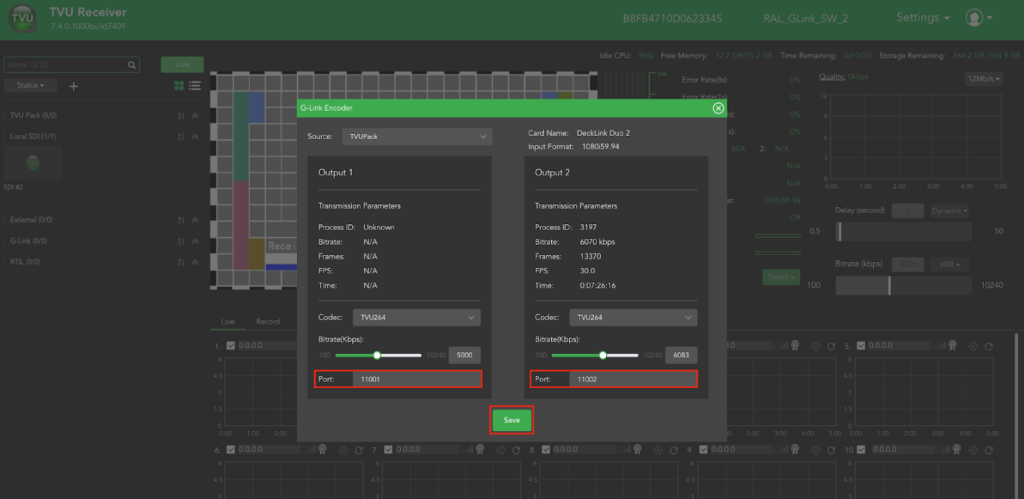
- When you are finished, click Save.
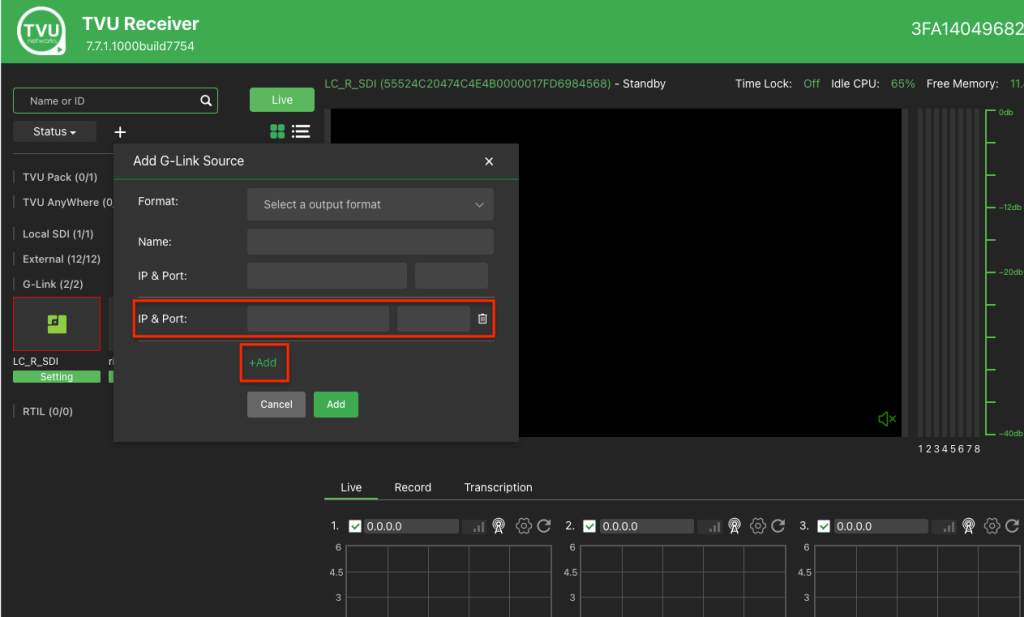
Adding the G-Link source to the receiver
Adding a G-Link source to the receiver.
To enable the G-Link receiving module, complete the following steps:
- Click the plus (+) in the top left pane of the Web interface and click G-Link Source from the pop-up menu.
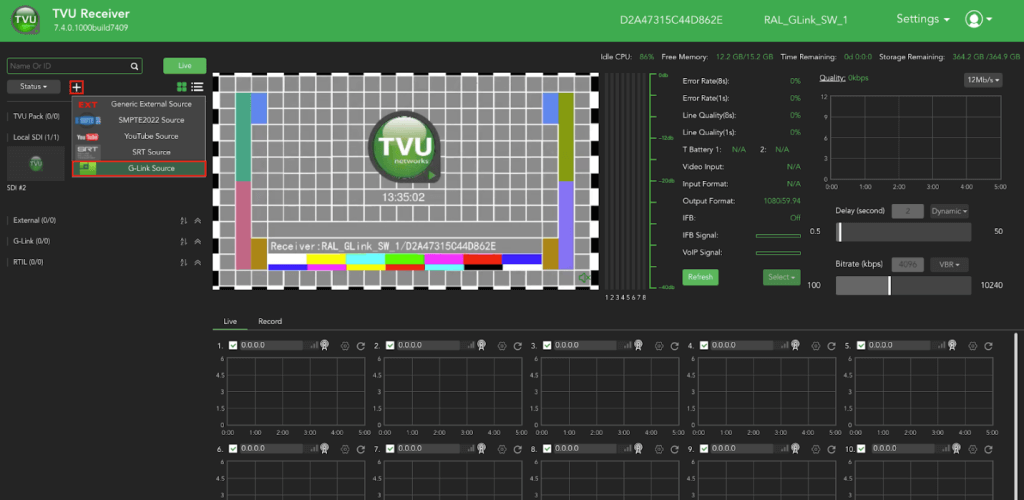
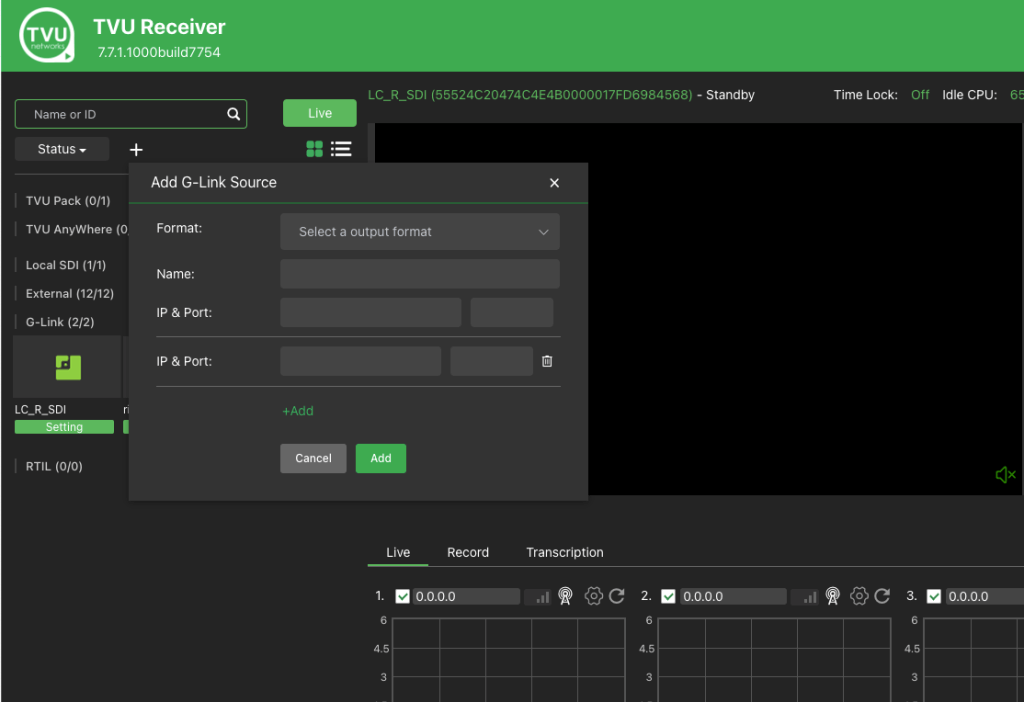
The Add G-Link Source dialog displays.
- Click the Format drop-down menu and select a video format.
- Enter the Name of the G-Link source that you want displayed in the G-Link source panel.
- Enter the IP address. This is the destination IP address of the TVU server encoding video source with the G-Link encoder.
- Enter the Port number. This is the destination port of the TVU server encoding the video source with the G-Link encoder (default ports are 12001 and 12002).
- Click Add and the window.
Editing G-Link source information
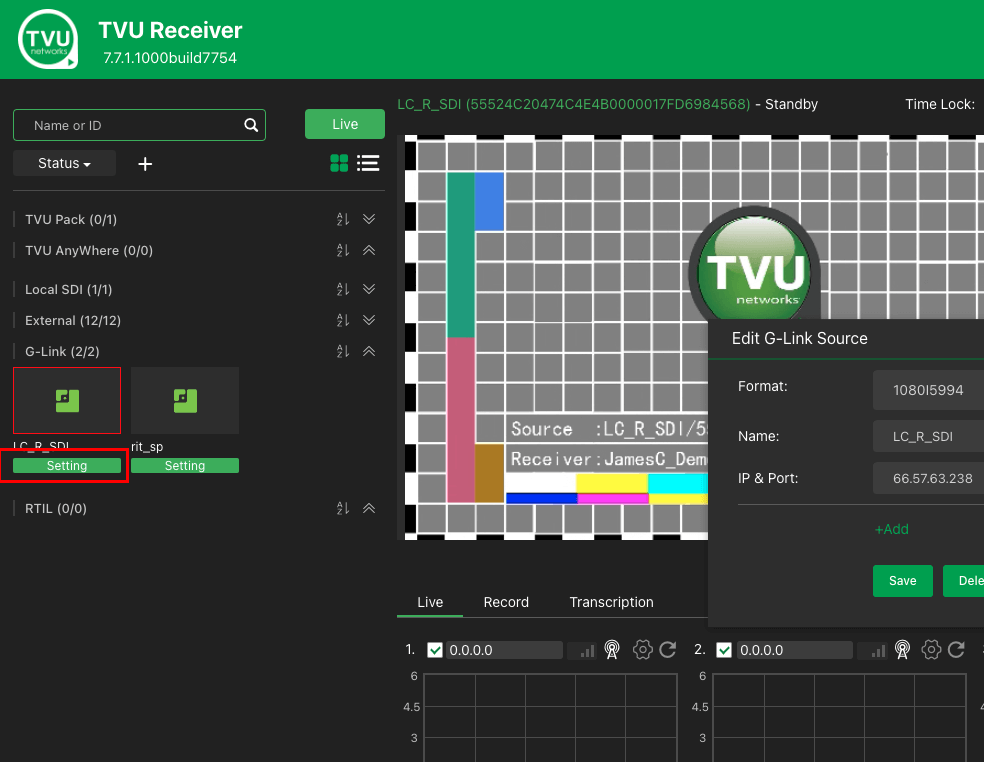
To edit the G-Link source information, complete the following steps:
- In the left pane, click the green Setting button.
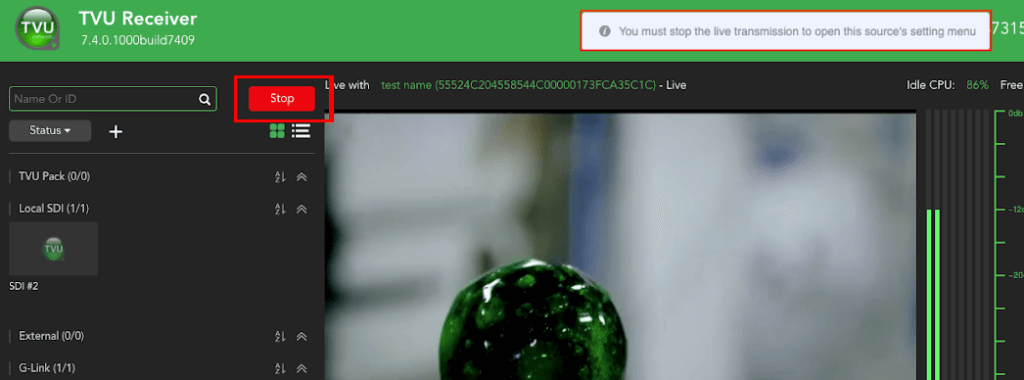
Note: If you are Live with your source, a message displays “You must stop the live transmission to open this source’s setting menu”.
- Click the red Stop button in the top-left pane to stop the transmission if necessary. Then, click the Setting button again.
The Edit G-Link dialog displays.
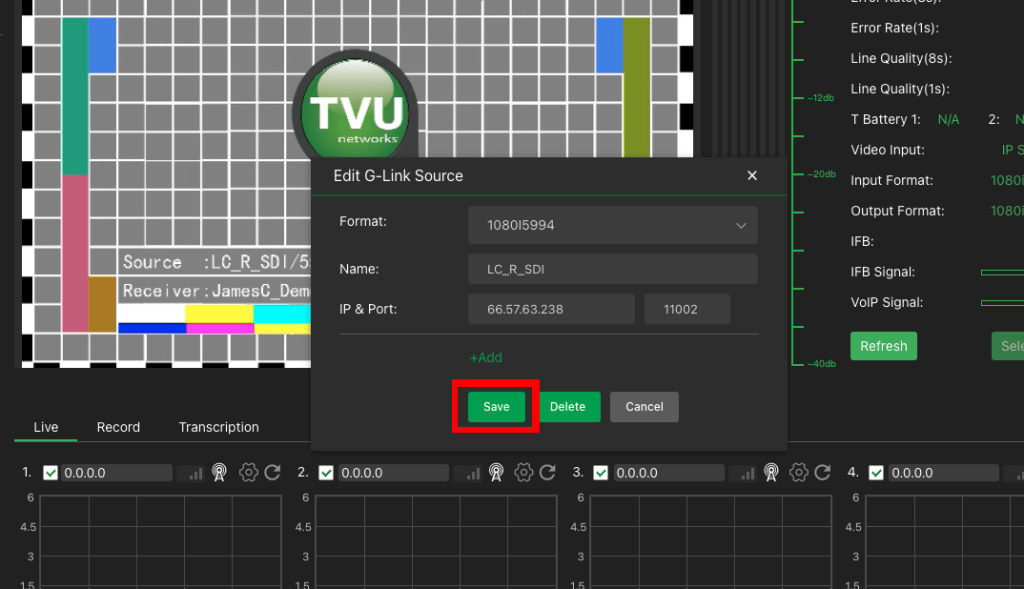
- Edit the source information and click Save.
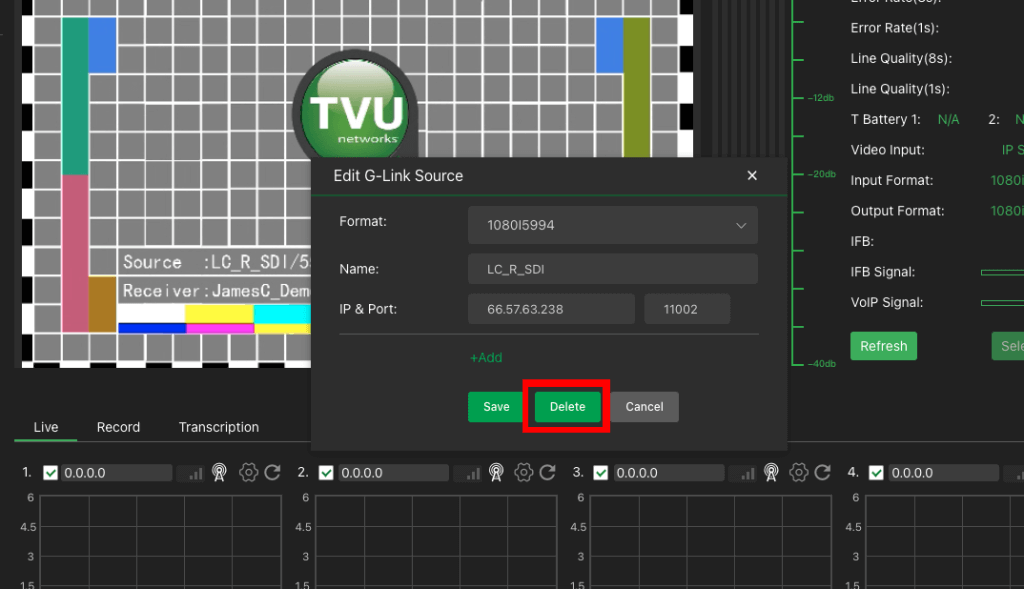
Removing a G-Link source
To delete a G-Link source, complete the following steps:
- In the left pane, click the green Setting button.
Note: If you are Live with your source, a message displays “You must stop the live transmission to open this source’s setting menu”.
- Click the Stop button to stop the transmission if necessary. Then, click the Setting button again.
The Edit G-Link dialog displays.
- Click the Delete button to delete the source and close the window.
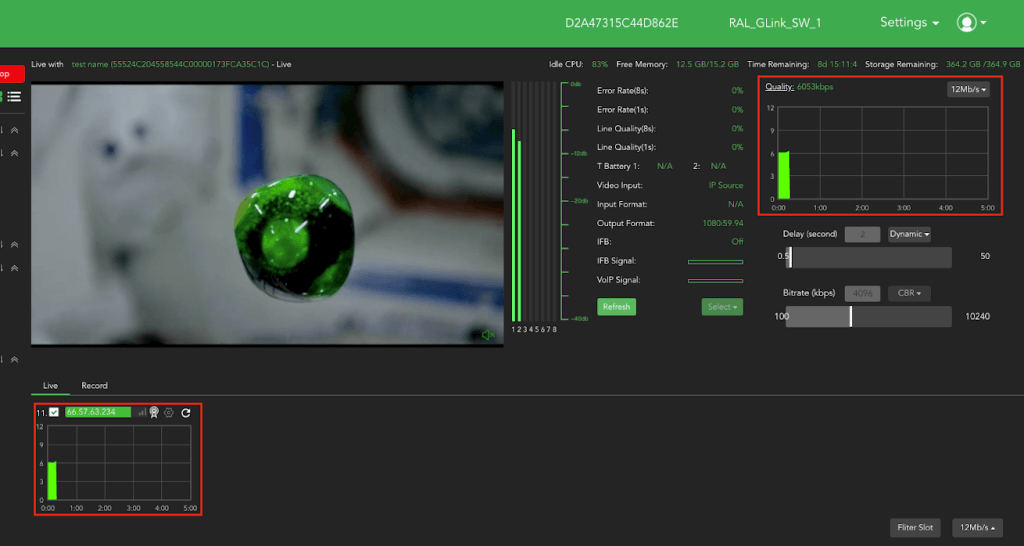
Monitoring the G-Link transmission
To monitor a G-Link transmission, complete the following steps:
- To monitor the transmission quality, view the top right Quality panel.
- To monitor the live status of your source, click the Live tab in the bottom left panel.
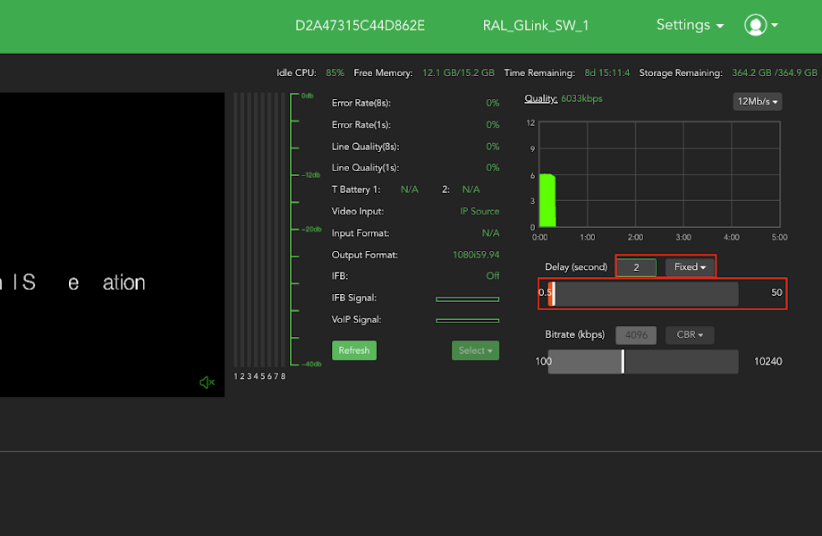
G-Link incoming transmission delay configuration
In the right panel are two latency modes for an incoming G-Link feed. A drop-down menu allows you to choose between Dynamic and Fixed.
Dynamic latency allows the transmission latency to increase its buffer if the network latency is not low enough.
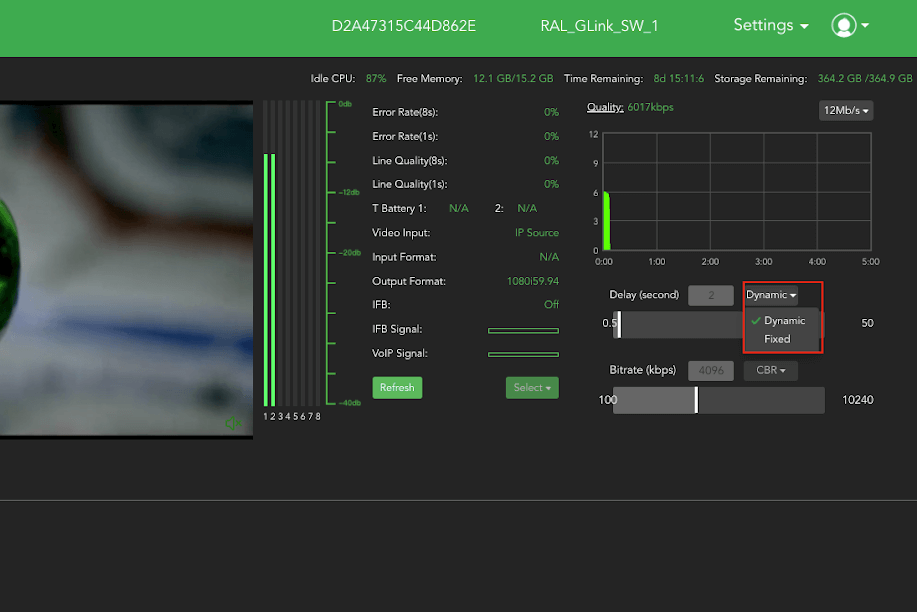
The Fixed latency is a static setting, regardless of network latency fluctuations. G-Link transmissions should achieve sub-second latency if the network environment is healthy.
G-Link SDI output resolution configuration
To configure the SDI output resolution setting, complete the following steps:
- Click Settings in the top right main navigation bar. Then, click SDI Output Setting from the drop-down menu.
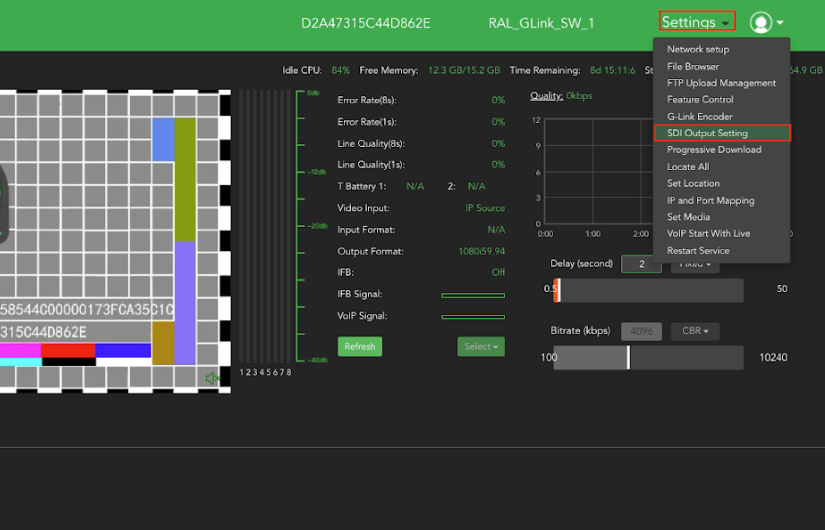
The SDI Output Settings dialog displays.
- Move the On switch to the right to enable the output settings.
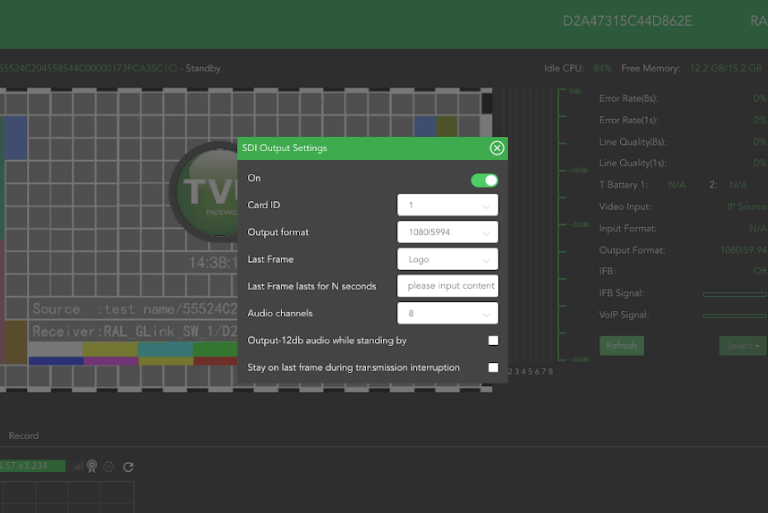
- When you are finished, close the window.
Link aggregation feature
Link aggregation enables the receiver to aggregate multiple internet links for sending and receiving live video transmission to eliminate disruption and outage. The receiver will automatically use link aggregation to receive G-Link sources with any internet links configured in the ‘Network Setup’ menu on the LinuxR GUI.
Complete the following steps to enable link aggregation on the encoding (sending) side:
G-Link:
- To add a G-Link source, click the plus (+) in the top left pane of the Web interface. Then click G-Link Source from the pop-up menu.
- In the Add G-Link Source pop-up window, click +Add.
- Enter the encoding receiver’s additional link IP and port information in the fields provided.
- Click the Add button.
- Click the Settings drop-down menu and select G-Link Encoder.
Note: The port shown in the “G-Link Encoder window” refers to the port of the G-Link encoder which can be found on the corresponding encoder in the G-Link encoder module.
TVU One:
To configure link aggregation for the TVU One, complete the following steps:
- Click Settings and IP Port Mapping.
- Enter the second IP and port information in the IP and Port Mapping pop-up window.
- Click Apply.
TVU Networks® Corporation, © Copyright 2024. All rights reserved in all media
Document Part Number: TVU G-Link Software Quick Start User Guide Rev C EN 03-2024