Contents
- TVU Remote Commentator introduction, setup, and use
- System requirements
- Features overview
- User Guide contents
- Step 1 – Create a Remote Commentator account
- Step 2 – Sign in to Remote Commentator
- Step 3 – Managing available sources
- Step 4 – Creating an event
- Creating a backup source for your Main event
- Step 5 – Adding Co-Hosts
- Step 6 – Adding Groups
- Step 7 – Invite commentators to the event
- Step 8 – Editing an event
- Stopping an event
- Reusing an event
- Step 9 – Editing or switching to a backup video in the Coordination room
- Coordinator Room feature
- TVU Remote Commentator browser controls and features
- Cloud Record feature
- Advanced Audio Mixer feature
- Multi-audio channel feature
- Advanced Audio Mixer user experience behavior
- What’s New feature
- Purchasing TVU Remote Commentator
- Appendix A – Participate using the TVU Anywhere app
- Step 1 – Download and install the TVU Anywhere app to your iOS or Android device
- Step 2 – Participate in the event
TVU Remote Commentator Quick Start Guide
Remote Commentator overview
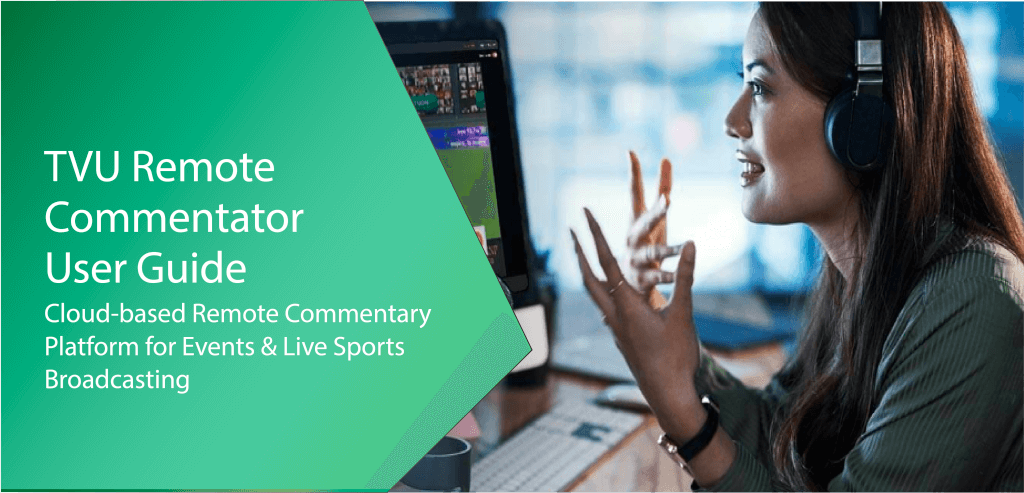
TVU Remote Commentator is a cloud-based commentary platform providing remote broadcasting solutions for live announcers, on-air hosts, and sporting event commentators.
This intuitive broadcasting solution delivers perfectly synchronized, high-quality audio commentary from any location to a worldwide audience over the public internet at a fraction of the cost of standard broadcasting solutions. This solution allows a remote commentator to add voice-overs to live and recorded content.
The TVU Remote Commentator subscription uses existing microservices that provide essential features, such as synchronizing sources, high-quality video, and low latency. The customized web user interface enables commentators and talents to participate in simple and independent production using mobile phones and laptops.
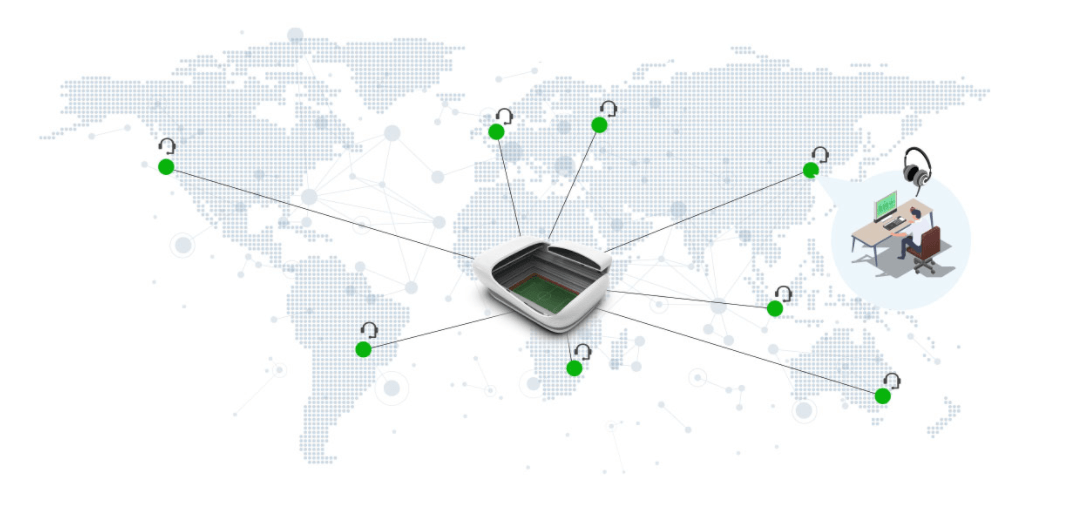
TVU Remote Commentator – How it works
- The Remote Commentator event producer creates an event and obtains a live or recorded video source.
- The commentator receives a link to view the event. This link opens a Chrome browser window where the commentator can provide audio commentary along with an assigned group of participants.
- The event producer monitors and controls the production using the Remote Commentator Web interface.
The Remote Commentator can:
- Produce multi-language commentaries for a single feed.
- Control advanced audio mixing.
- Use mobile devices and a PC using a public internet connection. No special equipment is required.
- Ensure high-quality video and audio with low latency.
- Enable talent to join with the click of a link.
- Provide an easy-to-use Web interface for non-technical users.
- Synchronize audio commentaries with the video or recorded source.
- Integrate audio production with the broadcast world.
- Use SDI Inputs from broadcasters to obtain the video feed and output the SDI with the commentators’ audio.
- Use a file-based workflow to upload files for voice-over operations.
System requirements
- A PC with an i7 processor, 8th generation or above, with 16 GB or above memory (for the event producer/coordinator)
- A PC with an i5 processor, 8th generation or above, with 8 GB or above memory (for the commentator)
- Minimum screen resolution of 1366 x 768
- Internet bandwidth at 32 Mbps (download) and 10 Mbps (upload)
- Windows 10 or later, Mac OS 12.0 or later
- Chrome browser
TVU compatible products
- Receiver (Build 8120) and above
- TVU Anywhere (Android): 10.3.18 above
- TVU Anywhere (iOS) 10.3.18 above
- TVU Anywhere (MAC) 10.2.13 above
- TVU RPS One (Build 81349) and above
- TVU One v3 (Build 80043) and above
- TVU One v2 (Build 7561) and above
- MLink v7 (Build 73034) and above
Features
- File-based workflow – Easily add commentary for any live event when the event and commentators are in different parts of the world. The file-based workflow allows you to upload MOV and MP4 files and add voice-overs to recorded content.
- Schedule service – An intuitive user interface makes creating events with predetermined start and end times easy. The event organizer can select any feed from a TVU Receiver SDI input and use it as the return video feedback (VFB) source and channel output, so commentators receive a high-quality video feed to follow the action.
- Group creation – Groups can be created using independent links, enabling people to engage with each other via audio and video.
- Talkback – Designed specifically for the event and sports commentators, TVU Remote Commentator has talkback functionality that allows independent audio control for communication and live commentary.
- VFB from receiver SDI Input – Select any feed from a TVU receiver’s SDI IN and/or multiple IP protocols for video return and integrate it with your broadcast facility. Select any input from external sources and/or TVU transceivers. Each input source can have up to 4 audio pairs. Each pair can be controlled independently. Remote Commentator supports TVU Grid video sources.
- Advanced Audio Mixer – Event producers can access the Advanced Audio Mixer used by TVU Producer for audio control. Get extraordinary audio with the Web-based Advanced Audio Mixer feature for level control, audio channel mapping on SDI OUT, recording, and mute/unmute functions. This feature can work with up to 4x output pairs, each controlled using an independent audio panel.
- No special equipment required – Simple integration with TVU Anywhere and a PC browser (Google Chrome) which does not require any special equipment.
- Cloud based – Events are created and managed in TVU cloud services, eliminating the need for expensive hardware or software.
- Coordinator room features – The Coordinator room allows an event producer to monitor video and audio feeds, have conversations with commentary groups individually or all together, switch between the Main and Backup sources, and edit the event to change video input sources or add commentary groups.
User Guide contents
This TVU Remote Commentator Quick Start User Guide provides a general overview of each feature and its functions, as well as instructions for an event producer on how to set up and use TVU Remote Commentator.
This user guide provides details for the following topics:
- Create a TVU Remote Commentator account
- Signing in to TVU Remote Commentator
- TVU Remote Commentator Web interface overview
- Managing available sources
- Creating an event
- Adding Co-Hosts
- Adding groups
- Inviting commentators to the event
- Editing or stopping an event
- Editing or switching to a backup video in the Coordination panel
- TVU Remote Commentator browser controls and features
- Talkback feature
- Cloud Record feature
- Advanced Audio Mixer feature
- Coordinator room feature
- What’s New feature
- Participate using the TVU Anywhere app
Step 1 – Create a Remote Commentator account
To create a Remote Commentator account, complete the following steps:
- Open a web browser window and enter:
https://commentator.tvunetworks.com
The Remote Commentator landing page displays.

- To create an account, click Sign Up.
- The Create account window displays.
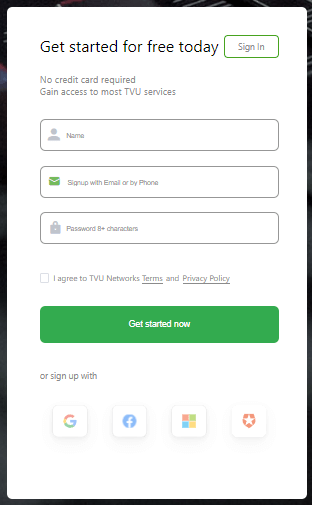
- Enter your Name, email, and Password. Click the Agreement check box and click Get Started now.
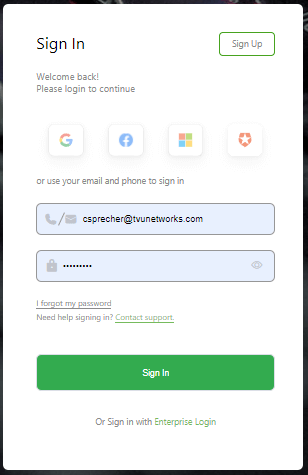
Step 2 – Sign in to Remote Commentator
To sign in to Remote Commentator, complete the following steps:
- Open a browser tab and enter:
https://commentator.tvunetworks.com
The Remote Commentator Sign-in page displays.
- Once you have a TVU account, sign in to Remote Commentator with your user credentials. If you set up a new account, sign in with your new credentials.
Note: Using the same credentials allows Remote Commentator to access details about your account.
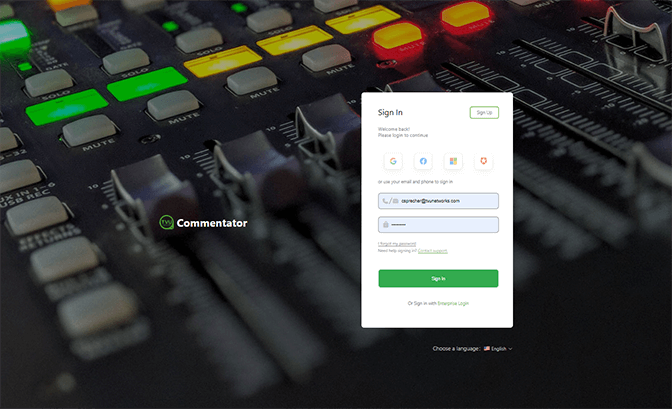
- Enter the following information:
- User ID: E-mail address
- Password: Enter your Password
- Click Sign In. The Remote Commentator Web interface opens.

TVU Remote Commentator Web interface overview
The Remote Commentator Web interface is where the remote commentator event producer will set up, schedule, control events, and manage remote commentators.
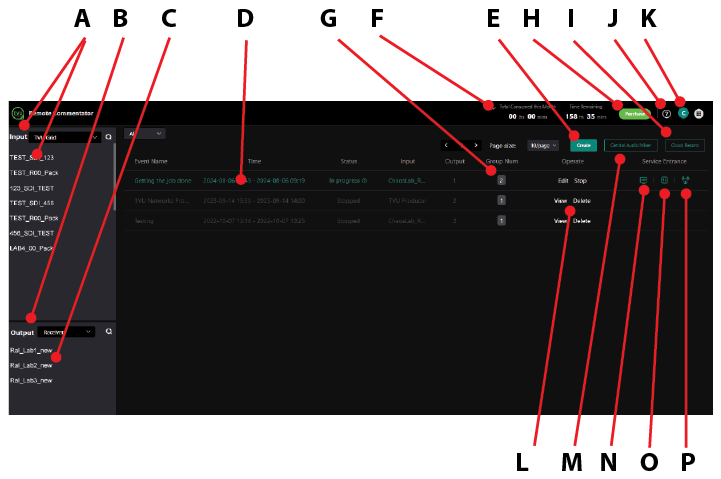
- Input drop-down menu and list: This is where you select an authorized Input device or source you want to send to the commentator.
- Output receiver feed: This is where you select the output device or format that sends the destination feed with the commentators’ audio.
- Assigned receivers list: This panel displays a list of authorized output receivers that can be selected.
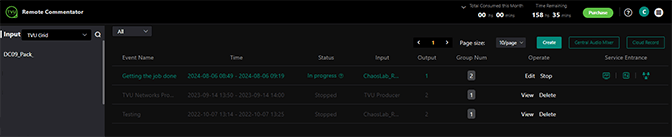
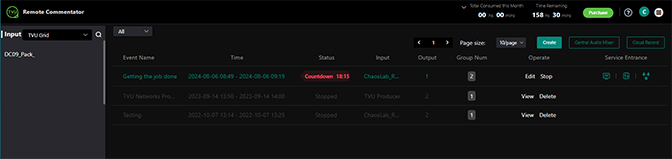
- Events panel: This panel displays your scheduled, expired, and in-progress events list.
- Create event button: Click this button to create and manage a new event. The new event will be added to your events list in the events panel.
- The Time Consumed/Remaining indicator: Allows you to monitor the time consumed and time remaining in your Remote Commentator account.
- Group link: The commentator receives a link to view the event by the event producer. This link opens a Chrome browser window where the commentator can provide audio commentary within an assigned group
- Purchase time button: Use this button to purchase and add more time to your account.
- Cloud Record button: This button opens the TVU cloud Recording Service in a new tab. Here, you can access, edit, and download your Remote Record and Recorded files.
- What’s New panel: The What’s new icon opens a panel describing the latest updates to Remote Commentator.
- User Preferences: Click this icon to change the language, view usage, enable cloud proxy, and sign out of Remote Commentator.
- Delete, View, Edit, and Stop operations: Use these operational buttons to Edit, view, delete, or stop an event.
- Central Audio Mixer button: This button opens the Central Audio Mixer interface.
- PP icon: This icon opens the TVU Producer interface (displayed in green when an event is running).
- Audio Mixer icon: This icon opens an Audio Mixer interface (displayed in green when an event is running).
- Coordinator room icon: This icon opens the Coordinator Room interface (displayed in green when the event is running).
Step 3 – Managing available sources
After successfully signing in, the Remote Commentator event user interface is displayed. Here, the input and output sources can be configured, and new events can be created and managed.
Note: A separate user interface is used for the commentator and another for the audio mixer engineer.
The Remote Commentator event producer sets up an event and obtains a live or recorded video source. When setting up a new event, the event producer can select the input and output sources in the left panel, which will appear as specified in the “Create an Event” window. These selections can also be changed in the “Create an Event” window.
Selecting an Input
Select an input source or device from the Input drop-down menu. Then, select a source or device from the list. This is the event feed that will be sent to the commentator.
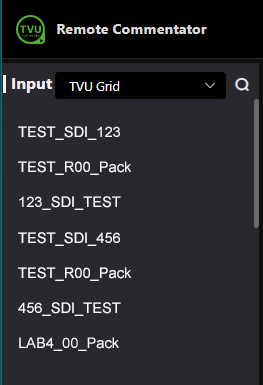
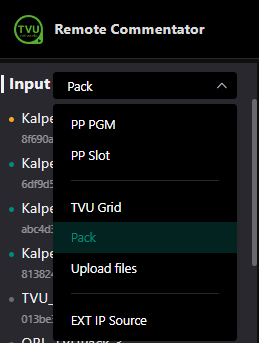
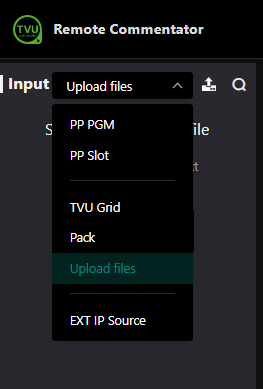
Your Input selections are:
- Selecting PP PGM will start a Producer session and integrate that Producer output as your remote commentator input source.
- Selecting a PP Slot will pull an input source from Producer and allow Remote Commentator to designate the slot (source) number into the Audio Mixer interface, whether you’re in a Producer PGM or not.
- Pack: If your live device is a Pack, you will select Pack as your Input source.
- TVU Grid: If your source is Grid, you would select Grid as your Input source.
- Upload files: Allow users to upload MOV and MP4 file formats as Input sources.
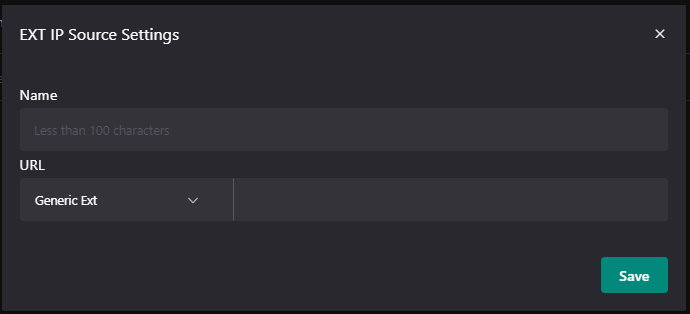
- EXT IP Source: If your source has an External IP, you would select EXT IP Source as your Input.
Select PP PGM if you want to integrate your Remote Commentator event into a live Producer PGM session.
Select PP Slot if you want to pull an input source from Producer and allow Remote Commentator to designate the slot (source) number in the Audio Mixer interface.
Select Pack if a Pack is your live device that receives the input.
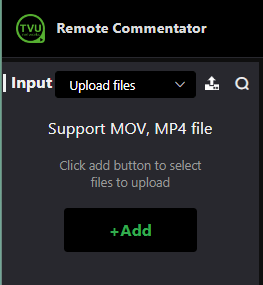
Select Upload Files to upload local MP4 or MOV files as an Input source.
- To upload a file, select Upload files from the drop-down menu.
- The Support MOV, MP4 file panel opens. Click the +Add button.
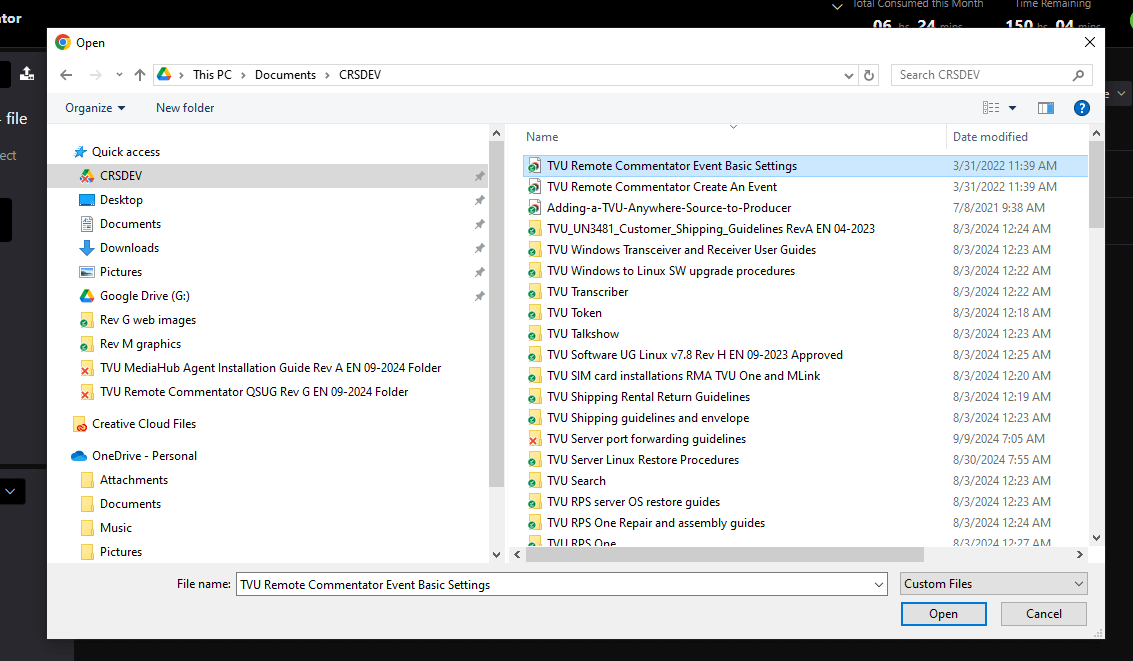
- Select a file from the pop-up window and click Open.
- Click the Upload icon. Your uploaded file becomes selectable as an Input source.

Select EXT IP Source in the Input drop-down menu if you want Remote Commentator to pull an External IP input source from TVU Producer.
- To add an EXT IP Source, click+Add.
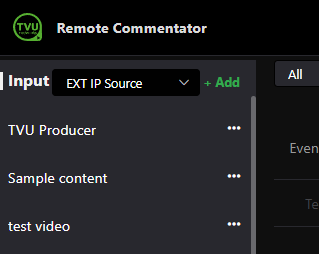
- In the EXT IP Source Settings pop-up, enter a Name and make a selection from the drop-down menu. Add the URL, then click Save.
Selecting an Output destination
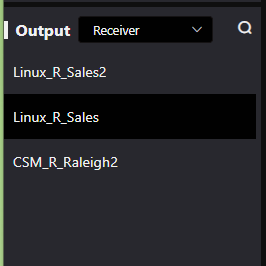
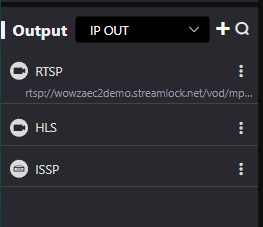
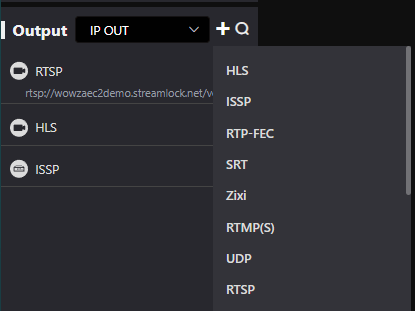
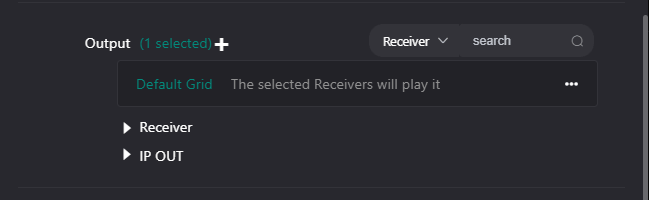
Click the Output drop-down menu and select Receiver or IP Out.
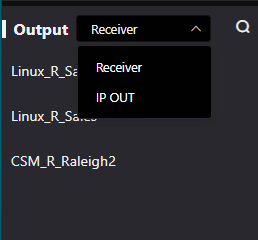
If you select Receiver, select an output (destination) receiver from the list. This receiver receives the audio and video feed from the remote commentator and is ready for airplay.
If you select IP Out, make a selection from the list. To add a new output, click the plus + to select an IP output protocol from the slide-out menu and configure your settings in the pop-up window.
Step 4 – Creating events
Remote Commentator allows you to create a Main event and multiple Backup events. Backup events allow users to set up an optional backup source that can be used during a live event. For more information about creating backup events, refer to “Creating a backup source for your event.”
Creating the Main event
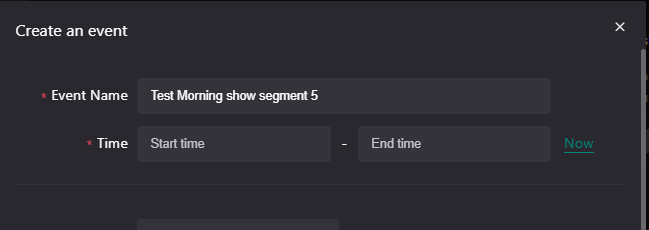
To create a Main event, complete the following steps:
- Click the blue Create button in the top right corner of the window.
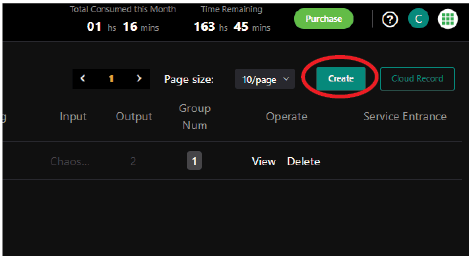
The ‘Create an Event’ pop-up window displays.
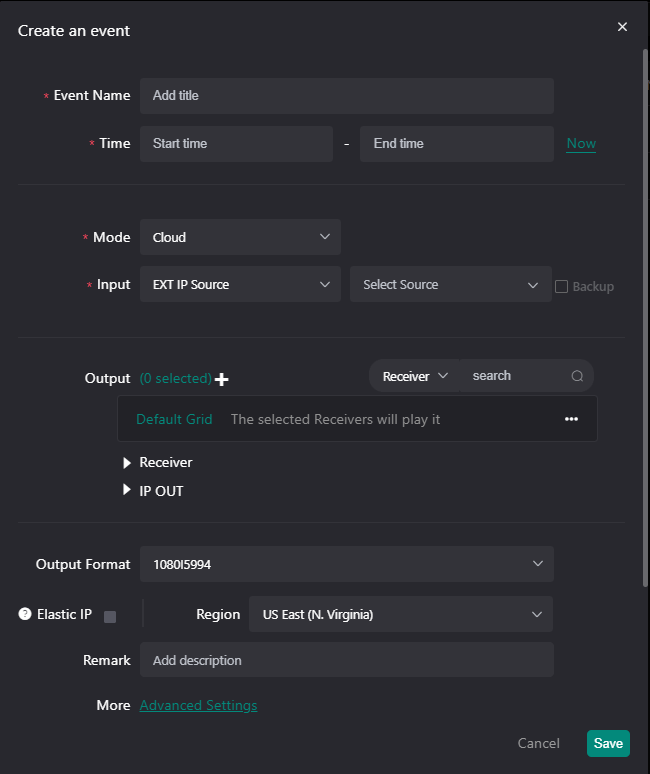
- Enter the Event Name.
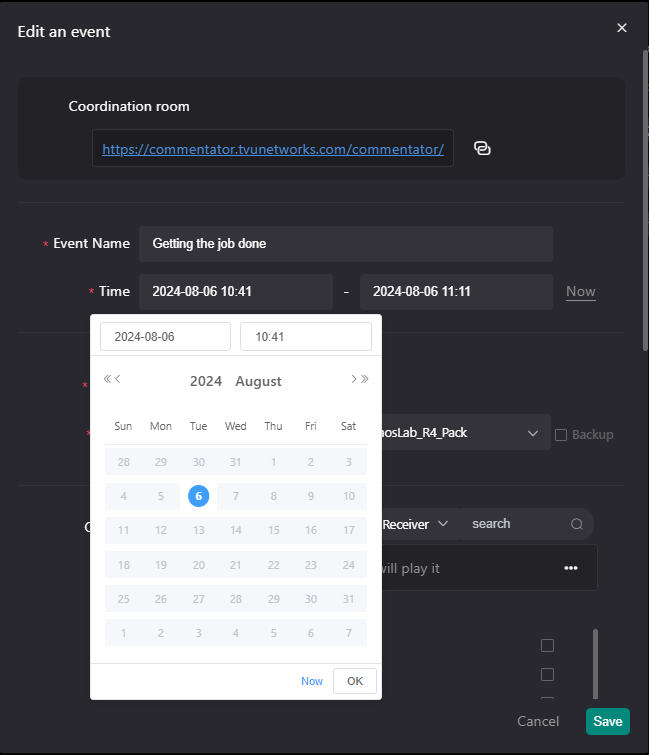
- Enter a Start time and End time. You can use one of two methods:
Method 1: Click the Start time and End time links and select
the event times from the pop-up menus. Then, click OK.
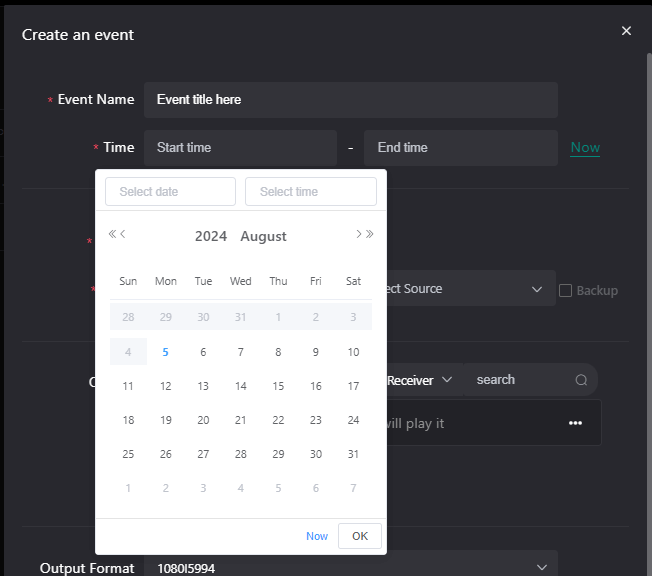
Method 2: Click Now.
- Enter the event time duration from the Duration drop-down menu.
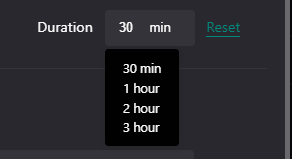
- To change your preset selection, click the Reset button.
Then, enter your preset selection again. - When you are finished, Click OK.
Note: If your start time is in the past, an error message displays.
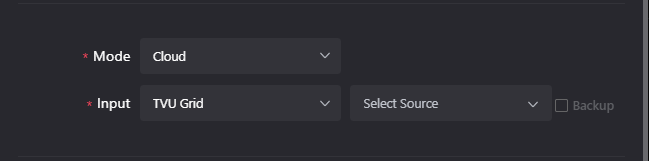
- Select a Mode from the drop-down menu:
- When selecting Cloud mode, Remote Commentator will automatically start a Producer session, which can be opened by clicking the green PP icon in the events panel “Service Entrance” column when the event is started. Select an Input source from the “Input” menu and an Output Source from the “Select Source” menu.
- Select TVU Transceiver mode when you use a transceiver to replace the producer session and run an on-premises Remote Commentator session. Then, select a Receiver from the “Select Receiver” menu, select an Input from the “Input” menu, and an Output Source from the “Select Source” menu.
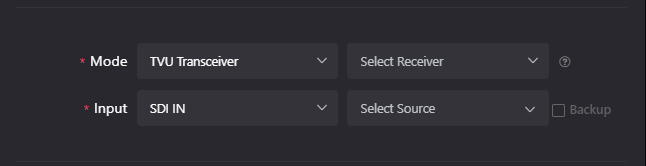
Note: Grid Output settings are set to “default.” To edit the Grid output settings, click the three-dots to open the Grid Settings panel.
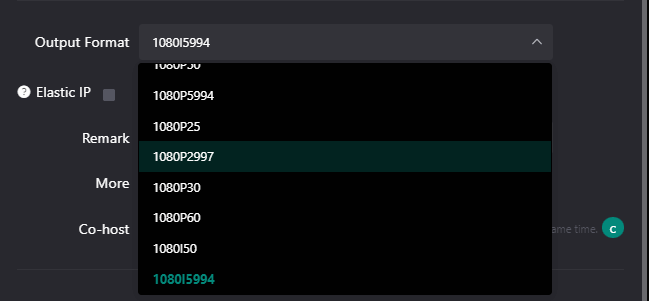
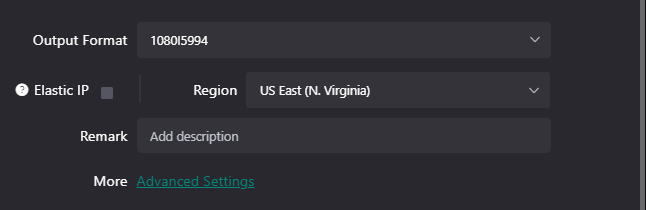
- Select an output format from the Output Format drop-down menu.
- To set up an Elastic IP, you must first contact TVU Support to enable this optional Amazon Web Service (AWS) feature.
An Elastic IP address is a public IPv4 address associated with a TVU AWS account, which is reachable from the internet. If you need to connect to an instance that does not have a public IPv4 address, you can associate an Elastic IP address with your instance to enable communication with the internet
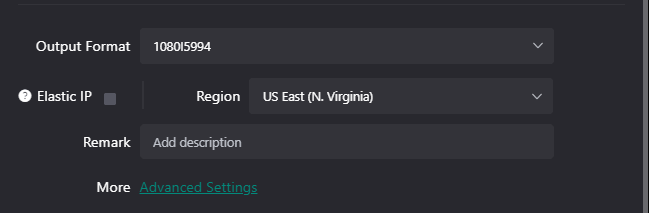
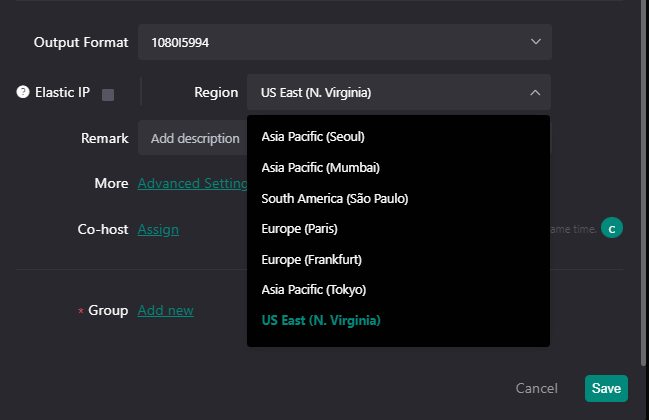
- The Region displayed is predetermined by the TVU Remote Commentator’s best match. The location displayed reflects the location of the Amazon Web Service (AWS) instance where the Remote Commentator is deployed.
- In the Remark field, enter a description of the event. This field is useful for tracking what is unique about this event with keywords or a text description.
- To create a Group, refer to “Step 6 – Adding Groups.” Adding Groups in the Create an Event window generates a separate link for each group of remote commentator participants. This function is useful when you have commentators speaking in different languages for different markets.
- Scroll down to More and click Advanced Settings.
The Advanced Settings window displays. Here, you can configure the Main window setting, bitrate, delay, select how many audio channels you want, and enable authorized features.
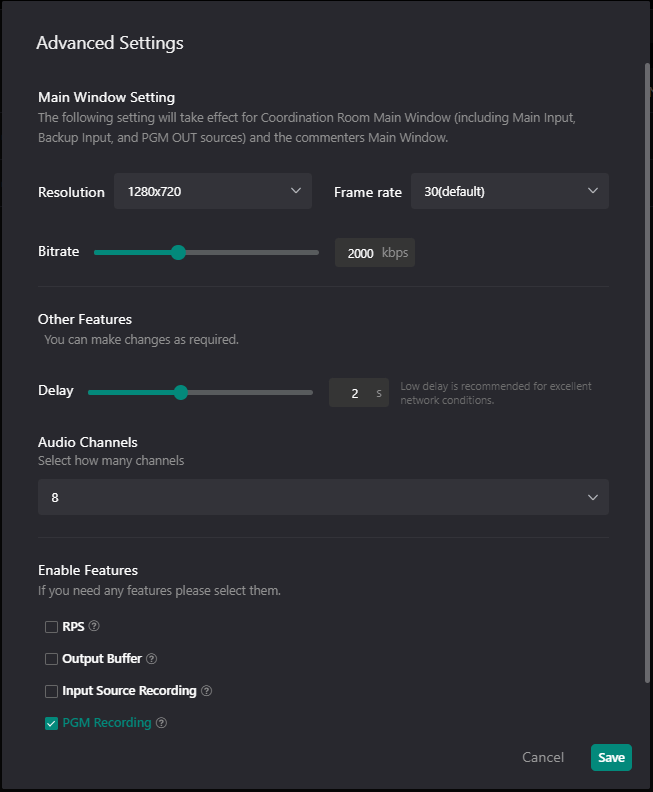
- Set the Resolution and Bitrate.
- Use the Delay slider to set the commentator’s maximum latency threshold. This setting allows extra time for the stream to get from the commentator to TVU servers before synchronizing it with the original video source for the final output.
- Enable the available features you want by clicking the desired checkboxes.
- Click Save.
Creating a backup source for your Main event
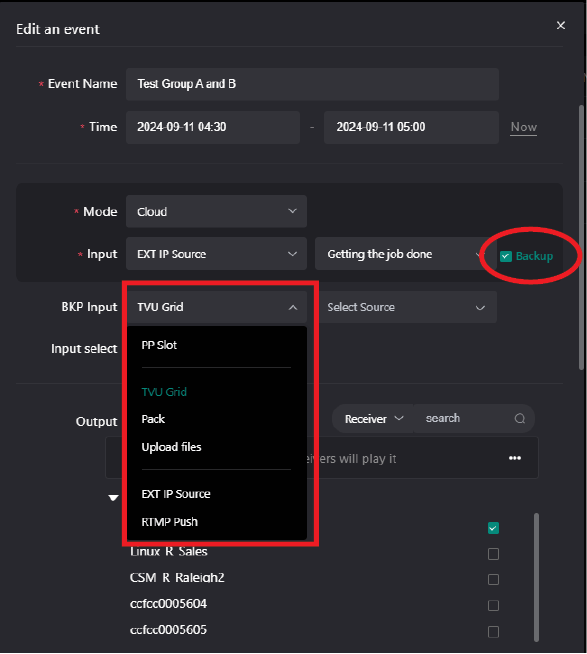
To set up an optional backup source that can be used during a live event, complete the following steps:
- To create a backup source for your Main event, complete the steps to edit your Event based on one of the following scenarios first:
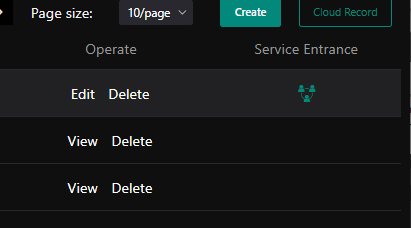
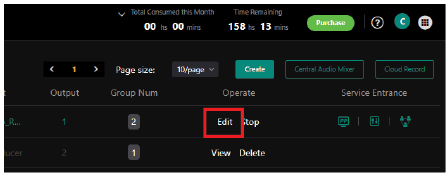
- To add a backup source to an existing event that is in progress, click Edit in the Operate column to open the “Edit an Event” window.
- To edit an existing event that has stopped, click View in the event “Operate” column and click the Reuse button at the bottom of the “View an Event” window.
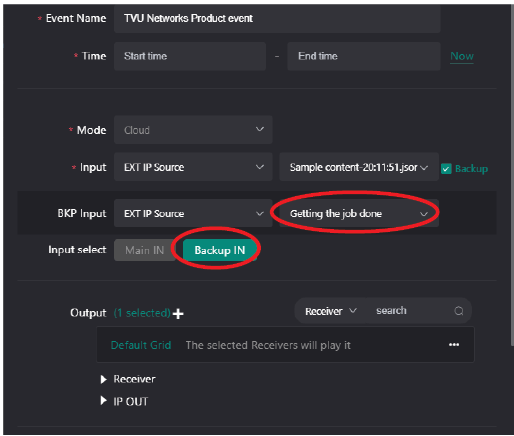
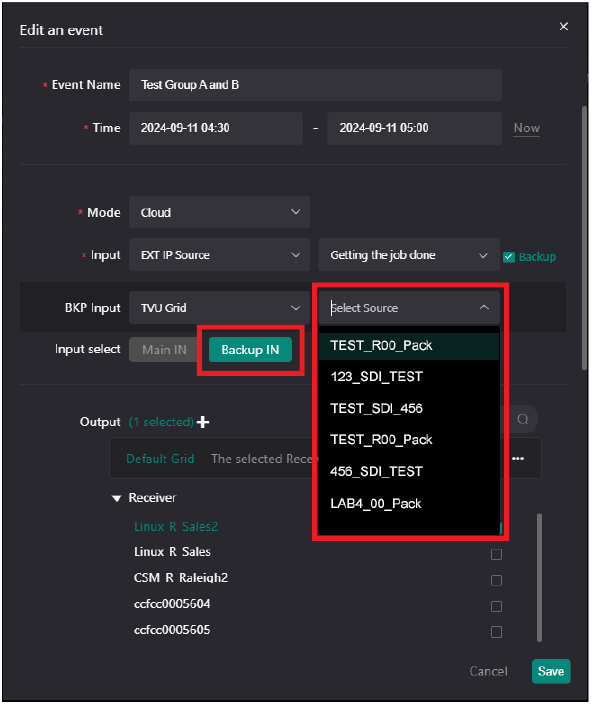
- Click the Backup checkbox.
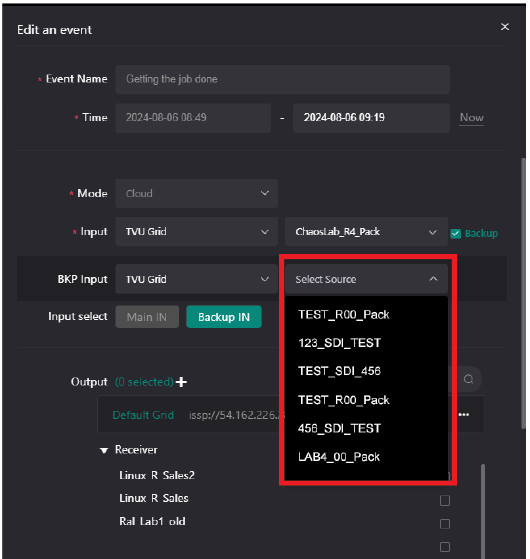
- Select a BKP Input from the drop-down menu.
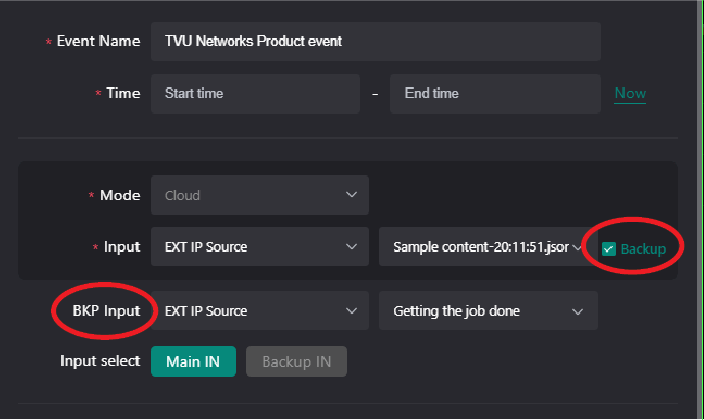
- Click the Backup IN button and select a backup source.
Note: Grid output settings are set to “default.” To edit the Grid output settings, click the three-dots to open the Grid Settings panel.
- Selecting PP Slot will pull an input source from Producer and allow Remote Commentator to designate the slot (source) number into the Audio Mixer interface, whether you’re in a Producer PGM or not.
- Select an output format from the Output Format drop-down menu.
- The Region displayed is predetermined by the TVU Remote Commentator’s best match. The location displayed reflects the location of the AWS instance where the Remote Commentator is deployed.
- In the Remark field, enter a description of the event. This field is useful for tracking what is unique about this event with keywords or a text description.
- Scroll to More and click Advanced Settings.
The Advanced Settings window displays. Here, you can configure the Main window setting, bitrate, delay, select how many audio channels you want, and enable authorized features.
- Set the Resolution and Bitrate.
- Use the Delay slider to set the commentator’s maximum latency threshold. This setting allows extra time for the stream to get from the commentator to TVU servers before synchronizing it with the original video source for the final output.
- Select how many Audio Channels you want from the drop-down menu.
- Enable the available features by clicking the desired checkbox.
- Click Save.
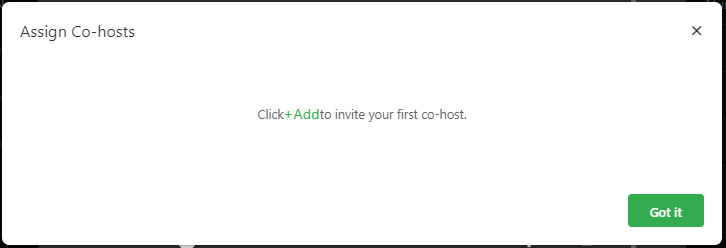
Step 5 – Adding Co-Hosts
- In the Create an Event window, Remote Commentator supports up to three online Co-Hosts.
- To Assign a Co-Host, click Assign.

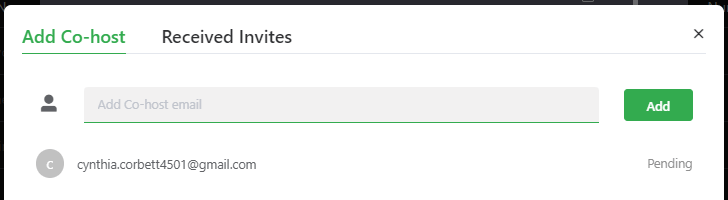
- Click the green +Add to invite your first Co-Host.
- Enter the Co-Host’s email and click Add. The invited Co-Host email is displayed as “Pending” until accepted.
- After the Co-Host accepts the invitation, select the radio button and click Assign.
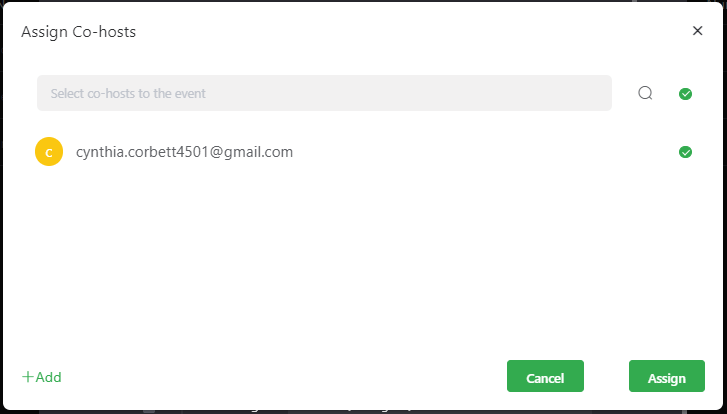
- To add up to three co-hosts, click +Add.
Step 6 – Adding Groups
Adding Groups in the Create an event window generates a separate link for each group of remote commentator participants for the event. This function is useful when commentators speak different languages for different markets. Having unique links for each commentary group enables each group to communicate internally without disturbing the other commentator groups. This allows multi-language comments to be synchronized in Remote Commentator with the video feed and output in multiple languages.
To add a group, complete the following steps:
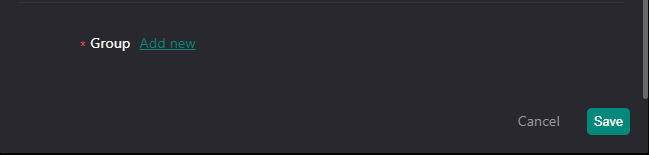
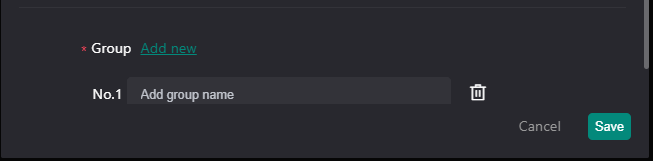
- At the bottom of the Create an Event window, scroll to Group, and click Add new.
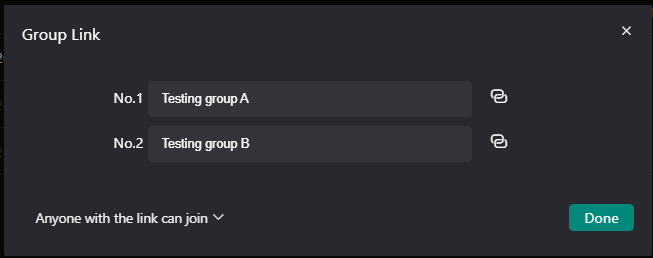
- In the field provided, enter a clear and descriptive name for each group. You can add multiple groups by clicking Add new again and repeating the process. Then, click Save.
- The Group Link pop-up window displays. Click Done. This will close the “Create an Event” window.
- Continue to Step 6 to invite commentators to the event.
Step 7 – Inviting commentators to the event
Group commentators can now be invited to join the event using a browser (Chrome is recommended). The commentators will be able to use the link to view the source events video feed and provide live commentary.
To invite your commentator groups to the event, complete the following steps:
- Click the Group Num you want to copy in the Events panel.
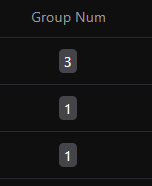
- In the Group Link pop-up, click the Copy Link icon and e-mail the URLs to your group commentators. When you’re finished with the Group Link pop-up, click Done.
- Group participants copy and paste the URL sent via e-mail into their Chrome browser address field and press Enter.
- The Participation settings pop-up displays. Enter your name and presets for the speaker, preview video, and microphone. Then, press Submit.
- A group participant can also select the e-mail link from a smart device and launch TVU Anywhere app to view the event. For information about using the TVU Anywhere app refer to “Appendix A – Participate using the TVU Anywhere app.”
The Remote Commentator browser window opens. The event displays in the VFB window. The participants display in the right panel, where they can control their microphone and preview.
An audio monitor for video return is located to the right of each participant’s preview window. This feature allows the commentator to set the audio level control and choose their preferences and volumes independently.
The commentator’s preview window can be set to full screen or PiP with video return by hovering over the preview and selecting the full screen or PiP icon.
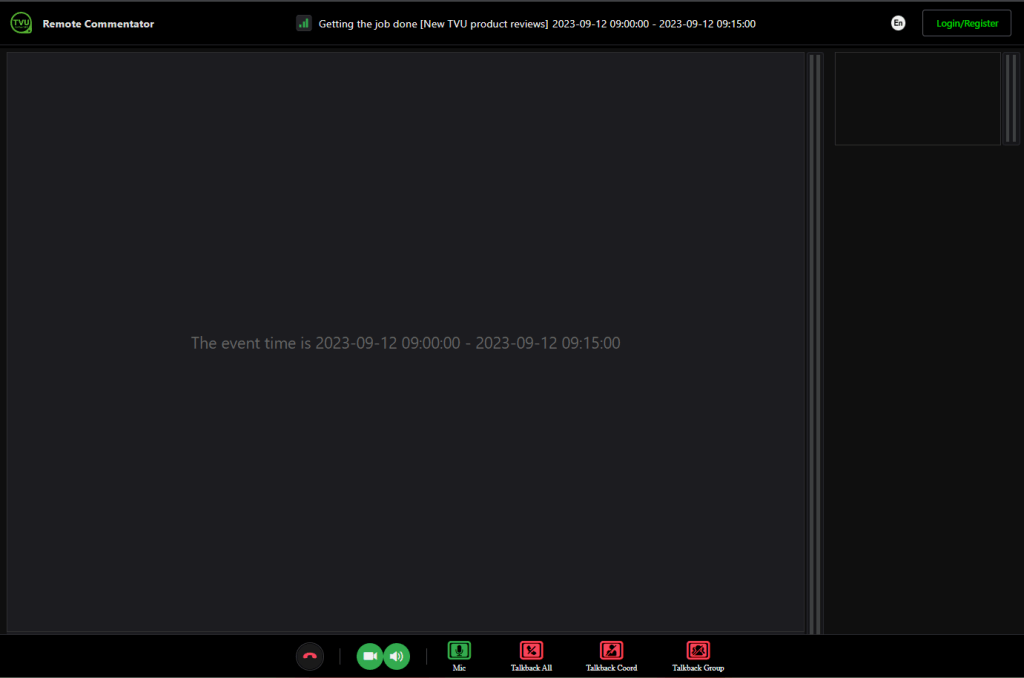
- The commentator’s browser window includes controls at the bottom of the screen for their camera, microphone control, speaker, and access to the Talkback features. The phone icon allows the commentator to leave the party.

For information about browser window controls, refer to “TVU Remote Commentator browser controls and features.”
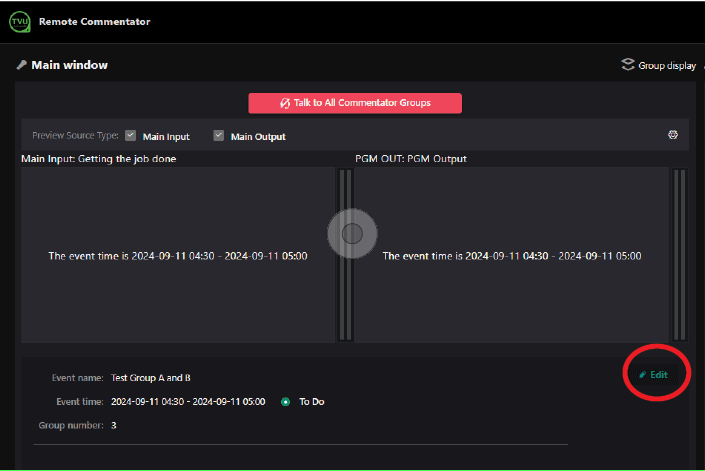
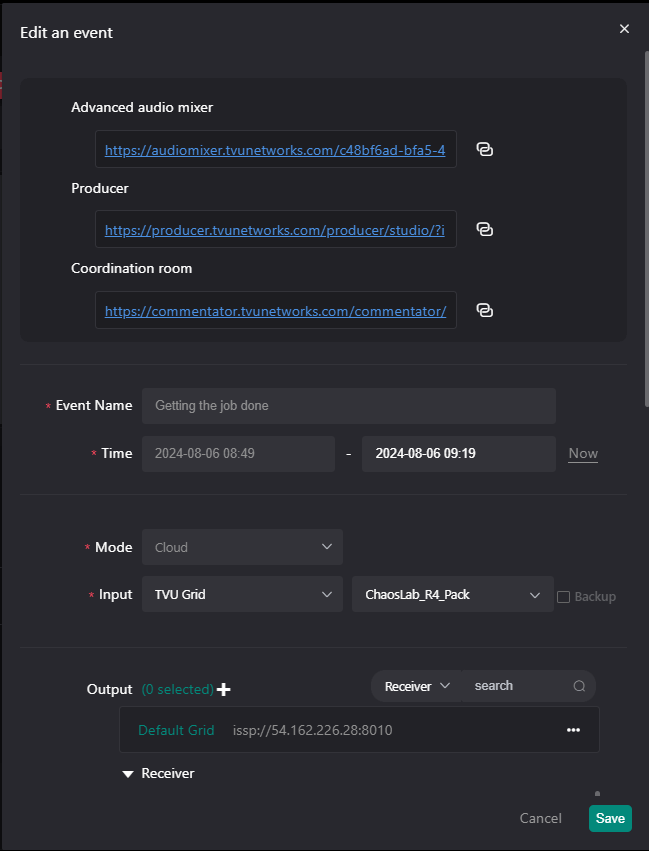
Step 8 – Editing an event
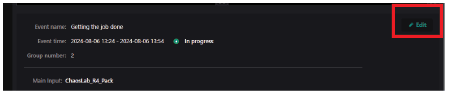
The event producer’s Web interface displays the live event and scheduling status on the right panel during the event. The event producer monitors and adjusts events if needed. When an event starts, the status displays “Preparing” and “In Progress” during the instance deployment.
When an event is live, the status displays “Countdown” in red and the event time remaining.
Note: When edits are made during an event, it will take up to four minutes to deploy the instance.
Editing the start and end time
To edit an event while the event is running, complete the following steps:
- In the event panel, click Edit in the Web interface operate column.
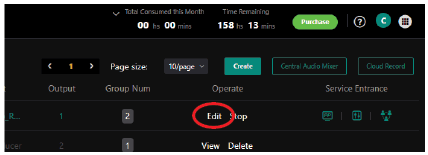
The Edit an event window is displayed.
- Hover the mouse over the Start time and End time fields to Edit the event times and Save your settings.
- Scroll up to the top of the window to Advanced audio mixer and click the link icon to copy the link.
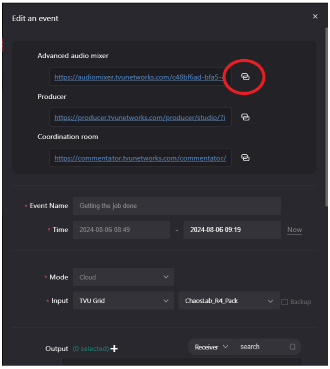
- Email the copied URL link to the Audio mixing engineer. For information about audio mixing controls, refer to the “Advanced Audio Mixer feature.”
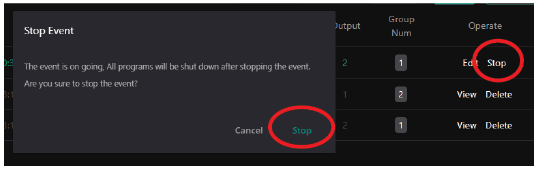
Stopping an event
To stop an event, complete the following steps:
- Select the event you would like to stop. Then click Stop to end the event output in the Event panel Operate column.
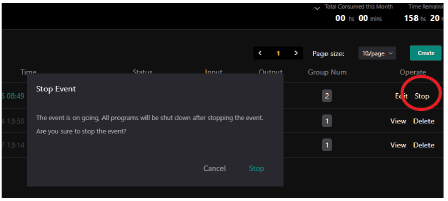
- The Stop Event confirmation window displays. Click Stop.
Reusing an event
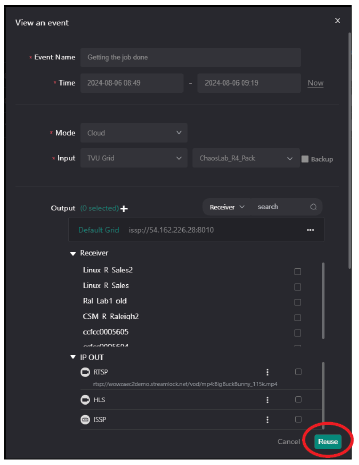
To reuse an event, complete the following steps:
- Select an event from the events list and click View.
- Scroll to the bottom of the Create an event window and click the Reuse button.
- Make any date or configuration changes and click Save.
You can add new groups to the event by repeating “Step 5 – Adding Groups.”
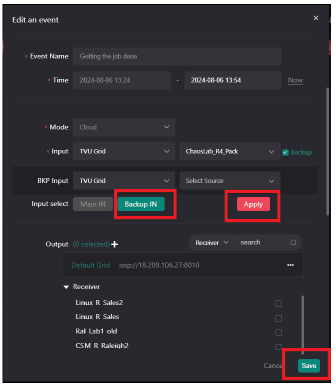
Step 9 – Editing or switching to a backup video in the Coordination room
To edit, add, or replace a backup source to a running event in the Coordination room, complete the following steps:
- Click the Edit link.
- The Edit an event window opens.
- Click the Backup checkbox.
- Select your backup input source from the BKP Input drop-down menu.
- Select a backup source to replace the main source in the Select Source drop-down menu.
- Click the Backup IN button.
- Click the Save button. The Main window is displayed.
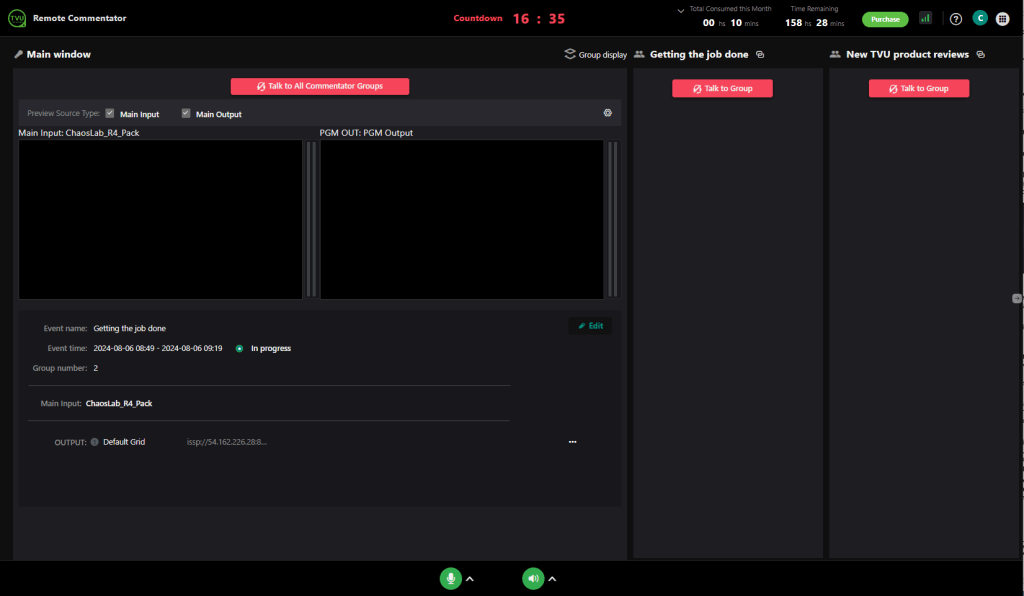
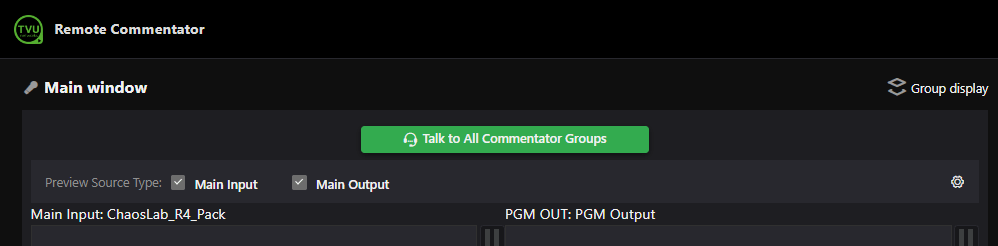
Coordinator Room feature
The Coordinator room allows an event producer or host to monitor video and audio feeds, converse with commentary groups individually or in groups, switch between the Main and Backup sources, edit the event to change video input sources or add commentary groups, and remove commentators from the coordinator room.
In addition, the Setting icon allows the event producer to configure the Main Input Audio Channel for both the event producer and commentators. However, the event producer can only configure the Main Output setting from the Coordinator Room main window.
When an event is running, click the Coordinator Room icon in the Events Panel “Service Entrance” column to open the Coordinator Room window.
Coordinator room icon
Coordinator room Web interface
Coordinator room Main window – Autio Channel Setting
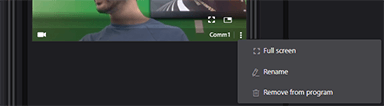
The event producer can remove a commentator from the Coordinator room by clicking the three-dot menu and selecting Remove from Program.
The event producer can communicate with each group independently or with all groups during a live event. To use the Coordinator Room feature in the Remote Commentator main window, click the Talk to Group button (when red) from a specific Commentary panel or click the Talk to all Groups button (when green).
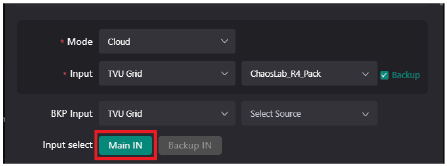
- In the Coordination Room window, you can switch between the Main input source and the Backup source by selecting the Main IN or Backup IN button at the bottom of the Coordination panel, then click Apply.
A “Switch input select successful” message is displayed at the top of the Main window.
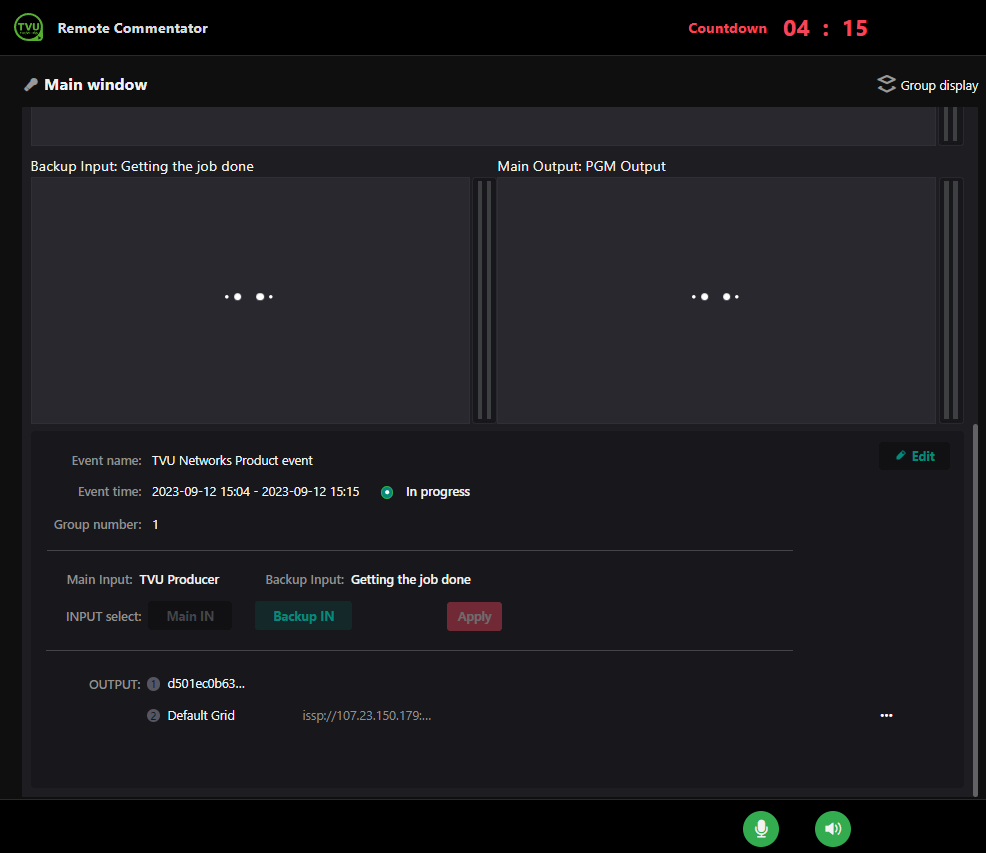
- The event producer can click the Edit button to open the Edit an event window and edit or change the backup source from the Coordination panel.
- In the Edit an event window, click the Main IN button.
- The Edit an event window can also be accessed by returning to the main Remote Commentator event window, selecting an event, and clicking the Edit button in the Events panel.
- Click the Backup checkbox and select another source from the BKP Input drop-down menu.
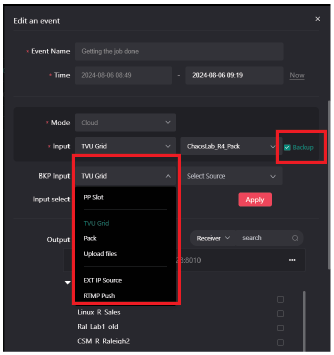
- Select another source from the Select Source drop-down menu.
- Click the Backup IN button, Apply the change, and the Save button to switch to your new backup input selection.
TVU Remote Commentator browser controls and features
This section describes how a commentator can use the TVU Remote Commentator browser controls and features.
The browser controls panel allows commentators to select their microphone and webcam. Commentators can easily leave the event by clicking on the red telephone icon.
Commentators can make the main feed into a pop-out “Picture-in-Picture” window if they want to keep it on their screen but look at another browser window or other software.
Talkback feature
Using the Talkback feature in TVU Remote Commentator provides a separate audio channel for commentators and producers to communicate off-air.
The Talkback feature allows commentators to enable or disable their audio feed to the program output. When the commentator’s audio is enabled, it is only used for internal communication with their group in the Coordinator Room. When this feature is disabled, the commentator audio is mixed with the output
production.
Using the Talkback feature as the commentator
To use the Talkback feature as the commentator, complete the following steps:
- To initiate talkback in TVU Remote Commentator with your event producer, either click and hold the Talkback icon along the bottom of the commentary window or hold down the spacebar on your keyboard.
- The Talkback icon will turn red when it’s active, and your microphone audio will go through an off-air back channel to your event producer.
- To stop talkback, release the mouse button from the Talkback icon or release the spacebar.
Using the Talkback feature as the event producer
To use the Talkback feature as the event producer, complete the following steps:
- In the Coordinator Room, you will see buttons to Talk to All Groups and to Talk to Each commentator group for the event.
- Click the Talk to all Groups button to speak with all commentators simultaneously.
- To speak with a single group of commentators, look to the right side of the Coordinator Room window, and click the Talk to Group button for that commentator group.
- The Talk to Group button will turn red when it’s active, and your microphone audio will go through an off-air back channel to your commentators.
- Click the button again to deactivate Talkback.
Cloud Record feature
The Cloud Record feature allows the event producer to record each camera source independently of other feeds and final program output.
Postproduction teams are continually looking to package and repackage content not just for TV but for mobile apps and social media platforms. In this environment, it is no longer enough to record the final output/ master mix as it limits the editing playing field.
Editors can now be prepared for all the postproduction requests by having HD-quality ISOs for each feed.
The Cloud Record feature enables you to:
- Effortlessly fix live mistakes during postproduction.
- Create custom content for Social Media.
- Add customized graphics to formulate a whole new program.
- Enhance revenue opportunities for your digital asset.
- Repurpose and rehash content with clean feeds.
- Significantly slash cost and time.
TVU Remote Commentator records the output from all of the group platforms. The Cloud record feature allows the event producer to automatically record and download the event with the commentator’s audio.
To enable the Cloud record feature, complete the following steps:
- Create a new event or edit your current event to enable the “Record Input Source.”
- Start your event or live instance. As soon as the new event is up and running, the Cloud recording automatically switches ON. It records all the ingested sources from the beginning until the end of your live event. Cloud recording will stop only when you stop your Remote Commentator instance or event.
- The Cloud Record menu option within the Remote Commentator Web interface can access all cloud recordings.
- In the events window, click Stop to stop the event and confirm your action.
- In the events window, click the Cloud record button in the top-right corner.
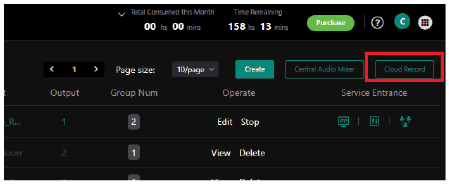
A new browser window opens with the TVU Recording Service landing page. The PGM output and input source recordings are displayed in the list.
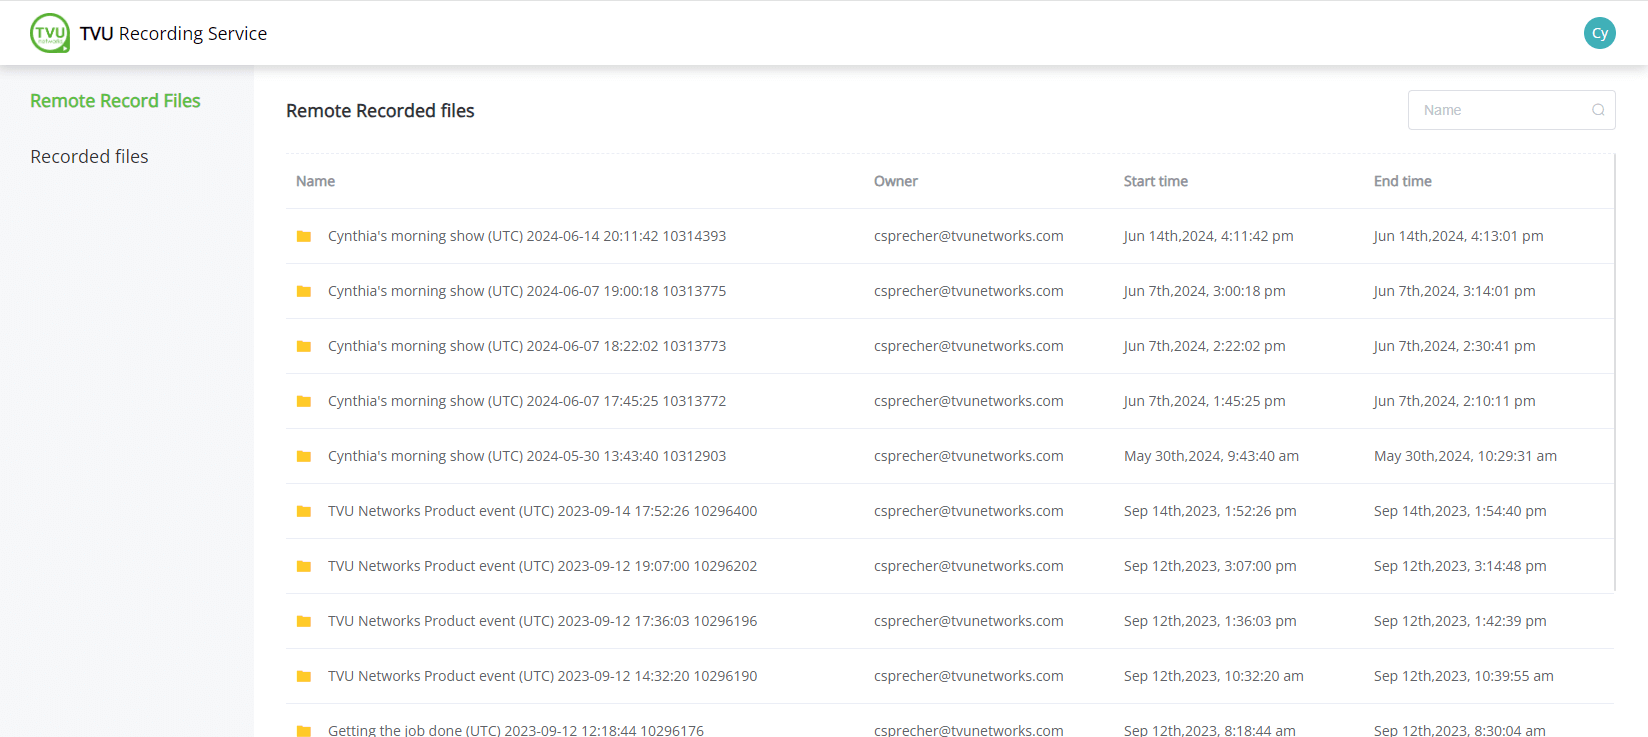
- Click a file on the Cloud Recording Service page to download a recording. The file is downloaded to your local drive.
Advanced Audio Mixer feature
The Advanced Audio Mixer is a dedicated separate interface built for audio operators to mix audio for the program separately from video and graphics operations.
Use the Advanced Audio Mixer to:
- Monitor each video feed for production.
- Adjust all audio input levels as well as the master output.
- Adjust pans (audio gain) for each channel.
- Assign channels for each group for simple management of multiple sources.
- Mute each channel or select as a solo monitor for fine-tuning.
TVU Remote Commentator allows the event producer to provide an Advanced Audio Mixer URL to the audio mixer engineer.
To copy the Audio mixer control URL, complete the following steps:
- Locate your event. Then, Click Edit on the events screen.
The Edit an event window opens.
- Scroll up to the top of the window to Advanced Audio Mixer link and click the Copy icon.
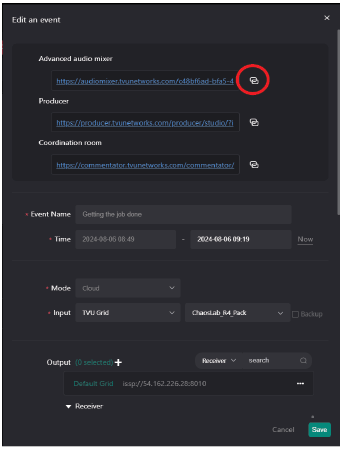
- Paste the URL link into an e-mail and send it to the audio mixer engineer.
This link will open the TVU Audio mixer UI.
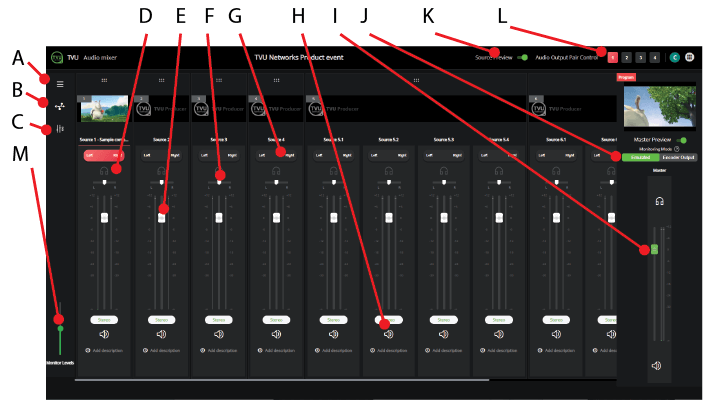
The Advanced Audio Mixer has the following controls:
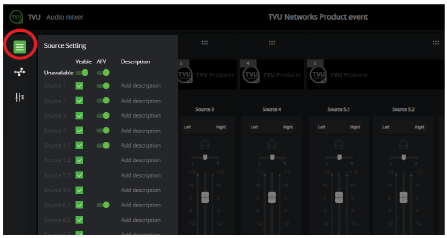
- Audio Mixer source settings menu: This icon opens the Source Setting menu, where the event producer can manage your input sources and their AFV settings. You can also add a source description to each input source.
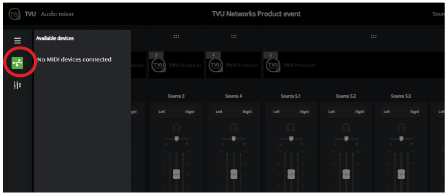
- Audio Mixer MIDI device icon: This icon displays the status of available and connected MIDI devices
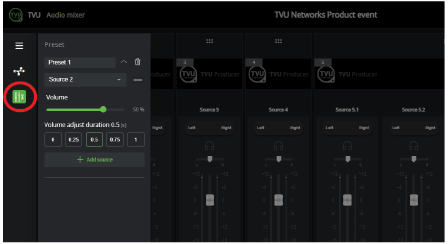
- Preset panel icon: This icon opens the Preset panel where the event producer can configure the audio volume and volume adjustment duration for a specific source.
- Headphone control icon: This icon allows the event producer to control the input source of headphones or sound monitoring.
- Fader level control: Use this slider to control the fader level for input sources independently.
- Pan control: Use this slider to pan the audio channel from left to right.
- Audio usage Indicator: Audio usage is indicated in red when enabled or gray when disabled for each input source.
- Mute icon: Use the Mute (speaker) icon to mute the input source audio.
- Master slider: This slider controls the overall audio level setting for the event.
- Monitoring modes: Monitoring modes allow the event producer to monitor the emulated and Encoder output. If you are monitoring the encoded output, there will be some delay between audio and video depending on your internet condition.
- Video Preview toggle: Use this toggle to enable or disable the video previews of running sources.
- Audio Output Pair Control: Select the Audio Output Pair Control buttons to configure up to 4 pairs of audio channels. This feature is useful for multi-language outputs.
- Monitor Levels setting: The volume for each pair of output channels can be adjusted or muted using the Master output level control slider in the Audio mix panel.
All of the audio mixing controls are available for the event. The audio mixer engineer can work with up to 4 output pairs, each with a dedicated independent audio panel. Each input source can have up to 4 audio pairs, each of which can be controlled independently.
Left panel controls
Audio Mixer Source Settings icon:
Click this icon to Display visible and unavailable sources. In this menu, you can add a description to each source, which is displayed at the bottom of each input source in the Audio Mixer Web interface.
AFV is disabled by default for the remote commentator. All commentators that join are enabled and mixed to the output pair number 1 by default.
Audio Mixer MIDI device icon:
The Audio Mixer MIDI device icon displays available and connected MIDI devices.
Preset Panel icon:
The Preset panel opens the Preset configuration panel where the event producer can configure the audio volume and volume adjustment duration for a specific source.
Multi-audio channel feature
This feature supports 2, 4, 6, or 8 embedded output audio channels in Producer. The Audio mix option in Producer allows up to 4 pairs of audio channels to be configured by selecting a number in the Audio Output Pair Control feature in the Audio mix panel. This feature is useful for multi-language outputs.
A user can independently adjust the volume of the audio output channels assigned to each pair. The volume for each pair of output channels can be adjusted or muted using the Master output level control slider in the Audio mix panel.
To set up multiple audio output channels in Producer, complete the following steps:
- Select a source in the Remote Commentator User Interface and click the Advanced Audio Mixer icon in the left panel. The Audio Mixer panel opens.
- Click the URL at the bottom of the panel to open the Audio Mixer interface.
- At the top-right corner of the interface, locate the “Audio Output Pair Control.” Channel setting number 1 is selected by default.

- Click the Left-Right button in the audio source panel to select the audio source channels you would like to pair to setting 1.
Note: Refer to “Advanced Audio Mixer user experience behavior” for information about stereo and dual mono settings.
- Adjust the individual source audio settings for channel 1. Then, adjust the Master audio level in the left panel to the desired setting.
- Click channel setting 2 and repeat steps 7 and 8, respectively, and so on, to pair up to 4 channels (with a maximum of 8 outputs).
- To adjust your audio channel paired settings, click the appropriate Audio Output Pair Control channel number to display your settings.
Advanced Audio Mixer user experience behavior
The following two types of audio sources are supported in the Audio Mixer interface:
Stereo – Stereo has one channel and includes one fader, pan control, and audio level indicators. When stereo is selected, both left and right indicators illuminate together to indicate one channel.
Dual mono – Dual mono has a left and right channel and includes two fader controls, two pan controls, and two audio level indicators. When dual mono is selected, both left and right indicators illuminate separately to indicate two channels.
Note: For more information about the Advanced Audio Mixer, refer to the latest TVU Producer Audio Mixer QSUG.
What’s New feature
You can quickly follow the latest TVU Remote Commentator updates and features and view them in the Remote Commentator Web interface.
Click the “?” icon in the top-right main navigation pane. The What’s New panel from within Remote Commentator opens.
The What’s New panel includes the following information:
- Remote Commentator versions/build information and environment updates.
- Supported TVU receivers and packs.
- Supported TVU Anywhere apps, smart device types, and software requirements.
- Browser requirements
- The latest feature release
Purchasing TVU Remote Commentator
We empower publishers, broadcasters, and commentators to deliver the broadcast to the widest audience on any platform, anywhere on the globe, by transforming your PC into a remote commentary control room. You can innovate and create your live event into a unique next-generation experience.
There are two ways to purchase Remote Commentator:
- Online at https://TVUNetworks.com
- By contacting your TVU Sales representative.
The TVU sales team can set up a monthly pricing schedule for customers that do not prefer to pay online.
Appendix A – Participate using the TVU Anywhere app
The TVU Anywhere app is available free of charge from the App store.
Step 1 – Download and install the TVU Anywhere app to your iOS or Android smart mobile device
To download and register for the TVU Anywhere app, complete the following steps:
- Go to the App Store from your mobile device and enter TVU Anywhere in the search field. Download and install the iOS TVU Anywhere Version 9.0.43 and above to your smartphone
or laptop. - Go to your Applications folder and launch the TVU Anywhere app.
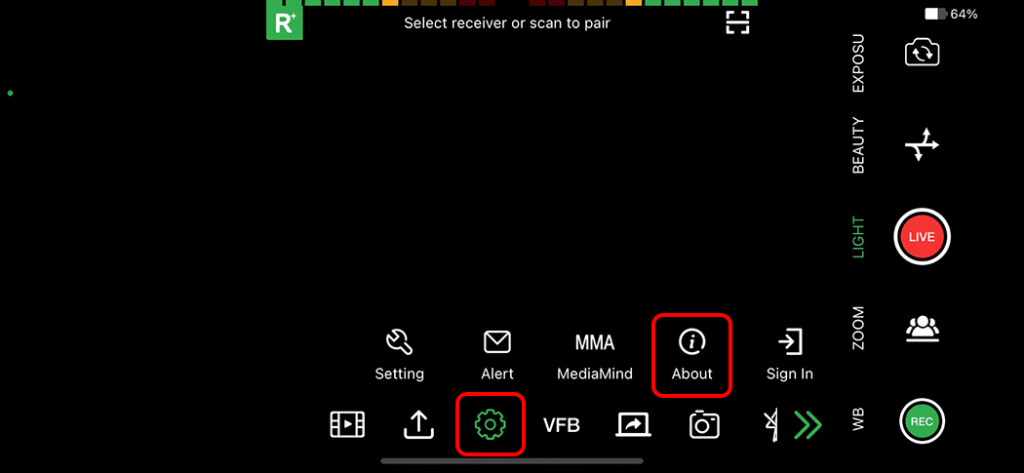
- Press the double arrows to open the feature bar.
- Press the Advanced icon and select About.
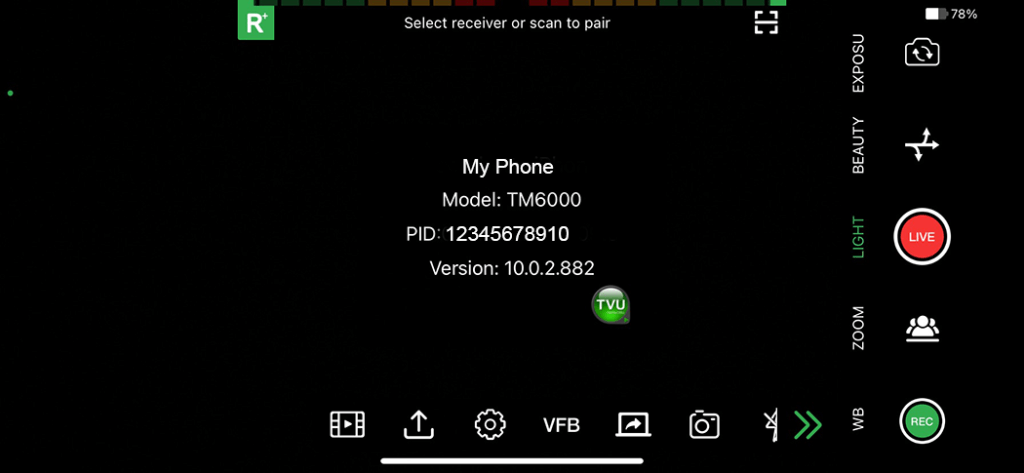
- Locate and write down your device’s PID displayed in the pop-up window.
Contact TVU Support to complete your registration. You will need to provide the following information:
- The device PID
- The receiver(s) name and PID
- After the PID is successfully registered, you can begin streaming.
On Mac OS
Download and Install the TVU Anywhere app version 9.0.40 and above to your Mac OS device.
Download and install the TVU Anywhere app to your Android device
The TVU Anywhere app is available free of charge from the Google Play Store. To download and register the TVU Anywhere app, complete the following steps:
- Click the Google Play icon from your mobile device and enter TVU Anywhere in the search field. Download and install the TVU Anywhere app version 9.0.42 and above to your smartphone.
- Go to your Applications folder and launch the TVU Anywhere app.
- Press the double arrows to open the feature bar.
- Press the Advanced icon and select About.
- Locate and write down your device’s PID displayed in the pop-up window.
- Contact TVU Support to complete your registration. You will need to provide the following information:
- The device PID
- The receiver(s) name and PID
- After the PID is successfully registered, you can begin streaming.
Step 2 – Participate in the event
- The remote participants will join using their iPhone or Android device by clicking on the URL the initiator sent.
- Participants click the URL sent via e-mail, and the TVU Anywhere app is launched using the Remote Commentator.
Participate using the TVU Anywhere app
The remote participant can now see this user interface on the TVU Anywhere app and can engage in a video commentary with all other remote participants.
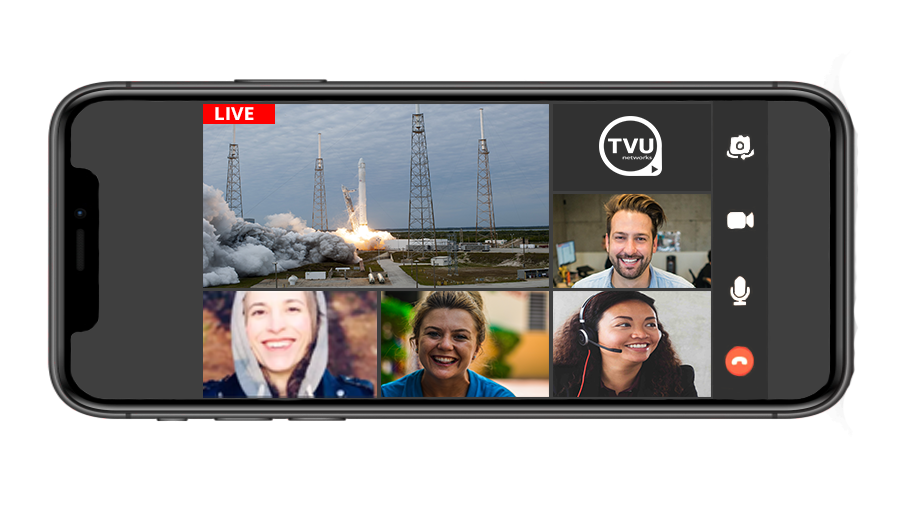
- Click the switch button To reverse the front and rear camera views on your cell phone.
- Click the camera ON to enable participants to see you. Click the camera OFF if you prefer not to be seen.
- Click the Microphone button to control the On and Off function of the microphone. When you click the Microphone button to Off, you are active, and participants cannot hear you.
- Horizontally scroll the screen to view more participants.
- PIP mode – Click PGM or a participant’s source to enlarge their window. The enlarged picture and your picture displays in PIP mode. Click the screen again to exit PIP mode.
- Talkback mode – The Talkback icon allows a commentator to disable or enable their audio feed to the program output by using the Talkback feature. When this feature is disabled, the commentator audio is being mixed to output. When enabled, the commentator audio is only used for internal
communication.
© Copyright 2024 TVU Networks Corporation. All rights reserved in all media.
TVU Remote Commentator QSUG Rev H EN 11-2024